Dinner

Creamy Beef and Shells Delightful Family Dinner
Looking for a quick and tasty family dinner? You’ll love Creamy Beef and Shells! This dish combines tender pasta, juicy ground beef, and a rich
![Taco lasagna is a fun dish that combines the best of tacos and lasagna. Below is a list of the key ingredients you will need to make this tasty meal: - 12 lasagna noodles - 1 pound ground beef or turkey - 1 packet taco seasoning - 1 can (15 oz) black beans, rinsed and drained - 1 cup corn kernels (fresh, canned, or frozen) - 2 cups salsa - 3 cups shredded cheddar cheese - 1 cup sour cream - 1 can (4 oz) diced green chilies, drained - 1 teaspoon garlic powder - 1 teaspoon onion powder - Fresh cilantro, for garnish Each of these ingredients plays a vital role in creating layers of flavor. The ground beef or turkey adds protein and richness. Taco seasoning gives that great Mexican flavor. Black beans and corn add texture and nutrition. Salsa brings moisture and zest, while cheddar cheese melts into a gooey delight. Sour cream offers a cool contrast, and the green chilies add just a hint of heat. You can find the full recipe with instructions to guide you in preparing this comforting dish. 1. Preheat Oven: Set your oven to 375°F (190°C). This step is key for even cooking. 2. Cook Noodles: Boil 12 lasagna noodles in salted water until they are al dente. Drain them and set aside. 3. Prepare the Meat: In a large skillet, brown 1 pound of ground beef or turkey over medium heat. Drain any excess fat. Mix in 1 packet of taco seasoning, 1 teaspoon of garlic powder, and 1 teaspoon of onion powder. Add a splash of water and cook for 2 minutes to blend the flavors. 4. Mix Ingredients: In a big bowl, combine 1 can of black beans (rinsed and drained), 1 cup of corn, and 2 cups of salsa. Add in 1 can of diced green chilies that are drained. Stir well. 1. Layering Process: In a 9x13 inch baking dish, spread a thin layer of the meat mixture on the bottom. Place 3 lasagna noodles on top. Add half of the bean and corn mix, half of the sour cream, and a third of the cheddar cheese. Repeat this process: meat mixture, noodles, bean and corn mix, sour cream, and cheese. Finish with a final layer of noodles. 2. Final Toppings: On top of the last layer of noodles, spread the remaining salsa and cheese. 1. Cover and Bake: Cover the dish with aluminum foil. Bake for 25 minutes. Remove the foil and bake for another 15 minutes, until the cheese is melted and bubbly. 2. Cool and Serve: Let the taco lasagna cool for about 10 minutes. This helps it set, making it easier to slice. Before serving, garnish with fresh cilantro for a pop of color and flavor. For the complete recipe, check the [Full Recipe]. To make your taco lasagna shine, focus on flavors. You can adjust the spice by using more or less taco seasoning. If you want heat, add diced jalapeños. For a milder taste, use less seasoning or choose a mild salsa. Cheese plays a big role. I prefer sharp cheddar for its bold flavor. If you want a twist, try pepper jack for extra spice. Mozzarella can also work, giving a nice stretch. You can mix different cheeses for fun tastes and textures. Choosing the right baking dish is key. A 9x13 inch glass or ceramic dish works great. It allows for even cooking and looks nice when serving. If you want to make mini lasagnas, use individual ramekins. Some handy kitchen gadgets can help too. A sharp knife makes slicing easier. A measuring cup helps with portion sizes. And don’t forget a good spatula for serving. These tools make cooking and serving fun and easy. For the full recipe, check the earlier section. Enjoy your taco lasagna adventure! {{image_2}} You can easily make taco lasagna fit your diet. For a vegetarian version, swap the meat for beans or lentils. Use 1 can of black beans or kidney beans. This keeps the protein but adds great flavor. If you need gluten-free options, try using rice noodles or corn tortillas instead of lasagna noodles. Both will hold the layers well and give you that delicious taste. Taco lasagna loves extra toppings! You can add sliced jalapeños for heat or diced tomatoes for freshness. Other great toppings include avocado, shredded lettuce, or olives. You can choose spicy or mild flavors based on your taste. Use hot salsa for a kick or mild salsa for a gentle flavor. You can also mix in chili powder for more spice. For the full recipe, check out the details above. Enjoy making your taco lasagna your own! To keep your taco lasagna fresh, follow these steps: - Refrigeration Tips: Allow the lasagna to cool completely before storing. Place it in an airtight container. It will last for about 3 to 5 days in the fridge. If your dish is large, cut it into smaller portions for easier storage. - Freezing Instructions: If you want to save some for later, you can freeze it. Wrap the lasagna tightly in plastic wrap and then in aluminum foil. This way, it won’t get freezer burn. It can last for up to 3 months in the freezer. Just remember to label it with the date. When it’s time to enjoy leftovers, here’s how to reheat: - Best Practices for Reheating: Always reheat your taco lasagna until it is hot all the way through. This ensures food safety and keeps the flavors intact. Use a food thermometer to check for a safe internal temperature of 165°F (74°C). - Microwave vs Oven Reheating: The microwave is quick but may make the lasagna soggy. Heat it in short bursts, about 1-2 minutes, checking often. The oven is better for crispy edges. Preheat to 350°F (175°C) and heat for about 20 minutes. Cover it with foil to prevent drying out, removing it for the last few minutes. Following these storage and reheating tips will help you enjoy your taco lasagna delightfully, even days later! For the full recipe, check out the Full Recipe section. Can I make taco lasagna ahead of time? Yes, you can prepare taco lasagna in advance. After you layer all the ingredients, cover it tightly. Store it in the fridge for up to 24 hours. When you're ready to bake, just add a few extra minutes to the cooking time. This makes it easy for busy weeknights. How long does taco lasagna last in the fridge? Taco lasagna will stay fresh in the fridge for about three to four days. Make sure to keep it covered. If you have leftovers, enjoy them for lunch or dinner later in the week. Can I use different types of meat? Absolutely! You can swap ground beef for ground turkey, chicken, or even plant-based meat. If you want to go vegetarian, skip the meat altogether. Just add extra beans or veggies for flavor. What sides complement taco lasagna best? Taco lasagna pairs well with simple sides. A fresh salad with lime vinaigrette is great. You can also serve tortilla chips with salsa or guacamole. These sides add a nice crunch and flavor to the meal. Taco lasagna is a fun twist on a classic dish. You layer noodles, meat, beans, and salsa for a tasty meal. Remember to adjust spices and try different cheeses to suit your taste. Also, don't forget about cooking tools and storage tips. This dish is easy to make ahead and great for sharing. You can even switch up ingredients for new flavors. Enjoy your cooking adventure with taco lasagna!](https://grilledflavors.com/wp-content/uploads/2025/06/6fe57b06-43bd-4003-bfa8-7800093f0295.webp)
Taco Lasagna Delight Easy and Flavorful Recipe
Looking for a fun twist on a classic? Taco Lasagna combines the best of both worlds: delicious tacos and hearty lasagna. In just a few

Creamy Parmesan Garlic Beef Bowtie Pasta Delight
Welcome to a delicious journey where creamy, cheesy flavors come together! Today, I’ll show you how to create Creamy Parmesan Garlic Beef Bowtie Pasta Delight.
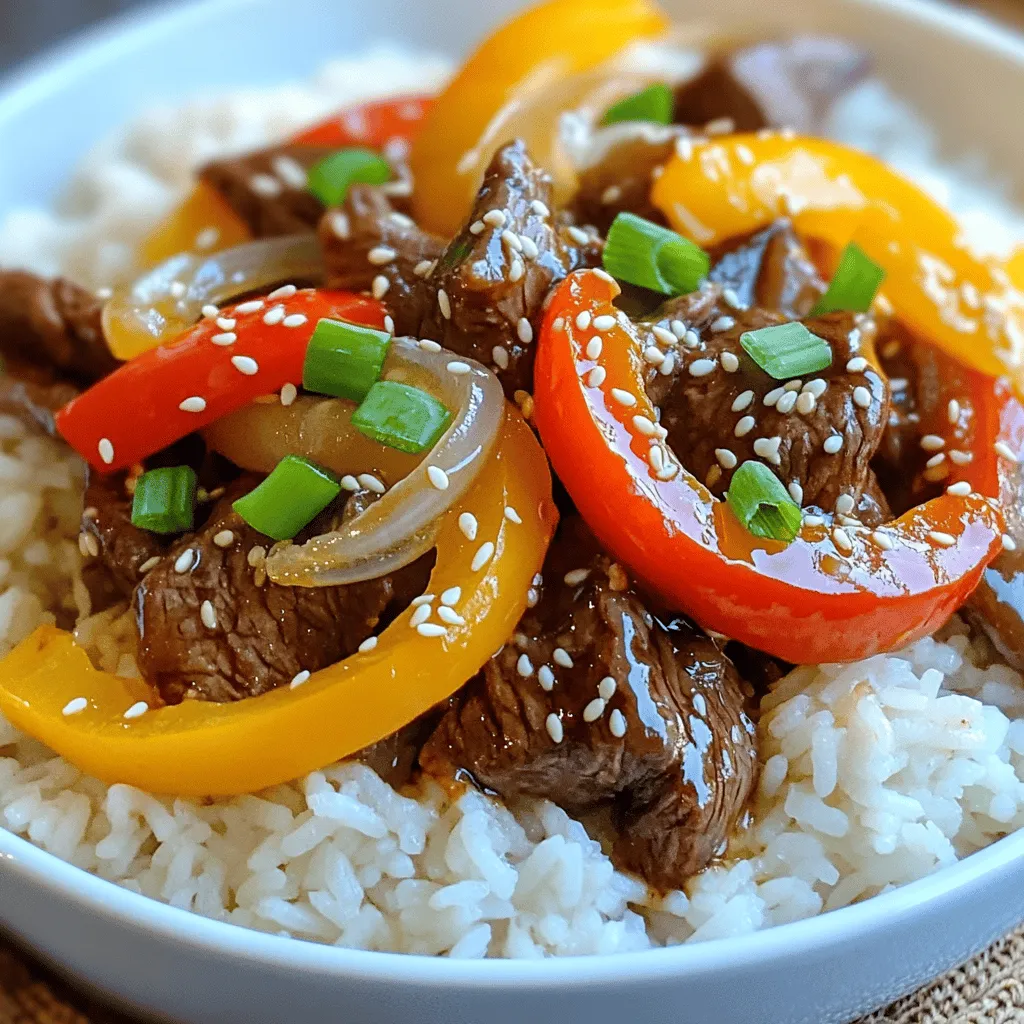
Beef and Pepper Rice Bowls Flavorful and Quick Meal
If you’re looking for a quick and tasty meal, Beef and Pepper Rice Bowls are the answer. You can whip up this flavorful dish in
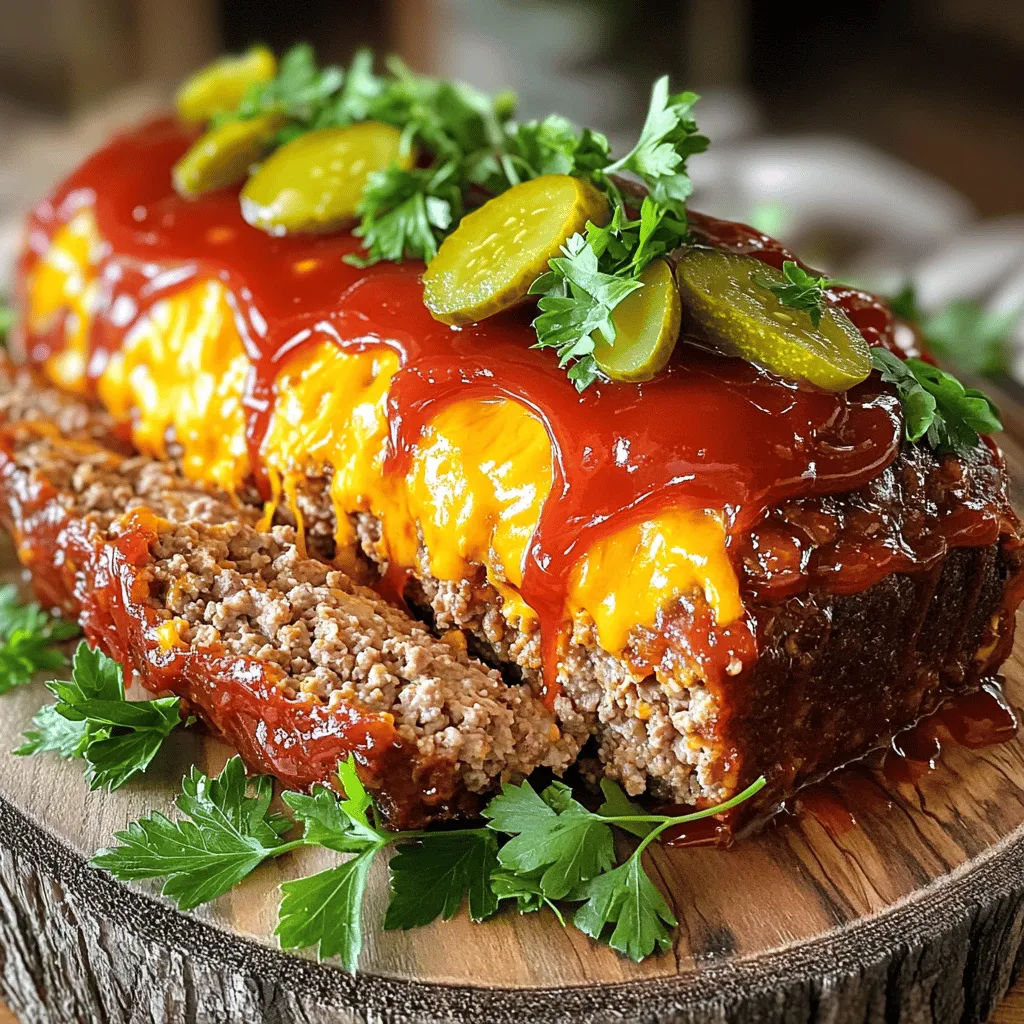
Cheeseburger Meatloaf Savory and Satisfying Dish
If you love cheeseburgers and meatloaf, then you’re in for a treat! My Cheeseburger Meatloaf combines savory flavors with delicious cheese for a meal that’s
![- 1 pound ground beef - 1/2 pound ground pork (option for ground turkey) - 1 cup breadcrumbs - 8 ounces mozzarella cheese, cut into small cubes - 1/4 cup grated Parmesan cheese - 2 cloves garlic, minced - 1 teaspoon dried oregano - 1 teaspoon dried basil - Salt and pepper to taste - 1/2 cup marinara sauce (plus extra for serving) - 1 large egg - Fresh basil leaves for garnish When making stuffed meatballs, quality ingredients matter. I love using a mix of ground beef and pork for flavor and texture. You can swap the pork with ground turkey for a leaner option. The breadcrumbs help bind the meat and give it a nice texture. Mozzarella cheese is the star of this dish. I cut it into small cubes so it melts perfectly inside each meatball. This cheese creates that gooey, cheesy center that everyone loves. Adding Parmesan cheese boosts the flavor. Minced garlic gives a lovely aroma. Oregano and basil add a nice Italian touch. Always season with salt and pepper to make the flavors pop. For serving, I use marinara sauce. It adds moisture and enhances the flavor. Don't forget the fresh basil leaves for garnish; they add color and freshness. You can find the full recipe here to get started on this delicious dish! - Preheat the oven to 400°F (200°C). - Prepare a baking sheet lined with parchment paper. To make the meat mixture, combine these ingredients in a large bowl: - 1 pound ground beef - 1/2 pound ground pork - 1 cup breadcrumbs - 1/4 cup grated Parmesan cheese - 2 cloves garlic, minced - 1 teaspoon dried oregano - 1 teaspoon dried basil - Salt and pepper to taste - 1 large egg Mix them well with your hands. The mixture should feel sticky but hold together. This helps the meatballs stay moist. Now comes the fun part! Shape the meatballs around mozzarella cubes. - Take about a tablespoon of the meat mixture. - Flatten it in your palm. - Place a cube of mozzarella in the center. - Fold the meat around the cheese, forming a ball. Place the meatballs on the prepared baking sheet. Bake them for 20 to 25 minutes. They should be browned and cooked through. Check for doneness by cutting one open. The inside should no longer be pink. Heat your marinara sauce in a saucepan over medium heat. Once the meatballs finish baking, add them to the sauce. Let them simmer for 5 to 10 minutes. This helps the meatballs soak up the sauce's rich flavor. When serving, plate the meatballs with marinara sauce on top. Garnish with fresh basil leaves for a touch of color. This dish looks great and tastes even better. For the full recipe, check the details above! To make the best stuffed meatballs, you need the right mix. Start with a blend of ground beef and ground pork. This mix gives great flavor and texture. Use one egg to hold everything together. If your meatballs feel too wet, add more breadcrumbs. If they feel too dry, add a splash of water or milk. This balance keeps them juicy. To avoid dry meatballs, do not overcook them. Bake just until they are brown and firm. Let them simmer in sauce after baking to soak up extra moisture. The marinara sauce adds flavor and keeps them tender. These meatballs shine when paired with pasta. Serve them over spaghetti or penne for a classic meal. You can also serve them as tasty appetizers. Just place toothpicks in them for easy eating. For side dishes, consider garlic bread or a fresh salad. A crisp Caesar salad complements the meatballs well. You can’t go wrong with a side of roasted veggies, either. Feel free to customize your meatballs with spices. Try adding crushed red pepper for heat or smoked paprika for depth. You can also mix in chopped fresh herbs like parsley or thyme for extra flavor. If you want different cheese, swap out the mozzarella. Try provolone or fontina for a unique taste. For a dairy-free option, look for vegan cheese that melts well. This way, everyone can enjoy your stuffed meatballs. For the full recipe, check out the Cheesy Stuffed Meatballs. {{image_2}} You can switch up the meat in your stuffed meatballs. Ground turkey or chicken works great. These options are leaner and still tasty. You can also try a mix of different meats for a unique flavor. For a vegetarian twist, use plant-based meat. It mimics the texture and taste of meat well. This way, everyone can enjoy these delicious meatballs! While mozzarella is classic, you can experiment with other cheeses. Try provolone, gouda, or even cheddar for a different taste. Each cheese adds its own flavor and creaminess. If you want a dairy-free option, there are vegan cheeses available. Look for those made from nuts or soy. They melt nicely and can replace mozzarella in the recipe. The sauce you use can change the whole dish. While marinara is a favorite, consider using Alfredo for a creamy touch. Pesto also adds a fresh taste and vibrant color. If you like heat, try spicy marinara. You can add red pepper flakes to your sauce for extra kick. Each sauce brings new life to the stuffed meatballs, making every meal special. To keep your stuffed meatballs fresh, store any leftovers in an airtight container. Place them in the fridge right away. They will stay good for up to three days. Always check for any signs of spoilage before eating. You can freeze both unbaked and baked meatballs. For unbaked ones, place them on a baking sheet and freeze until firm. Then, transfer them to a freezer bag. Baked meatballs should cool completely before freezing. They will last for up to three months. To reheat, thaw in the fridge overnight. Then, bake at 350°F (175°C) until hot. Stuffed meatballs fit perfectly in any meal plan. You can add them to pasta dishes or serve them on a sub for a tasty sandwich. They also work great in soups or stews. Try using them in a meatball salad for a fun twist. These ideas make meal prep easy and fun! For the [Full Recipe], check the earlier section. Bake the stuffed meatballs for 20 to 25 minutes at 400°F (200°C). Check for a golden brown color. The meat should also be firm to the touch. This time ensures they cook through and stay juicy. Yes, you can make these meatballs ahead. Prepare them and store them in the fridge for up to one day. You can also freeze them for up to three months. Just remember to thaw them before baking. If you need a substitute for breadcrumbs, try crushed crackers or oats. You can also use almond flour for a gluten-free option. These will still help hold the meatballs together while adding flavor. Check the meatballs with a meat thermometer. The internal temperature should reach 160°F (70°C). You can also cut one open to see if the meat is no longer pink. Juices should run clear. Absolutely! You can use Alfredo, pesto, or even a spicy sauce. Each sauce adds its own unique flavor to the meatballs. Feel free to experiment and find your favorite pairing. For the full recipe, be sure to check the details above. This article covered how to make delicious stuffed meatballs. You learned about key ingredients like ground meats, cheese, and seasonings. I shared step-by-step instructions for mixing, baking, and serving them. I also included tips to make perfect meatballs and offered creative variations. In closing, these meatballs can be fun and easy to make. You can customize them to your taste. Enjoy experimenting with different flavors and serving ideas!](https://grilledflavors.com/wp-content/uploads/2025/06/d76b185d-4cd0-42d2-882f-89d1267913fe.webp)
Stuffed Meatballs with Mozzarella Cheese Scrumptious Dish
Prepare to delight your taste buds with stuffed meatballs filled with gooey mozzarella cheese! This scrumptious dish blends savory ground meats with flavorful herbs and
![To make a tasty Mexican Ground Beef and Potato Skillet, gather the following ingredients: - 1 lb ground beef - 2 medium potatoes, diced - 1 medium onion, chopped - 2 cloves garlic, minced - 1 bell pepper (any color), chopped - 1 can (14 oz) diced tomatoes with green chilies - 1 tablespoon chili powder - 1 teaspoon ground cumin - 1 teaspoon paprika - ½ teaspoon salt - ½ teaspoon black pepper - ¼ teaspoon cayenne pepper (optional, for extra heat) - 2 tablespoons olive oil - Fresh cilantro, chopped (for garnish) - Avocado slices (for serving) - Shredded cheese (optional for topping) This list gives you the basics. Feel free to mix in your favorite vegetables or spices. For a full recipe, check out the Spicy Mexican Ground Beef and Potato Skillet. Enjoy making this dish! - Sautéing Vegetables Start by heating 2 tablespoons of olive oil in a large skillet over medium heat. Add 1 chopped onion and 1 chopped bell pepper. Cook them for about 3-4 minutes. They should become soft and fragrant. Next, add 2 minced garlic cloves. Cook for another minute until the garlic smells nice. - Browning Ground Beef Increase the heat slightly. Add 1 pound of ground beef to the skillet. Use a spatula to break it apart. Cook for about 5-7 minutes. Make sure it turns brown and is fully cooked. - Cooking Potatoes After the beef is browned, stir in 2 diced medium potatoes. Let them cook for 5 minutes. This helps them soften. If you want, cover the skillet for a few minutes to steam the potatoes. - Adding Ingredients Once the potatoes start to soften, add 1 can of diced tomatoes with green chilies. Then, mix in 1 tablespoon of chili powder, 1 teaspoon of ground cumin, 1 teaspoon of paprika, ½ teaspoon of salt, ½ teaspoon of black pepper, and ¼ teaspoon of cayenne pepper if you want more heat. Stir everything well to combine. - Simmering the Skillet Lower the heat to medium-low. Cover the skillet and let it simmer for about 15-20 minutes. Stir occasionally. This allows the potatoes to become tender and all the flavors to mix. - Adjusting Seasoning After simmering, taste your dish. Adjust the seasoning if needed. This is your chance to make it just right for you. Remove the skillet from the heat when everything is cooked through and delicious. You can find the full recipe above to guide you through this tasty dish. Enjoy your cooking! - Best Practices for Sautéing Start with a hot skillet. Add olive oil, then your onions and peppers. Stir them often for even cooking. This helps to build great flavor. Keep an eye on the heat; don't let them burn. Cook until they are soft, about 3-4 minutes. - How to Achieve Perfectly Cooked Potatoes Cut your potatoes into small, even pieces. This helps them cook at the same time. After adding them to the skillet, cover it for a few minutes. This steams the potatoes and speeds up cooking. Stir occasionally to avoid sticking. Check for doneness by piercing with a fork. - Adding Extra Spice Want more heat? Add cayenne pepper or some chopped jalapeños. These spices boost flavor and give a kick. You can also try a dash of hot sauce for a different taste. - Using Fresh Herbs Fresh cilantro is a must! It adds a bright flavor to your skillet. Add it right before serving for the best taste. You can also use fresh parsley or green onions for variety. These herbs make your dish look and taste fresh. For more ideas, check out the Full Recipe! {{image_2}} Swap for Different Proteins You can change the ground beef to other meats. Ground turkey or chicken works well. You can also use veggie crumbles for a plant-based option. Each protein brings its own flavor. Choose what suits your taste or diet. Using Sweet Potatoes Sweet potatoes can replace regular potatoes. They add a sweet flavor and nutrition. Just dice them like regular potatoes and cook them the same way. The dish becomes colorful and tasty. Accompaniments This dish pairs great with warm tortillas. You can serve it with rice or a fresh salad. Add some beans for extra protein. A dollop of sour cream can add creaminess. Creative Serving Ideas Try serving the skillet in a tortilla bowl. You can also top it with a fried egg for breakfast. For a fun twist, mix it into a quesadilla. Each option makes the meal more exciting! For the full recipe of this delicious dish, check out the [Full Recipe]. Proper Refrigeration After you enjoy your Mexican Ground Beef and Potato Skillet, store leftovers in a safe way. Let the dish cool down first. Then, place it in an airtight container. This keeps moisture in and bad smells out. You can store it in the fridge for up to three days. Always label the container with the date to track freshness. Freezing the Skillet If you want to keep it longer, freezing is a great option. Divide the skillet into portions for easy thawing. Use freezer-safe containers or bags. Remove as much air as possible to prevent freezer burn. This dish can stay good in the freezer for up to three months. When you're ready to eat it, just thaw it in the fridge overnight. Best Methods for Reheating When reheating, you want to keep the meal tasty. The best way is to use the stove. Heat a skillet over medium heat. Add a splash of water or broth to keep it moist. Stir occasionally until it's hot. This usually takes about 5-10 minutes. You can also use the microwave. Place the portion in a microwave-safe bowl. Add a bit of water, then cover it with a lid or microwave-safe wrap. Heat on high for 1 to 2 minutes. Stir halfway to ensure even heating. Both methods work well to bring back those delicious flavors. For the full recipe, check out the link above. How can I make it spicier? To give your skillet a kick, add cayenne pepper. Start with a pinch and taste. You can also mix in jalapeños or hot sauce. Fresh chili peppers work great too. Just chop them up and sauté with the onions. Is it possible to make this skillet vegetarian? Yes, you can swap the ground beef for lentils or black beans. Use vegetable broth instead of beef broth if you like. Add more veggies, like zucchini or mushrooms, for extra flavor. This keeps the dish hearty and tasty. Can I prepare it in advance? Absolutely! This dish stores well. Cook it, let it cool, and place it in an airtight container. Store it in the fridge for up to three days. You can also freeze it for up to three months. Just thaw and reheat when ready. What sides pair well? Serve this dish with warm tortillas or rice for a full meal. A fresh salad with lime dressing adds a light touch. Guacamole or salsa makes a great dip too. How long does it last in the fridge? In the fridge, it lasts for about three days. Make sure to keep it in a tight container. If you notice any off smells or colors, throw it out. Enjoy it fresh for the best flavor. For the full recipe, check the [Full Recipe]. This blog post covered the key steps in making a delicious skillet dish. We explored ingredients like ground beef, potatoes, and fresh vegetables. I shared easy steps for preparation and cooking, plus tips to enhance flavor. You can even swap ingredients for different tastes! In conclusion, you can adapt this recipe to fit your preferences. Experiment with spices or veggies. Enjoy creating your own version that suits your taste. Happy cooking!](https://grilledflavors.com/wp-content/uploads/2025/06/724e5339-d806-4792-a333-1f6082679252.webp)
Mexican Ground Beef and Potato Skillet Delight
Are you ready to enjoy a quick and tasty meal? My Mexican Ground Beef and Potato Skillet is just what you need! It’s packed with
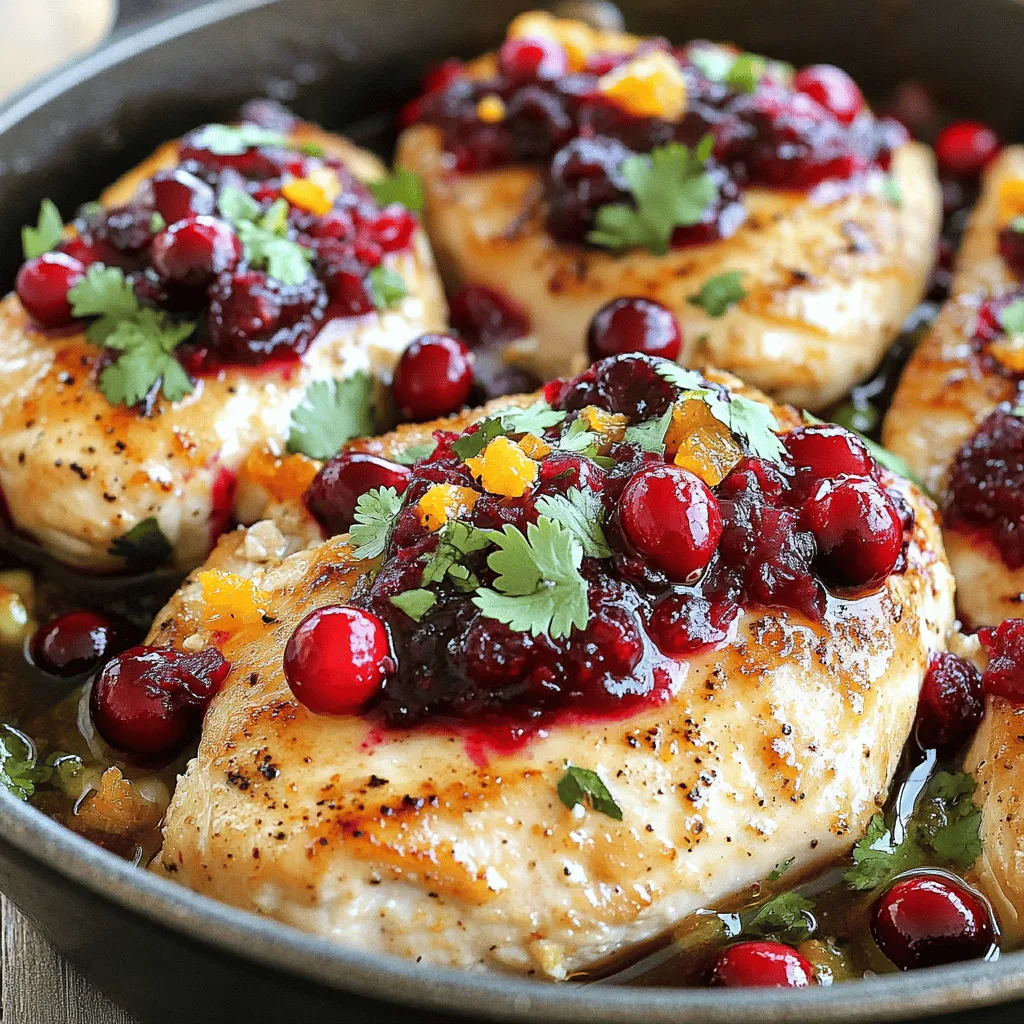
Cranberry Orange Chicken Flavorful and Easy Recipe
Are you ready to impress your taste buds with a simple yet delicious dish? Follow this easy Cranberry Orange Chicken recipe for a burst of
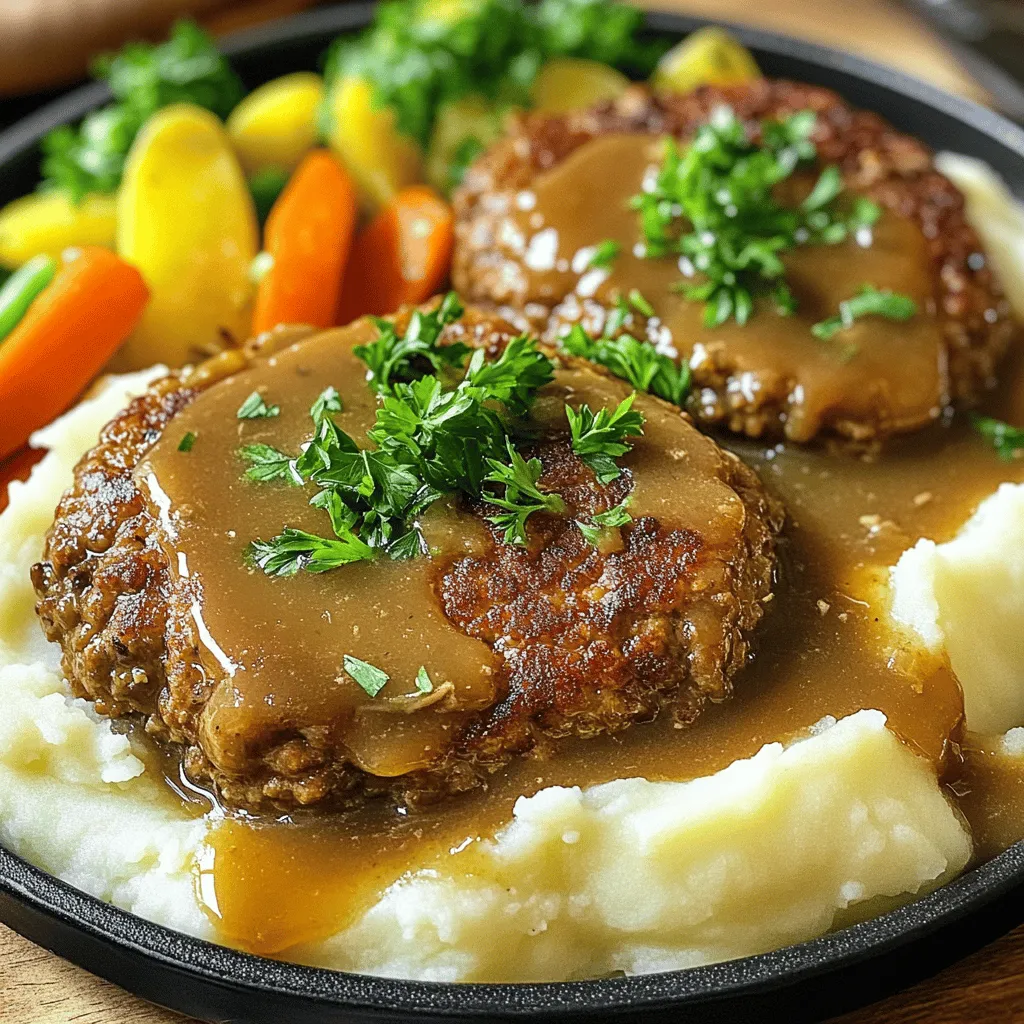
Best Salisbury Steak and Gravy Recipe for Dinner
Looking for a tasty, comforting meal? You’ve come to the right place! My Best Salisbury Steak and Gravy Recipe will impress your family and friends.
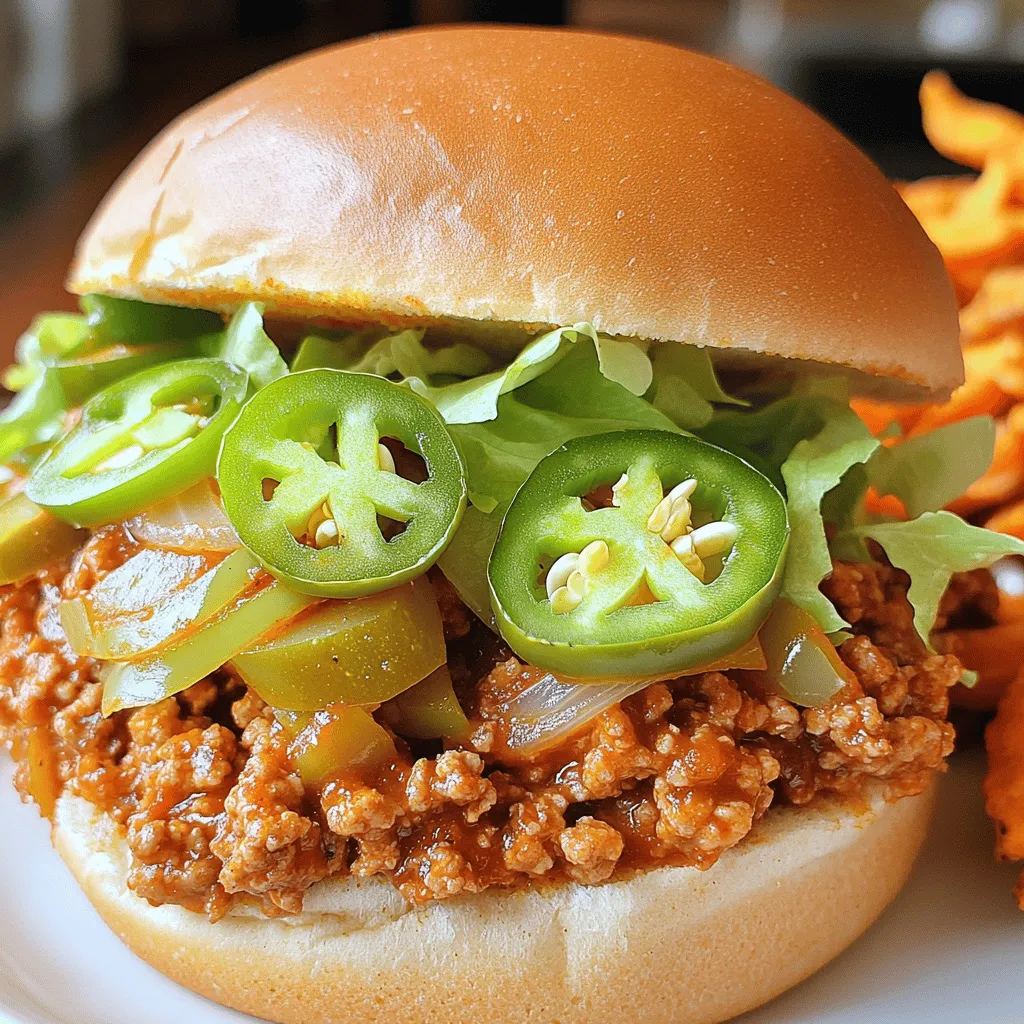
Delicious Cajun Chicken Sloppy Joes Quick and Easy Meal
Looking for a quick and easy meal that packs a flavorful punch? Let me introduce you to my Delicious Cajun Chicken Sloppy Joes! This dish