Dinner

- 200g feta cheese - 300g cherry tomatoes - 3 cloves garlic, minced - 2 tablespoons olive oil - 250g pasta of choice - 1 teaspoon dried oregano - 1/2 teaspoon chili flakes (optional) - Salt and pepper to taste - Fresh basil leaves for garnish - Zest of 1 lemon - Additional vegetables (spinach, bell peppers, etc.) - Protein add-ins (chicken, shrimp, etc.) - Different cheese alternatives Gathering the right ingredients is key to making baked feta pasta a hit. Start with the required ingredients. Feta cheese is the star of this dish. It melts beautifully and adds a creamy texture. The cherry tomatoes burst with flavor when baked. Garlic gives the dish an aromatic kick. Olive oil adds richness, while oregano brings a nice herbal note. You can adjust the chili flakes to make your dish mild or spicy. Don't forget salt and pepper to enhance all the flavors. Fresh basil leaves and lemon zest add brightness at the end. Feel free to explore optional ingredients. Adding vegetables like spinach or bell peppers can boost nutrition. If you want more protein, try adding chicken or shrimp. You can also switch the feta for different cheese, like goat cheese, for a new taste. For the full recipe, check out the details and step-by-step instructions provided. - First, preheat your oven to 200°C (400°F). - Grab a baking dish and place your block of feta cheese in the center. - Surround the feta with cherry tomatoes. - Now, sprinkle minced garlic, olive oil, dried oregano, chili flakes, salt, and pepper over the feta and tomatoes. - Bake everything for about 30 minutes until the feta is golden and the tomatoes burst. - While that bakes, cook your pasta according to package instructions until it’s al dente. Drain and set aside. - Once the feta and tomatoes are done, take them out of the oven. - Use a fork to mash the feta into the tomatoes. This creates a creamy sauce. - Mix in your cooked pasta and make sure it’s all combined well. - Adjust the seasoning if needed. - Serve hot, adding fresh basil leaves and lemon zest on top for a nice touch. For the complete cooking details, check the Full Recipe. Enjoy this simple yet yummy dish! - Choosing the best feta cheese Use high-quality feta for great taste. Look for a creamy texture and a tangy flavor. Feta made in Greece often has the best taste. Crumbled feta works well, but a block is ideal for baking. - Cooking pasta to the right consistency Cook your pasta until just al dente. This means it should be firm but not hard. The pasta will cook a bit more once mixed with the baked feta and tomatoes. Always save a bit of pasta water. It can help make the sauce creamy. - Pairing with side dishes or salads Baked feta pasta pairs well with a simple green salad. A fresh salad with lemon vinaigrette adds brightness. You could also serve it with garlic bread for a hearty meal. - Using as a main or a starter This dish shines as a main course. However, you can also serve it as a starter for a dinner party. Just serve smaller portions and add a garnish like basil. - Overcooking the feta and tomatoes Be careful not to overcook the feta and tomatoes. Bake them until the feta is golden and the tomatoes burst. This helps create a creamy sauce without drying out the ingredients. - Not seasoning properly Season your dish well. Use enough salt and pepper to bring out the flavors. Taste before serving and adjust if needed. A sprinkle of lemon juice at the end can really brighten the dish. {{image_2}} For baked feta pasta, you can use many pasta shapes. Penne and rigatoni are my favorites. They hold the sauce well. You can also try fusilli or farfalle for fun twists. If you need gluten-free options, choose pasta made from brown rice or chickpeas. These work great without losing flavor. To boost the taste, consider adding spices and herbs. Fresh basil, parsley, or thyme can brighten the dish. A pinch of red pepper flakes adds warmth. You can also toss in vegetables like spinach or bell peppers. They add color and nutrients. If you want a creamier sauce, try adding cream cheese or mascarpone. Mix in about 100g with the feta before baking. This will give you a rich texture. Adjust the pasta ratio to keep the dish balanced. You may need a bit less pasta to maintain creaminess. After enjoying your Baked Feta Pasta, store leftovers in an airtight container. This keeps the dish fresh and prevents odors. You can refrigerate it for up to three days. Just make sure it cools down before sealing. This helps maintain the taste and texture. To freeze, let the dish cool completely. Transfer it to a freezer-safe container. You can freeze Baked Feta Pasta for up to three months. When you want to eat it, thaw it overnight in the fridge. Reheat in the oven or on the stove. Add a splash of water if it seems dry. For quicker meals, prep your ingredients ahead of time. Chop the garlic and tomatoes and store them together. You can even cube the feta early. When you’re ready to cook, just assemble everything in the baking dish. This makes my weeknight cooking fast and easy! Baked feta pasta is a simple dish that combines baked feta cheese and cherry tomatoes. This dish became popular on social media, especially during 2020. It is easy to make and tastes great. The cheese gets creamy, while the tomatoes burst with flavor. You mix this with pasta for a satisfying meal. The dish is great for busy weeknights. Yes, you can make baked feta pasta vegan. Simply swap out the feta cheese for a plant-based cheese. There are many tasty vegan options now. You can also add nutritional yeast for a cheesy taste. Use whole grain or lentil pasta for a healthy twist. This way, everyone can enjoy this dish. To reheat leftovers, use the oven or a microwave. For the oven, set it to 180°C (350°F). Place the pasta in an oven-safe dish. Cover it with foil to keep it moist. Heat for about 15 minutes. In a microwave, heat a portion for 1-2 minutes. Stir it halfway through to heat evenly. This helps keep the flavor and texture. Baked Feta Pasta is a simple, tasty dish. We covered the main ingredients, steps, and tips for success. You can customize it with veggies or protein. Avoid mistakes like overcooking and under-seasoning. Remember to store leftovers properly for freshness. Explore different pasta types and flavors too. This dish is versatile and fun to make. Try it tonight for a delicious meal!
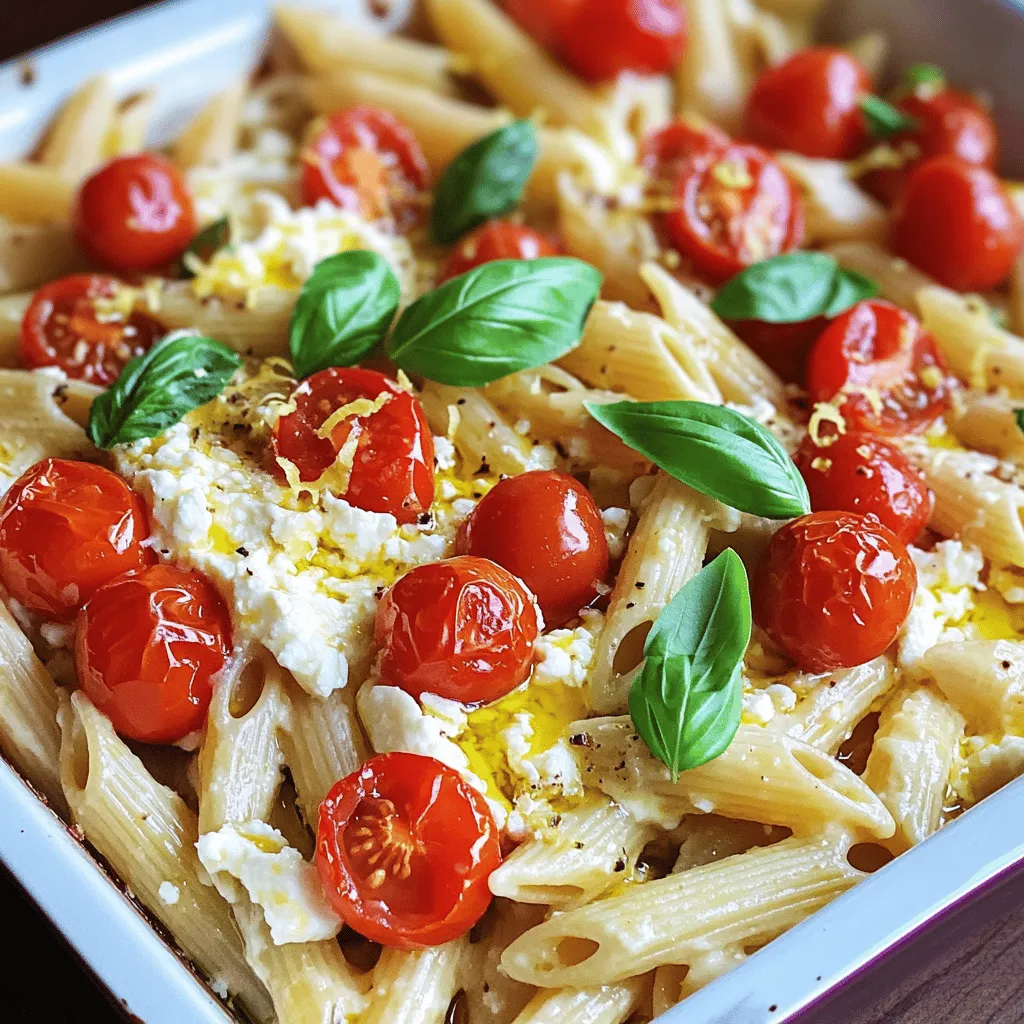
Baked Feta Pasta Flavorful and Easy Weeknight Dish
Are you ready for a quick and tasty meal? Baked Feta Pasta is your answer! This simple dish combines creamy feta with juicy tomatoes and
To create a rich and creamy smoked Gouda mac and cheese, you need some key ingredients: - 8 ounces elbow macaroni - 2 tablespoons unsalted butter - 2 tablespoons all-purpose flour - 2 cups milk (whole or 2%) - 1 cup smoked Gouda cheese, shredded - 1 cup sharp cheddar cheese, shredded - 1 teaspoon Dijon mustard - 1/2 teaspoon garlic powder - 1/4 teaspoon smoked paprika - Salt and pepper to taste These ingredients work together to create a flavor-packed dish. The combination of smoked Gouda and sharp cheddar gives it a unique taste. The Dijon mustard adds a nice kick, while garlic powder and smoked paprika enhance the flavor. If you want to elevate your dish, consider adding these optional ingredients: - 1/2 cup breadcrumbs (for topping) - 2 tablespoons fresh parsley, chopped (for garnish) Breadcrumbs on top create a crunchy texture. Fresh parsley adds color and freshness to your mac and cheese. You can easily swap some ingredients based on your taste or what you have: - Use gluten-free pasta instead of elbow macaroni for a gluten-free option. - Substitute gouda with other cheeses like fontina or Gruyère. - If you prefer a different flavor, try adding a splash of hot sauce or a pinch of cayenne pepper. These changes can help you customize the dish to your liking. Enjoy crafting your perfect smoked Gouda mac and cheese! {{ingredient_image_1}} Start by boiling water in a large pot. Add salt to the water for flavor. Once boiling, add 8 ounces of elbow macaroni. Cook it according to the package instructions until it is al dente. This usually takes about 7-9 minutes. Drain the pasta and set it aside. This step is key for the best texture. In the same pot, melt 2 tablespoons of unsalted butter over medium heat. Once the butter melts, whisk in 2 tablespoons of all-purpose flour. Cook this mixture for about 1-2 minutes until it turns golden and bubbly. Slowly pour in 2 cups of milk while whisking to avoid lumps. Keep whisking for about 5 minutes until the sauce thickens. This will create a smooth base for your cheese. Next, lower the heat. Stir in 1 cup of shredded smoked Gouda cheese and 1 cup of sharp cheddar cheese until they melt completely. The sauce should be creamy and smooth. Now, add 1 teaspoon of Dijon mustard, 1/2 teaspoon of garlic powder, and 1/4 teaspoon of smoked paprika. Season with salt and pepper to taste. Mix well to combine all the flavors. Add the cooked macaroni to the cheese sauce. Stir gently but thoroughly until every piece of pasta is coated with the sauce. This step ensures that every bite is a creamy delight. If you want to enhance the dish, you can transfer it to a baking dish at this point. If you love a crunchy topping, preheat your oven to 350°F (175°C). Transfer the mac and cheese into a greased baking dish. Sprinkle 1/2 cup of breadcrumbs on top. Bake it for 15-20 minutes until the top is golden and bubbly. This adds a nice texture contrast to the creamy pasta. Don't forget to garnish your dish with 2 tablespoons of chopped fresh parsley before serving. This adds a pop of color and freshness to your meal. Enjoy your creamy smoked Gouda mac and cheese! To make your mac and cheese creamy, focus on the roux. Start with equal parts butter and flour. Cook it until it looks golden. This step helps thicken the sauce. When you add milk, do it slowly while whisking. This keeps lumps away. As you cook, the sauce should thicken nicely. Stir in the cheese when done. Use high-quality smoked Gouda for the best results. It gives that creamy, rich flavor everyone loves. Seasoning is key to great flavor. Start with salt and pepper. They enhance all the other tastes. Add Dijon mustard for a little tang. It brightens the dish. Garlic powder brings warmth, while smoked paprika adds depth. Taste your sauce before mixing it with pasta. Adjust the seasoning if needed. A little extra salt or spice can make a big difference. Smoked Gouda shines on its own, but mixing it with other cheeses adds depth. Sharp cheddar pairs well. It brings a nice bite. Try adding a bit of cream cheese for extra creaminess. You can also use Gruyère or Fontina for a unique twist. Each cheese offers a different flavor. Experiment to find your favorite blend. Pro Tips Use Fresh Cheese: For the best flavor and creaminess, opt for freshly shredded cheese instead of pre-shredded. Pre-shredded cheese often contains anti-caking agents that can affect melting. Experiment with Cheeses: Feel free to mix in other types of cheese like fontina, Monterey Jack, or even a hint of blue cheese for a unique flavor profile. Add Protein: To make this mac and cheese a more filling meal, consider adding cooked chicken, bacon, or sautéed vegetables like spinach or mushrooms. Make Ahead: This dish can be prepared ahead of time. Simply assemble it, cover, and refrigerate. When ready to serve, bake it directly from the fridge, adding a few extra minutes to the cooking time. {{image_2}} You can make your Smoked Gouda Mac and Cheese even better by adding protein. Cooked chicken, crispy bacon, or even sautéed vegetables work well. - Chicken: Shred cooked chicken and stir it in after you mix the pasta with the cheese sauce. - Bacon: Cook bacon until crispy. Crumble it and mix it in or sprinkle on top. - Vegetables: Try spinach, broccoli, or peas. Sauté them first for added flavor. Adding protein not only boosts flavor but also makes the meal heartier. If you need a gluten-free version, there are easy swaps. Use gluten-free elbow macaroni instead of regular pasta. Look for brands that taste great and hold up well in the dish. For the roux, replace all-purpose flour with cornstarch or gluten-free flour. Mix 2 tablespoons of cornstarch with 2 tablespoons of water. Add this mixture to the butter before adding milk for a smooth sauce. These options let everyone enjoy a bowl of creamy goodness. Want to spice things up? Add heat with jalapeños or hot sauce. - Jalapeños: Dice fresh jalapeños and sauté them with the butter. This adds a nice kick. - Hot Sauce: Drizzle your favorite hot sauce directly into the cheese sauce. Adjust the amount to your taste. These spicy twists create a fun flavor explosion in every bite. After enjoying your smoked Gouda mac and cheese, store any leftovers in an airtight container. Make sure to cool it down to room temperature before sealing. This helps keep the dish fresh. You can store it in the fridge for up to three days. If you want to keep it longer, consider freezing it. For the best taste when reheating, use an oven or stovetop. If you use the oven, preheat it to 350°F (175°C). Place the mac and cheese in a baking dish and cover it with foil. Heat for about 20 minutes. This method keeps it creamy and prevents it from drying out. If you choose the stovetop, add a splash of milk as you warm it. Stir it gently over low heat to bring it back to life. Freezing is a great option if you want to save some for later. Here are some key points: - Do cool the dish completely before freezing. - Do use a freezer-safe container. - Do label the container with the date. - Don't freeze it with breadcrumbs on top. They can get soggy. - Don't store it for more than three months for the best flavor. Following these tips ensures your smoked Gouda mac and cheese stays tasty and ready to enjoy! Yes, you can use different cheeses. Try a mix of sharp cheddar, mozzarella, or even Monterey Jack. Each cheese adds a unique taste and texture. If you want a smoky flavor, smoked cheddar is a great choice. Just keep the cheese amounts the same. This way, you still get that creamy texture. To make this dish ahead, cook the pasta and cheese sauce first. Combine them in a baking dish, but skip the breadcrumb topping for now. Cover and store it in the fridge for up to two days. When ready to eat, preheat the oven, add breadcrumbs, and bake until hot. This saves time and gives you that fresh-baked taste. Absolutely! Kids love the creamy texture and cheesy flavor. Smoked Gouda adds a nice twist, but it's not too strong. You can adjust the seasoning to make it milder if needed. This dish can be a fun meal that they will enjoy. Plus, it's a great way to sneak in some extra nutrients with added veggies. In this blog post, we explored how to make smoked Gouda mac and cheese. We covered key ingredients, cooking steps, and tips for a creamy texture. I shared ideas for adding flavor and made it easy to customize your dish. Remember, cooking is fun. Feel free to experiment with ingredients and flavors. Enjoy your delicious creation and make it your own!
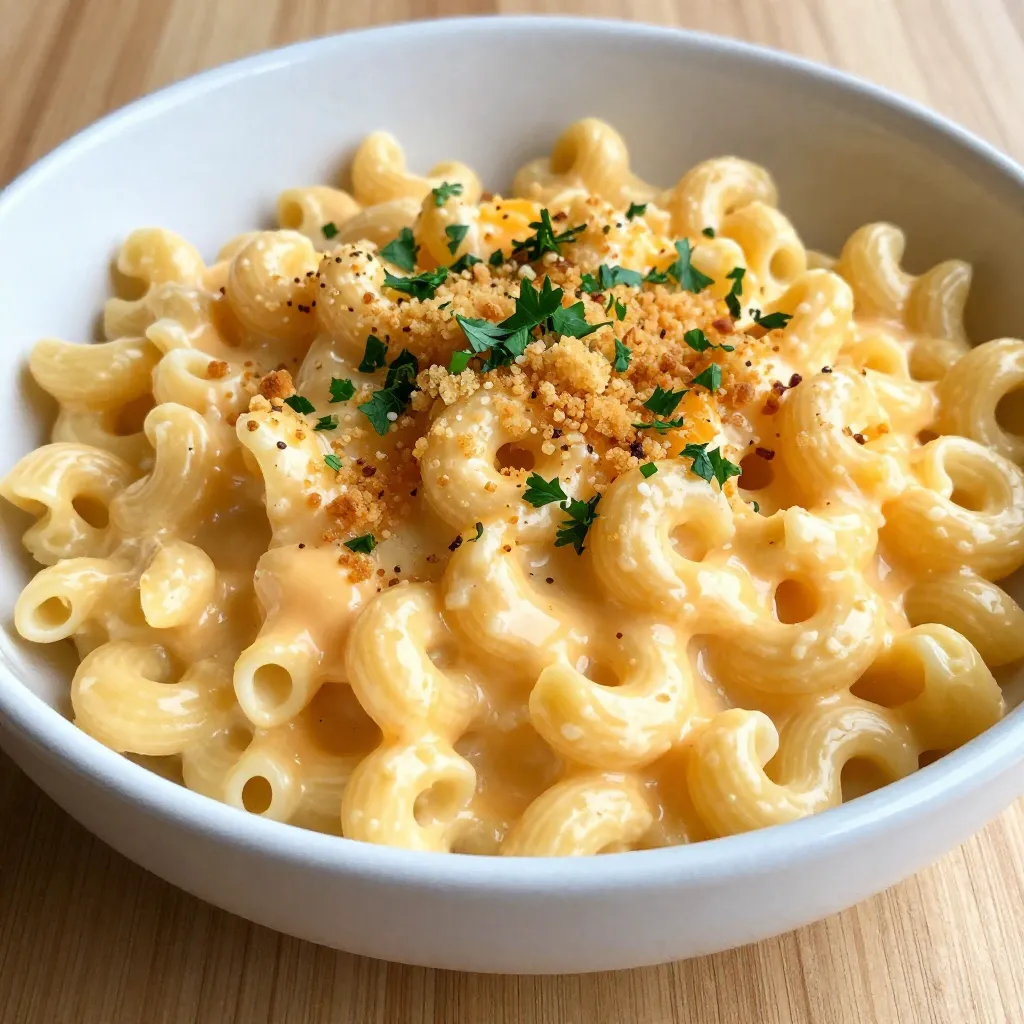
Smoked Gouda Mac and Cheese Creamy Flavor Explosion
Get ready for a flavor boom with my Smoked Gouda Mac and Cheese! This dish blends rich, creamy cheese with a hint of smokiness that’s
- 4 cups cranberry juice (100% juice) - 1 cup orange juice (freshly squeezed for best flavor) - 1 liter sparkling water or club soda - 1 cup fresh cranberries (for garnish) - 1 orange, thinly sliced - 1 lime, thinly sliced - Ice cubes The main ingredients for this punch are simple and fresh. The cranberry juice provides a tart flavor. Orange juice adds sweetness and brightness. The sparkling water gives it that fizzy pop. Fresh cranberries, orange slices, and lime slices make it look pretty. Ice cubes keep it nice and cold. - 1 tablespoon fresh mint leaves (optional) If you want to make your punch even better, add fresh mint leaves. They give a nice smell and a hint of coolness. You can also try adding other fruits, like sliced strawberries or pineapple. These fruits will add more color and flavor to your punch. Always choose 100% juice for the best taste. Look for juices with no added sugars. Freshly squeezed orange juice is best, but you can also use bottled juice. Make sure it is pure. Using high-quality juices makes your punch taste amazing. {{ingredient_image_1}} First, grab a large punch bowl. Pour in 4 cups of cranberry juice. Make sure it is 100% juice for the best taste. Next, add 1 cup of fresh orange juice. Squeeze the oranges right before you pour. This helps the flavor pop! Stir the juices gently until they mix well. Now, it’s time to add some fun! Toss in 1 cup of fresh cranberries. They add color and a burst of flavor. Slice 1 orange and 1 lime into thin pieces. Add these slices to the bowl, too. They not only taste great but also look beautiful. If you want, add 1 tablespoon of fresh mint leaves. This will give your punch a refreshing twist. Before serving, slowly pour in 1 liter of sparkling water or club soda. This keeps the fizz alive and makes the drink bubbly. Fill each glass with ice cubes first. Then ladle the punch over the ice. This way, it stays cold and refreshing. If you added mint leaves, place one on top of each glass for a nice touch. Enjoy your festive drink! To keep your punch fizzy, add the sparkling water just before serving. This ensures the bubbles stay fresh and lively. If you mix it too early, the fizz will fade. You can also try using chilled sparkling water. The colder it is, the better it will hold its bubbles. Pick clear glassware to show off the bright colors of your punch. A tall glass or a fun punch cup works great. You can even use mason jars for a rustic look. Make sure the glasses are also chilled for a refreshing sip. You can prepare the juices and fruits ahead of time. Mix the cranberry and orange juice and cut the fruits. Store them in the fridge until you are ready to serve. Just don’t add the sparkling water until the last minute. This way, your punch stays fizzy and looks amazing. Pro Tips Chill Your Ingredients: Always chill your cranberry juice and orange juice beforehand to keep the punch refreshing and cold without needing too much ice. Customize the Bubbles: Feel free to experiment with flavored sparkling water, such as lemon or lime, to add an extra layer of taste to your punch. Add Seasonal Fruits: Incorporate seasonal fruits like pomegranate seeds or sliced apples for added flavor and visual appeal during the holidays. Make It a Mocktail: For a fun twist, serve this punch in a cocktail glass and add a splash of your favorite non-alcoholic spirit for a festive mocktail option. {{image_2}} You can make this punch for everyone to enjoy. Use the same recipe, but skip any alcohol. It tastes great without it! Kids love this drink too. You can even add fun straws for their cups. This punch stays festive for any party. Adding spices can make this drink even better. Try a pinch of cinnamon or nutmeg. These spices give a warm flavor. You can also add more fruits. Think about pomegranate seeds or sliced berries. These additions look pretty and taste amazing. Not everyone likes their drinks sweet. You can adjust the sweetness to fit your taste. If you want less sugar, use unsweetened cranberry juice. You can also add a splash of lemon juice for a tart twist. For a sweeter punch, mix in a little honey or agave. Adjust it until it’s just right for you! To store leftover Sparkling Cranberry Punch, pour it into a clean container. Use a glass jar or a pitcher with a lid. Seal it tightly to keep out air. This helps the punch stay fresh. Store it in the fridge. Use it within 2 days for the best taste. If you add ice, remove it before storing. Ice will melt and water down the punch. If your punch goes flat, don’t worry! You can easily re-fizz it. Pour in more sparkling water or club soda. Mix gently to keep the bubbles. You can also add fresh fruit to lift the flavor. Remember to only add sparkling water just before serving for the best fizz. The shelf life for your ingredients varies. Here’s a quick guide: - Cranberry juice: Use within a week once opened. - Orange juice: Freshly squeezed juice is best in 3 days. - Fresh cranberries: They last up to 2 weeks in the fridge. - Fresh fruit: Use within a week for the best taste and look. Keeping track of these times helps you enjoy your punch at its best! Yes, you can make Sparkling Cranberry Punch in advance, but with some tips. Mix the cranberry juice and orange juice ahead of time. Store this juice mix in the fridge. Just remember to add the sparkling water right before serving. This keeps the punch fizzy and fresh. If you don’t have fresh fruit, you can use frozen fruit. Frozen cranberries or slices of frozen orange and lime work well. They add flavor and chill the punch without watering it down. You could also use fruit juice or flavored sparkling water for a twist. Yes, you can easily make this punch alcoholic. Add your favorite spirit like vodka or rum. A cup of alcohol mixed in with the juices will give it a nice kick. Just remember to adjust the amount of juice if needed. In this article, we explored how to make a delicious Sparkling Cranberry Punch. I covered key ingredients and garnishes that elevate your drink. You learned step-by-step instructions for preparing this refreshing beverage, plus tips to keep it fizzy. Whether you want a non-alcoholic option or themed variations, there’s something for everyone. Finally, I shared storage tips to help you enjoy leftovers. Enjoy this punch at your next gathering and impress your guests!
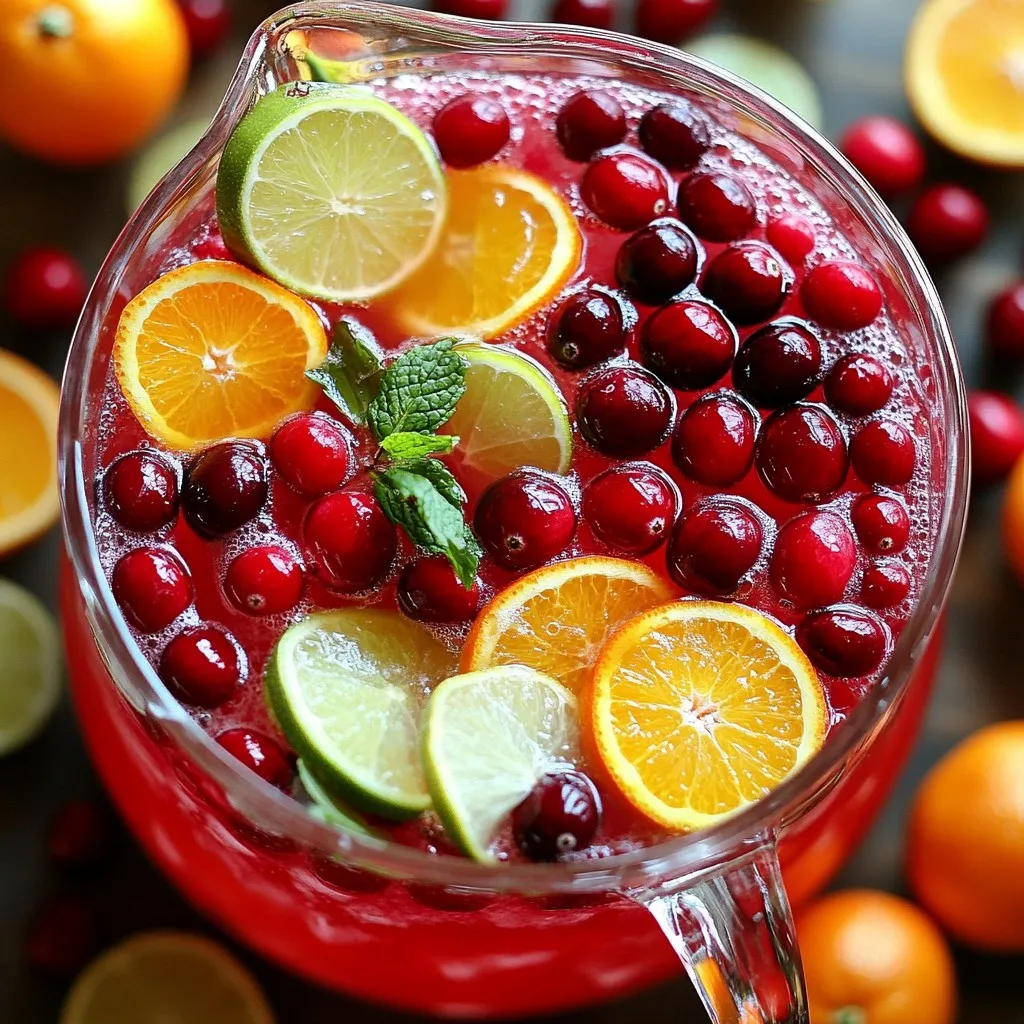
Sparkling Cranberry Punch Festive and Refreshing Drink
Looking for a festive drink to wow your guests? Sparkling Cranberry Punch is the perfect blend of sweet and tart flavors. This refreshing drink will
To make this dish, gather the following items: - 1 lb flank steak, cut into small strips - 1 cup uncooked jasmine rice - 2 cups beef broth - 1 cup queso blanco (or queso dip) - 1 medium onion, diced - 1 bell pepper, diced (any color) - 2 cloves garlic, minced - 1 tablespoon olive oil - 1 teaspoon smoked paprika - 1 teaspoon cumin - Salt and pepper to taste - Fresh cilantro, for garnish - Lime wedges, for serving These ingredients create a rich and flavorful meal. The flank steak gives a tender bite, while the queso adds a creamy touch. If you can’t find certain ingredients, here are some swaps: - Use chicken or turkey instead of flank steak. - Swap jasmine rice for basmati or brown rice. - Substitute vegetable broth for beef broth for a vegetarian option. - Try cheddar cheese if you can’t find queso blanco. - Use any bell pepper color you prefer. These changes can still keep the dish tasty. Each serving of this delicious skillet contains: - Calories: 520 - Protein: 36g - Carbohydrates: 45g - Fat: 22g - Fiber: 2g This meal is balanced, providing protein and carbs. It’s a great option for a hearty dinner. {{ingredient_image_1}} Start by cutting the flank steak into small strips. Use a sharp knife for clean cuts. Next, season the steak well. I like to use salt, pepper, smoked paprika, and cumin. These spices add great flavor. Heat a large skillet over medium-high heat. Add one tablespoon of olive oil. Once the oil is hot, add the seasoned steak strips. Sear them for about 3-4 minutes. Make sure they brown nicely on all sides. This step locks in the flavors. After searing, remove the steak from the skillet and set it aside. In the same skillet, add the diced onion, bell pepper, and minced garlic. These vegetables add color and taste. Sauté them for about 5 minutes. You want them to soften but not lose their crunch. Stir them often to avoid burning. This step brings out their natural sweetness. Now it’s time to add the rice. Pour in 1 cup of uncooked jasmine rice and mix it with the veggies. Stir for 1-2 minutes to toast the rice lightly. This enhances the rice's flavor. Next, pour in 2 cups of beef broth. Bring the mixture to a boil. Once boiling, reduce the heat to low. Cover the skillet and let it simmer for about 15 minutes. This cooks the rice and absorbs the broth. After the rice is done, add the steak back into the skillet. Pour in 1 cup of queso blanco. Stir gently until everything combines and heats through. Finally, garnish with fresh cilantro and serve with lime wedges. Enjoy your savory steak and queso rice skillet! To sear steak well, start with a hot skillet. Heat your skillet over medium-high heat for a few minutes. Add one tablespoon of olive oil and let it shimmer. Season the flank steak strips with salt, pepper, smoked paprika, and cumin. This adds great flavor. Place the steak in the skillet, but do not overcrowd. Sear for about 3-4 minutes. Flip the steak only once to get a nice brown crust. Once browned, remove it from the skillet and set it aside. To make fluffy rice, rinse the jasmine rice under cold water. This removes excess starch. In the skillet, add the rice to the sautéed vegetables and stir for 1-2 minutes. Toasting the rice enhances its flavor. Pour in the beef broth and bring it to a boil. Once boiling, reduce the heat to low and cover. Let it simmer for about 15 minutes. Avoid lifting the lid during cooking. This helps the rice absorb moisture and become fluffy. You can adjust the spice level to fit your taste. For a mild dish, use less smoked paprika. If you crave heat, add some chili powder or diced jalapeños. You can also use a hot queso dip instead of queso blanco. Always taste your dish as you cook. This way, you can balance the spices to your liking. Don’t be afraid to experiment! Pro Tips Choose the Right Cut: Flank steak is great for this dish, but you can also use skirt steak or sirloin for different flavors and textures. Toast the Rice: To enhance the flavor, make sure to toast the rice with the vegetables before adding the broth; this adds a nutty aroma. Monitor Liquid Levels: Keep an eye on the liquid while the rice cooks; if it absorbs too quickly, add a bit more broth or water as needed. Garnish with Freshness: Fresh cilantro and lime wedges really elevate the dish, adding brightness and balancing the richness of the queso. {{image_2}} You can make this dish more colorful and healthy by adding vegetables. Try some chopped zucchini, corn, or diced tomatoes. These add great flavor and nutrition. Just sauté them with the onion and bell pepper. You can also add spinach at the end. It wilts quickly and adds a nice touch. If you like heat, add some spice! You can use jalapeños or red pepper flakes. Stir them in with the garlic for a nice kick. If you want more flavor, try adding chipotle powder. It gives a smoky taste along with the heat. Adjust the spice to your taste to make it just right. Queso blanco is creamy and tasty, but you can switch it up. Try cheddar cheese for a sharper flavor. Pepper jack is great for a spicy twist. You can also mix cheeses for a unique taste. Just make sure to melt it well into the rice and steak for a creamy finish. To store your Steak and Queso Rice Skillet, let it cool down first. Then, place the leftovers in an airtight container. This will keep the dish fresh. Store it in the fridge for up to three days. When you are ready to enjoy your leftovers, heat them in a skillet. Add a splash of beef broth to keep it moist. Heat over medium heat for about five to seven minutes. Stir often to ensure even warming. You can also use a microwave. Place the dish in a microwave-safe bowl. Heat for two to three minutes, stirring halfway through. If you want to keep your dish longer, freezing is a great option. Use a freezer-safe container or a heavy-duty bag. Make sure to remove as much air as possible to avoid freezer burn. You can freeze the dish for up to three months. When you’re ready to eat, thaw it in the fridge overnight before reheating. Yes, you can! While flank steak works great, feel free to try sirloin or ribeye. Both are tender and flavorful choices. Just cut them into small strips like the flank steak. This will help them cook evenly in the skillet. Definitely! You can prepare the steak and rice mixture ahead. Cook everything up to adding the queso. Store it in the fridge for up to two days. When you're ready to eat, heat it up, add the queso, and mix it well. This makes for a quick meal when you're short on time. This dish is tasty on its own, but you can add sides too. Consider serving it with fresh guacamole or a simple salad. You can also pair it with tortilla chips for some crunch. Lime wedges add a zesty kick that enhances the flavors well. In this post, we covered the ingredients needed for a delicious skillet dish. We explored steps to prepare the steak, cook vegetables, and mix all ingredients. I shared tips for searing steak, making fluffy rice, and adjusting spice levels. You learned about variations with vegetables, cheese, and more. Lastly, we discussed storage and reheating for leftovers. As you cook, remember these tips to create a tasty meal. Enjoy customizing it to your taste!
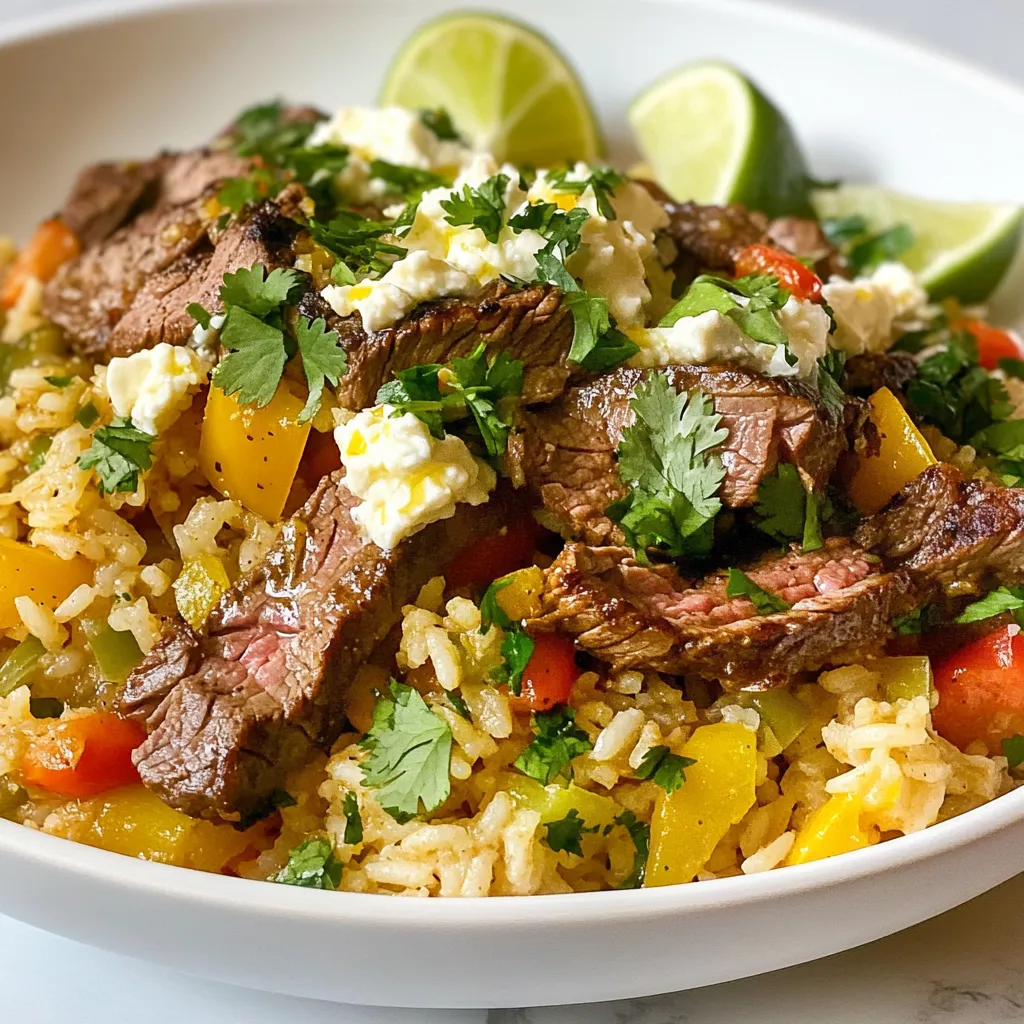
Savory Steak and Queso Rice Skillet Recipe Guide
Are you ready to spice up your dinner table? This Savory Steak and Queso Rice Skillet combines tender steak, creamy queso, and fluffy rice in
Here are the ingredients you will need for sweet potato black bean tacos: - 2 medium sweet potatoes, peeled and diced - 1 can black beans, drained and rinsed - 1 tablespoon olive oil - 1 teaspoon ground cumin - 1 teaspoon smoked paprika - ½ teaspoon chili powder - Salt and pepper to taste - 8 small corn tortillas - ½ red onion, diced - 1 avocado, sliced - Fresh cilantro, chopped (for garnish) - Lime wedges (for serving) If you don't have some ingredients, don't worry! Here are some easy swaps: - Use butternut squash instead of sweet potatoes for a different flavor. - Canned chickpeas can replace black beans for a nutty taste. - If you prefer, avocado can be swapped for a dollop of sour cream. - Use olive oil or any other oil you like for roasting. - For a kick, try using jalapeños instead of red onion. Sweet potato black bean tacos are not only tasty but also good for you. Here’s a quick look at their nutrition: - Calories: About 350 per serving - Protein: Approximately 12 grams - Fiber: Around 10 grams - Fat: About 10 grams (mostly healthy fats from avocado and olive oil) - Vitamins: High in Vitamin A from sweet potatoes and Vitamin C from lime and avocado These tacos offer a balanced mix of carbs, protein, and healthy fats. They are filling and packed with nutrients. Enjoy these flavors while knowing they are good for your body! {{ingredient_image_1}} 1. Start by preheating your oven to 400°F (200°C). 2. Peel and dice the sweet potatoes. Aim for small, even pieces. 3. Line a baking sheet with parchment paper for easy cleanup. 1. Spread the diced sweet potatoes on the baking sheet. 2. Drizzle with olive oil. 3. Sprinkle cumin, smoked paprika, chili powder, salt, and pepper over the potatoes. 4. Toss the sweet potatoes until they are fully coated with the spices. 5. Roast them for about 25-30 minutes. Stir them halfway for even cooking. 6. While sweet potatoes roast, heat black beans in a small pot over medium heat. 7. Simmer the beans for about 5 minutes. Add salt and pepper to taste. 8. Once the sweet potatoes are tender and caramelized, take them out of the oven. 1. Warm the corn tortillas in a dry skillet for 30 seconds on each side. 2. Place a generous amount of roasted sweet potatoes on each tortilla. 3. Add a spoonful of black beans on top. 4. Sprinkle diced red onion and sliced avocado over the filling. 5. Finish with chopped cilantro and serve with lime wedges on the side. To roast sweet potatoes well, start by cutting them into small cubes. This helps them cook evenly. Use a baking sheet lined with parchment paper for easy cleanup. Preheat your oven to 400°F (200°C). Toss the sweet potatoes in olive oil, cumin, smoked paprika, chili powder, salt, and pepper. Make sure every piece is coated. Roast for 25 to 30 minutes. Stir them halfway to get that nice caramelization. To boost the flavor of your tacos, add lime juice over the sweet potatoes. This adds a bright, fresh taste. You can also sprinkle some chili flakes for heat. If you like extra creaminess, mash the avocado and mix it with lime juice. This gives it a zesty twist. Try adding fresh herbs like cilantro for a pop of freshness, too. Serve your tacos warm. Use small corn tortillas, as they hold the filling well. Fill each tortilla generously with roasted sweet potatoes and black beans. Top with diced red onion and sliced avocado. Don’t forget to garnish with fresh cilantro. Serve lime wedges on the side for squeezing. This adds a nice touch at the table. Enjoy your delicious and filling tacos! Pro Tips Roasting Sweet Potatoes: For the best flavor, ensure the sweet potatoes are spread out evenly on the baking sheet to allow for even caramelization. Spice Variations: Feel free to adjust the spices to your preference; adding cayenne pepper for heat or using taco seasoning can elevate the flavor. Tortilla Tips: Warming the tortillas in a dry skillet not only softens them but also enhances their flavor. Consider wrapping them in a cloth to keep warm. Garnishing: Add a squeeze of lime juice right before serving for a burst of freshness that brightens the dish. {{image_2}} Sweet potato black bean tacos are naturally vegan and gluten-free. The main ingredients—sweet potatoes and black beans—fit perfectly into these diets. Use corn tortillas, which are gluten-free, to keep your tacos light and tasty. If you want to add more protein, consider using quinoa or chickpeas instead of black beans. They blend well with sweet potatoes. You can dress up your tacos in fun ways. Here are some ideas for toppings: - Diced tomatoes - Sliced jalapeños - Shredded lettuce - Crumbled feta or vegan cheese - Salsa or hot sauce These toppings add color and flavor. Mix and match your favorites for a unique twist each time you make them! You can easily adjust the heat level in these tacos. For a spicy kick, add more chili powder or fresh jalapeños. If you prefer mild flavors, stick with the base spices. You can also serve hot sauce on the side. This way, everyone can spice things up as they like. Cooking should be fun and personal! To store leftover tacos, first, let them cool down. Place the tacos in an airtight container. Keep them in the fridge for up to three days. If you have extra filling, store it separately. This keeps the tortillas from getting soggy. You can freeze the sweet potato and black bean filling. Allow it to cool, then pack it in a freezer-safe bag. Remove as much air as possible before sealing. It can last up to three months. When you are ready to eat, just thaw it overnight in the fridge. To reheat the tacos, preheat your oven to 350°F (175°C). Place the tacos on a baking sheet. Heat for about 10-15 minutes until warm. If you’re reheating filling, warm it in a skillet over medium heat. Stir until hot. Enjoy your flavorful tacos just like fresh! Yes, you can prep sweet potato black bean tacos in advance. Roast the sweet potatoes and heat the beans. Store them in separate containers. This makes it easy to assemble tacos later. Just warm the tortillas and fill them when ready to eat. If you can't find corn tortillas, try flour tortillas or lettuce wraps. Both options work well. Flour tortillas offer a soft texture. Lettuce wraps give a fresh, crunchy bite. Choose what you like best and enjoy the flavors. Yes, sweet potato black bean tacos are very healthy. Sweet potatoes are rich in vitamins and fiber. Black beans add protein and more fiber. Together, they create a balanced meal. Add avocado and cilantro for healthy fats and extra flavor. This dish is tasty and good for you! This blog post covered all you need for sweet potato black bean tacos. We explored ingredients, cooking steps, and helpful tips to make the best tacos. I shared ways to adjust the recipe for your needs, from vegan options to spicy versions. You learned smart storage methods and answers to common questions. Making these tacos is easy and fun. Use this guide to create tasty meals that everyone will love. Enjoy your cooking journey and try out different flavors!
Sweet Potato Black Bean Tacos Flavorful and Nutritious
Are you ready to enjoy a dish that’s both tasty and good for you? Sweet potato black bean tacos pack a punch of flavor and
- 4 medium sweet potatoes, peeled and cut into 1-inch cubes - 3 tablespoons pure maple syrup - 2 tablespoons olive oil - 1 teaspoon ground cinnamon - 1/2 teaspoon ground nutmeg - 1/4 teaspoon salt - 1/4 teaspoon black pepper - 2 tablespoons chopped pecans (optional) - Fresh parsley, for garnish (optional) Alternative sweeteners If you want to change the flavor, use agave syrup or honey. They both work well with sweet potatoes. Oil variations You can swap olive oil for coconut oil or avocado oil. Each oil adds a different taste. Spice swaps Try ginger or cardamom instead of cinnamon. They can add a unique twist to the dish. {{ingredient_image_1}} - First, preheat your oven to 400°F (200°C). - Line a large baking sheet with parchment paper. This helps prevent sticking. - In a bowl, mix 3 tablespoons of pure maple syrup with 2 tablespoons of olive oil. - Add 1 teaspoon of ground cinnamon, 1/2 teaspoon of ground nutmeg, 1/4 teaspoon of salt, and 1/4 teaspoon of black pepper. - Whisk the mixture until it is well combined. - Next, take 4 medium sweet potatoes. Peel them and cut them into 1-inch cubes. - Toss the sweet potato cubes in the maple mixture. Make sure each piece is evenly coated. - Spread the sweet potatoes out in a single layer on your prepared baking sheet. - Ensure there is space between each cube. This allows for even roasting. - Roast the sweet potatoes in the preheated oven for 25-30 minutes. - Flip them halfway through the cooking time. This helps them cook evenly. - Look for fork-tender sweet potatoes that are caramelized on the edges. - For added crunch, sprinkle 2 tablespoons of chopped pecans over the sweet potatoes for the last 5 minutes. To get the best sweet potatoes, focus on texture and flavor. - Achieving the right texture: Cut the sweet potatoes into 1-inch cubes. This size helps them cook evenly. Space them out on the baking sheet. This allows hot air to circulate around each piece, leading to crisp edges. - Balancing flavors: Use pure maple syrup for a rich sweetness. Combine it with cinnamon and nutmeg for warmth. A pinch of salt enhances these flavors. Don't skip the black pepper; it adds a nice kick. You can prepare these sweet potatoes in advance. This saves time when you want to enjoy them. - How to prep in advance: Peel and cut the sweet potatoes a few hours before cooking. Store them in cold water to prevent browning. - Storage tips before roasting: Keep the sweet potatoes in the fridge if you prep them early. Mix the maple sauce and store it separately until you are ready to bake. Pair these sweet potatoes with a variety of dishes to create a complete meal. - Complementary dishes: They go well with roasted chicken or grilled fish. You can also serve them alongside a fresh salad for a lighter option. - Ideal pairings for a meal: Try them with quinoa or a warm grain salad. The sweet flavor of the potatoes contrasts nicely with savory dishes. Pro Tips Choosing Sweet Potatoes: Select firm, smooth sweet potatoes without blemishes for the best flavor and texture. Even Cubes: Cut the sweet potatoes into uniform 1-inch cubes to ensure they roast evenly and cook at the same rate. Maple Syrup Alternatives: Consider using honey or agave syrup if you want a different flavor profile while keeping it sweet. Storage Tips: Store any leftovers in an airtight container in the refrigerator for up to 3 days and reheat in the oven for best results. {{image_2}} You can easily boost the flavor of maple cinnamon roasted sweet potatoes. Adding fresh herbs can make a big difference. Try rosemary or thyme for a fragrant touch. Both herbs pair well with the sweet and spicy notes of the dish. Another great idea is to add citrus zest. A bit of orange or lemon zest can brighten the flavors. It adds a fresh twist that balances the sweetness of the maple syrup. Nuts can provide a nice crunch. While pecans are great, you can switch things up. Walnuts or almonds also add a tasty crunch. If you want a nut-free dish, try using seeds. Pumpkin or sunflower seeds can add texture without nuts. This recipe is quite flexible for different diets. If you want a vegan option, it already fits that bill since it contains no animal products. Just check your maple syrup to ensure it is pure. For those needing gluten-free options, you're in luck. All the ingredients are gluten-free. Just ensure you use a gluten-free brand of maple syrup if you choose a processed one. To keep your maple cinnamon roasted sweet potatoes fresh, store them in an airtight container. Place them in the fridge within two hours of cooking. This way, they stay tasty for up to four days. When you want to enjoy them again, reheat in the oven at 350°F (175°C) for about 10-15 minutes. You can also use the microwave, but they may lose some crispiness. If you want to save some for later, freezing works well. Let the sweet potatoes cool completely. Spread them on a baking sheet in a single layer and freeze for 1-2 hours. Once frozen, transfer them to a freezer-safe bag or container. They can last up to three months in the freezer without losing quality. In the fridge, your sweet potatoes last about four days. They may show signs of spoilage if they turn brown or feel mushy. If you see any mold or odd smells, it's best to toss them out. Always check before you eat! Yes, you can use other types of potatoes. Regular white potatoes or Yukon Golds work well. However, sweet potatoes have a unique flavor and texture that make this dish special. If you choose a different type, adjust the cooking time. Some may cook faster, while others may take longer. Sweet potatoes are done when they are fork-tender. This usually takes 25 to 30 minutes in the oven. You can check by inserting a fork into a piece. If it goes in easily, they are ready! Look for a caramelized edge for extra flavor. To reheat roasted sweet potatoes, use the oven. Preheat it to 350°F (175°C). Spread the sweet potatoes on a baking sheet and heat for about 10 minutes. You can also use a microwave, but the oven keeps them crispy. Just place them in a microwave-safe dish and heat for 1 to 2 minutes. Yes, maple cinnamon roasted sweet potatoes are healthy! They are packed with vitamins A and C. Sweet potatoes also have fiber, which helps digestion. The maple syrup adds a touch of sweetness without many calories. Just keep an eye on the amount of syrup you use. These maple cinnamon roasted sweet potatoes are easy and tasty. We discussed the key ingredients, steps for preparation, and cooking tips. You learned about variations and how to store leftovers. Now, you can whip up a warm dish that fits any meal. Don’t hesitate to experiment with flavors and substitutes. Enjoy making sweet potatoes that are not only delicious but also healthy!
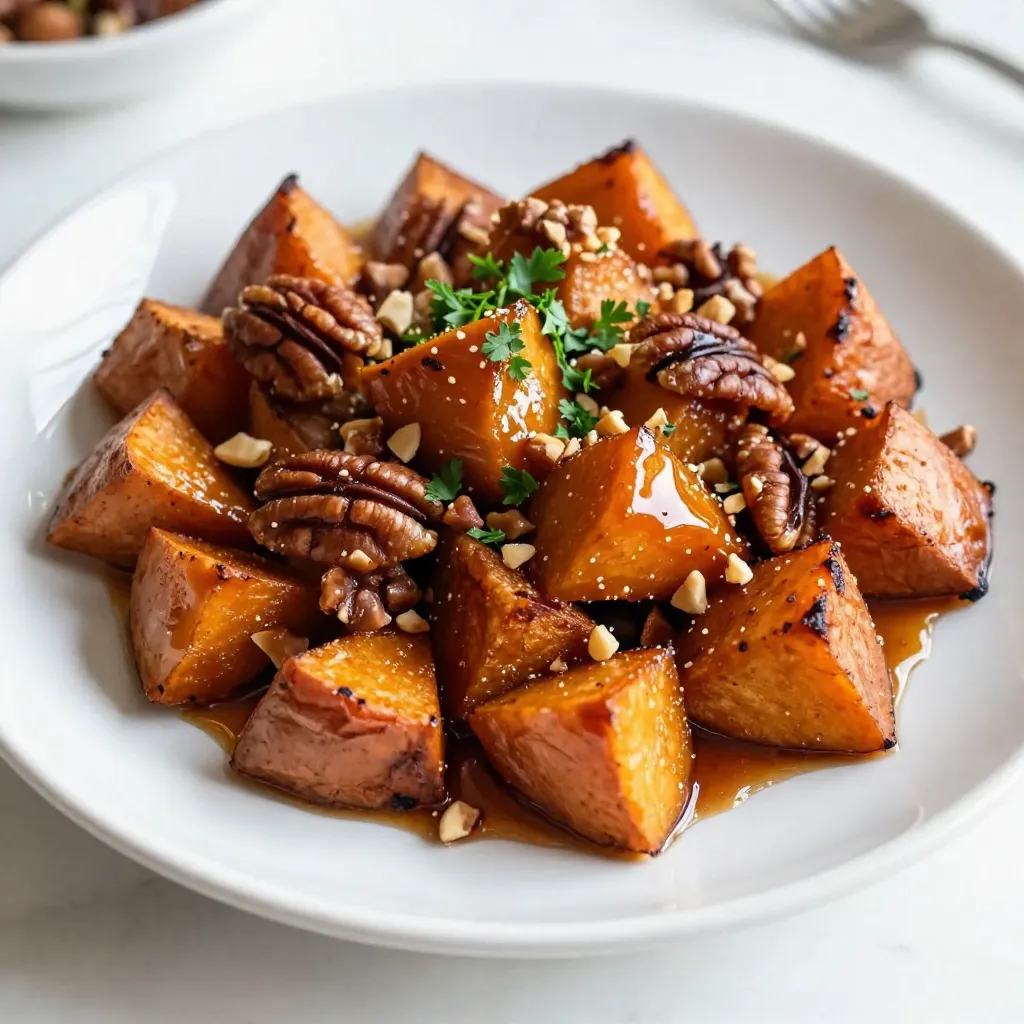
Maple Cinnamon Roasted Sweet Potatoes Delightful Dish
Want to impress your family with an easy and tasty side dish? In this recipe, I’ll show you how to make Maple Cinnamon Roasted Sweet
To make Lemony Tuscan Artichoke Soup, you need a few key ingredients: - 2 cans (14 oz each) artichoke hearts, drained and quartered - 1 medium onion, chopped - 3 cloves garlic, minced - 4 cups vegetable broth - 1 medium potato, peeled and cubed Artichoke hearts are the star of this soup. They add a unique flavor and texture. Onions and garlic create a tasty base. The potato adds creaminess when you blend it. Vegetable broth gives depth to the soup. Next, we have the seasonings and extras that really bring this soup to life: - 2 tablespoons olive oil - 1 teaspoon dried oregano - 1 teaspoon dried thyme - Juice of 1 lemon - Zest of 1 lemon - Salt and pepper to taste - Fresh parsley, chopped (for garnish) - Croutons or toasted bread (for serving) Olive oil helps to sauté the onions and garlic. Oregano and thyme add earthy notes. Lemon juice and zest brighten the flavor. Don’t forget salt and pepper for seasoning! Fresh parsley makes a lovely garnish and adds color. Croutons or toasted bread give a nice crunch when serving. {{ingredient_image_1}} First, heat 2 tablespoons of olive oil in a large pot over medium heat. Add 1 chopped onion. Sauté it until it turns translucent, which takes about 5 minutes. Next, add 3 minced garlic cloves. Cook for another minute until the garlic smells good. This mix is the start of our soup, and it fills your kitchen with a warm aroma. Next, add 2 cans of drained and quartered artichoke hearts to the pot. Stir in 1 teaspoon of dried oregano and 1 teaspoon of dried thyme. Cook this mix for 2 to 3 minutes. This step helps the flavors blend and makes the soup even tastier. Now, it’s time to add the main ingredients. Put in 1 peeled and cubed medium potato along with 4 cups of vegetable broth. Bring the pot to a boil, then turn the heat down low. Let it simmer for about 15 to 20 minutes. The potato should be tender after this time. Once the potatoes are cooked, use an immersion blender to blend the soup. You can blend until smooth or leave some chunks if you want a thicker texture. Blending gives the soup a creamy feel and makes it rich and comforting. After blending, stir in the juice and zest of 1 lemon. This adds a bright flavor that makes the soup special. Season with salt and pepper to taste. Let it simmer for another 5 minutes. This helps the new flavors mix in well. When serving, ladle the soup into bowls. Garnish with fresh chopped parsley for a pop of color. Add croutons or toasted bread on the side for a crunchy contrast. Enjoy the deliciousness of this Lemony Tuscan Artichoke Soup! Using fresh ingredients makes a big difference in taste. Fresh artichoke hearts add a bright flavor. Chopped onion and minced garlic bring a nice smell. Sauté them well to make the base extra tasty. Heat olive oil in a pot on medium heat. Add the onion first, cooking until it's clear. This should take about 5 minutes. Then, add the garlic for one more minute. This step wakes up the flavors! I recommend using an immersion blender for this soup. It’s easy and quick. You can blend the soup right in the pot. If you want a smoother texture, blend it all. If you like some chunks, blend only half of it. This gives the soup a nice mix of textures. For a traditional blender, let the soup cool a bit before blending. Always be careful to avoid splatters! Pair this soup with crusty bread or croutons. They add a nice crunch and flavor. You can also sprinkle fresh parsley on top for color. This makes it look pretty too! When storing leftovers, put the soup in an airtight container. It stays fresh in the fridge for about 3 days. To reheat, use the stove or microwave. Add a splash of broth to boost the flavor if needed. Enjoy your meal! Pro Tips Use Fresh Herbs: Fresh herbs can elevate the flavor of your soup. If available, substitute fresh oregano and thyme for the dried versions for a more vibrant taste. Adjust Consistency: If you prefer a creamier soup, consider adding a splash of coconut milk or a dollop of sour cream before serving for extra richness. Customize Your Garnish: Try adding a sprinkle of grated Parmesan cheese or a drizzle of balsamic glaze on top for an extra layer of flavor. Make It Ahead: This soup stores well in the refrigerator for up to 3 days. Reheat gently on the stove and add a bit more broth if it thickens too much. {{image_2}} You can mix things up with different veggies in this soup. Try using spinach or kale for more greens. If you want protein, add cooked chicken or white beans. For a gluten-free option, make sure your broth is certified gluten-free. You can also swap the potato for sweet potato for a hint of sweetness. If you need a dairy-free version, skip the cream or use a plant-based cream. Herbs and spices can change the soup's taste. Add basil or rosemary for a new twist. A pinch of red pepper flakes gives it a nice kick. For a creamy version, stir in coconut milk or heavy cream after blending. This adds richness and smoothness to the soup. You can also try a splash of white wine for added depth. Seasonal ingredients can brighten your soup. In the fall, add roasted butternut squash. In summer, toss in fresh corn or diced tomatoes. If you want to make it a pasta dish, cook some small pasta like orzo or ditalini separately and mix it in. This turns the soup into a hearty meal that fills you up. To keep your soup fresh, store it in an airtight container. Place it in the fridge within two hours of cooking. The soup will stay good for about three to four days. If you want to save it longer, consider freezing it. Use freezer-safe containers or bags. Make sure to leave some space for expansion. The soup will last for up to three months in the freezer. You can reheat the soup in two ways: microwave or stovetop. For the microwave, pour the soup into a bowl and cover it. Heat in short bursts, stirring in between to warm it evenly. For the stovetop, pour the soup into a pot. Heat it on low, stirring often, until warm. To boost the flavor, add a splash of lemon juice or a pinch of salt before serving. Most ingredients stay fresh for a week. Artichoke hearts in a can last long if stored properly. Check the expiration date on the can. Fresh potatoes last for weeks in a cool, dry place. If the soup has been cooked, look for signs of spoilage. If it smells off or has mold, it's best to toss it. Always trust your senses when it comes to food safety. Can I use frozen artichoke hearts? Yes, you can use frozen artichoke hearts. Just thaw and drain them first. They will still add great flavor to your soup! How long does the soup last in the fridge? The soup lasts about 3 to 5 days in the fridge. Store it in an airtight container for the best results. Is this soup vegan-friendly? Yes, this soup is vegan-friendly! It uses vegetable broth and no animal products. Enjoy it guilt-free! Nutrition benefits of artichokes and potatoes Artichokes are rich in fiber, which aids digestion. They also have antioxidants that help fight inflammation. Potatoes provide vitamins C and B6, plus potassium. Together, they make this soup healthy and hearty. How to make a thicker soup? To thicken your soup, blend more of it until smooth. You can also add a bit more potato. This adds texture and keeps it filling. Can I add proteins like chicken or beans? Absolutely! You can add cooked chicken for extra protein. Canned beans, like white beans, work well too. Just stir them in before blending for a tasty twist. Lemony Tuscan Artichoke Soup offers bright flavors and an easy preparation process. We discussed the key ingredients, including artichoke hearts and fresh herbs. I shared step-by-step cooking instructions and helpful tips for the best taste. You can even explore variations to suit your diet. Remember to store leftovers properly for later enjoyment. Enjoy this delicious soup that warms the heart and nourishes the body!
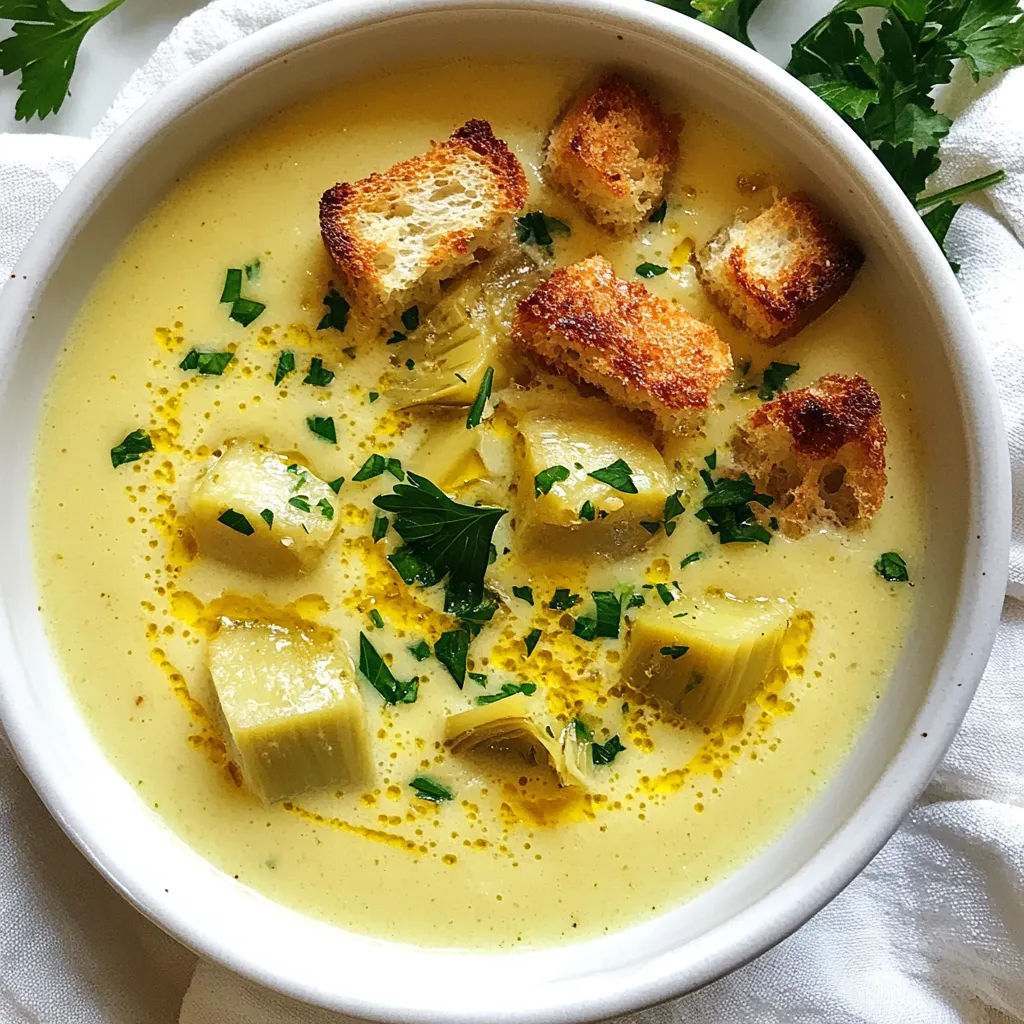
Lemony Tuscan Artichoke Soup Flavorful and Easy Recipe
Looking for a bright and tasty soup to warm your soul? This Lemony Tuscan Artichoke Soup is your answer! Packed with fresh flavors and easy
To make Cheesy Cajun Garlic Chicken Rotini, you will need: - 8 oz rotini pasta - 2 tablespoons olive oil - 1 lb chicken breast, diced - 3 cloves garlic, minced - 1 tablespoon Cajun seasoning - 1 cup heavy cream - 1 cup shredded cheddar cheese - 1/2 cup grated Parmesan cheese - Salt and pepper to taste - 2 green onions, chopped (for garnish) - 1 red bell pepper, diced You can swap some ingredients based on what you have: - Pasta: Use penne or fusilli instead of rotini. - Chicken: Substitute with shrimp or firm tofu for a different protein. - Heavy cream: Use half-and-half or coconut cream for a lighter sauce. - Cheese: Try pepper jack for a spicy kick or mozzarella for a milder taste. - Cajun seasoning: Mix paprika, cayenne, and garlic powder if you lack Cajun spice. To prepare this dish, gather these tools: - A large pot for boiling pasta - A large skillet for cooking chicken and sauce - A mixing spoon for stirring - A measuring cup for liquids - A knife and cutting board for chopping vegetables - A colander for draining pasta With these ingredients and tools, you'll be ready to create a delicious and hearty meal. Enjoy the cooking process as much as the final dish! {{ingredient_image_1}} To start, grab a large pot and fill it with water. Add a good amount of salt to the water. This adds flavor to the pasta. Bring the water to a boil. Once boiling, add 8 oz of rotini pasta. Cook it according to the package instructions until it is al dente. This usually takes about 8-10 minutes. When done, drain the pasta and set it aside. Next, take a large skillet and place it on medium heat. Pour in 2 tablespoons of olive oil and let it heat. Once hot, add 1 lb of diced chicken breast. Season it with salt, pepper, and 1 tablespoon of Cajun seasoning. Cook the chicken for about 6-8 minutes. You want it to turn golden brown and be fully cooked. After the chicken is cooked, it’s time to add more flavor. Toss in 3 cloves of minced garlic and 1 diced red bell pepper. Sauté this mixture for about 2-3 minutes. You want the garlic to smell good and the pepper to soften a bit. Now it's time to create a creamy sauce. Pour in 1 cup of heavy cream into the skillet. Stir well, making sure to scrape the bottom of the skillet. This helps combine all the tasty bits left from cooking the chicken. Bring this mixture to a simmer, then lower the heat. Next, add 1 cup of shredded cheddar cheese and 1/2 cup of grated Parmesan cheese to the sauce. Stir until the cheeses melt and the sauce is nice and smooth. If you need to, taste and adjust the seasoning. Finally, add the drained rotini to the skillet. Toss everything together until the pasta is coated in that cheesy sauce. This step is key to a delicious meal! To make the sauce smooth, stir well after adding the heavy cream. Scrape the skillet's bottom to mix all flavors. Let it simmer gently. This helps the flavors blend perfectly. Add cheeses slowly for a creamy texture. If it seems too thick, add a splash of pasta water. Cajun seasoning is key for flavor. Adjust the amount based on your spice level. Taste as you cook. You can add extra salt or pepper if needed. Fresh garlic brings a strong taste, so use the right amount. For a touch of sweetness, add a pinch of sugar. Use medium heat for cooking chicken to avoid burning. Stir often to ensure even cooking. When sautéing garlic and peppers, don’t let them brown too much. This keeps the flavors bright. Toss the pasta quickly with the sauce to coat it evenly. Serve hot for the best experience. Pro Tips Cook Pasta Al Dente: Make sure to cook the rotini just until al dente to prevent it from becoming mushy when mixed with the creamy sauce. Adjust the Heat: If you prefer a spicier dish, feel free to add more Cajun seasoning or a dash of hot sauce while cooking the chicken. Use Fresh Ingredients: Fresh garlic, bell peppers, and green onions not only enhance the flavor but also add vibrant colors to your dish. Leftover Storage: This dish can be stored in an airtight container in the refrigerator for up to 3 days. Reheat gently on the stovetop with a splash of cream to revive the sauce. {{image_2}} You can boost the flavor and nutrition of your cheesy Cajun garlic chicken rotini by adding vegetables. Some great options are: - Spinach: Toss in fresh spinach during the last minute of cooking. It wilts down quickly and adds color. - Zucchini: Dice zucchini and sauté it with the chicken for extra crunch. - Mushrooms: Sliced mushrooms add an earthy tone. Cook them until they are tender. - Broccoli: Steam broccoli florets and mix them in for a pop of green and a healthy touch. These veggies not only enhance the dish but also make it more colorful and fun. If you want to switch up the protein in this recipe, you have options. Here are a few that work well: - Shrimp: Use peeled shrimp instead of chicken. Cook them until they are pink and tender. - Sausage: Andouille or smoked sausage gives a smoky flavor. Slice and cook it until golden. - Tofu: For a vegetarian option, use firm tofu. Press, cube, and sauté it until crispy. These alternatives can give your dish a new twist and cater to different diets. You can adjust the heat level to fit your taste. If you want a spicier dish, here are some ideas: - Add more Cajun seasoning: Increase the amount to boost the spice. - Include crushed red pepper flakes: Sprinkle them in while cooking for extra heat. - Hot sauce: Drizzle your favorite hot sauce on top before serving. If you prefer a milder version, simply use less Cajun seasoning and avoid the hot sauce. You can still enjoy the rich flavors without the heat. To keep your Cheesy Cajun Garlic Chicken Rotini fresh, cool it first. Place leftovers in an airtight container. Use glass or plastic containers with tight-fitting lids. Store in the fridge for up to three days. Label your containers with the date. This way, you’ll always know when to eat them. When reheating, add a splash of milk or cream. This helps the sauce stay creamy. You can use a microwave or a skillet. If using the microwave, heat in short bursts. Stir in between to avoid hot spots. For the skillet, heat over low heat. Stir until warmed through. This keeps the dish tasty and safe. If you want to freeze your rotini, let it cool completely. Place it in freezer-safe bags or containers. Remove as much air as possible to prevent freezer burn. Label the bags with the date and contents. You can freeze it for up to three months. To thaw, place it in the fridge overnight. Reheat it easily after thawing. Yes, you can use different pasta shapes. Penne, fusilli, or bowtie work great. Choose a shape you like. Just keep the cooking time similar to rotini. Adjust the sauce as needed for the pasta you choose. To make this dish dairy-free, swap heavy cream for coconut cream. Use dairy-free cheese instead of cheddar and Parmesan. Nutritional yeast can give a cheesy flavor too. Check labels to ensure all ingredients are dairy-free. You can prepare this meal ahead of time. Cook the pasta and chicken, then store them separately. Mix them with sauce just before serving. This helps keep the pasta from getting soggy. You can reheat it on the stove or in the microwave. This article covered how to create a tasty dish. We explored essential ingredients, substitutions, and tools you need. I shared step-by-step instructions for cooking pasta, chicken, and sauce. You learned tips for perfect seasoning and techniques. Variations let you customize with veggies or proteins. Storage tips help keep leftovers fresh. In the end, enjoy experimenting with flavors and techniques. You can make this dish yours! Happy cooking!
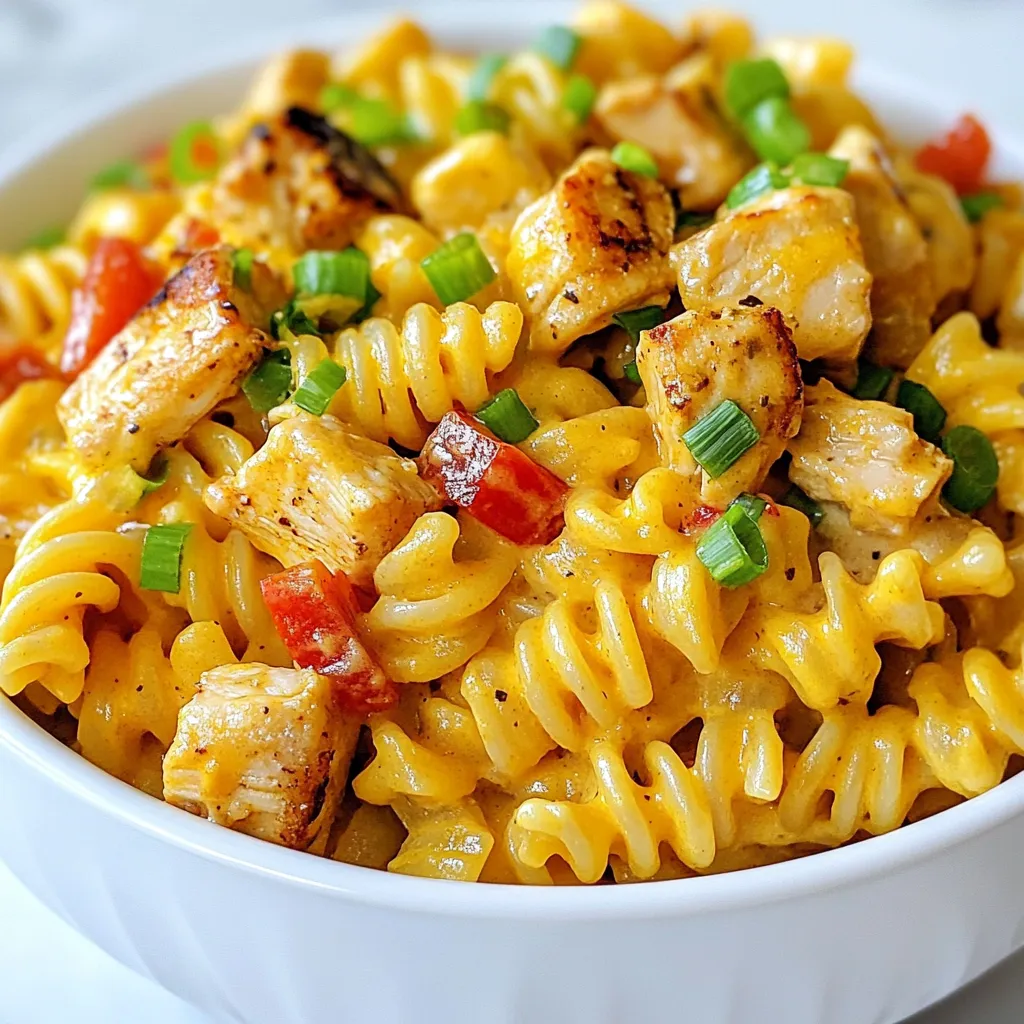
Cheesy Cajun Garlic Chicken Rotini Delightful Meal
If you crave a creamy, zesty dish, you’ve found the right recipe! This Cheesy Cajun Garlic Chicken Rotini is a delightful meal full of flavor.
- 2 boneless, skinless chicken breasts - 1 can (15 oz) white beans, drained and rinsed - 1 can (4 oz) diced green chilies - 1 medium onion, diced - 2 cloves garlic, minced - 1 cup corn kernels, frozen or fresh For this chili, you need quality chicken and beans. The chicken breasts add protein. White beans give it a creamy texture. Diced green chilies add a mild heat. Onion and garlic build a strong base flavor. Corn kernels add sweetness and color. - 1 teaspoon ground cumin - 1 teaspoon chili powder - 1 teaspoon onion powder - 1 teaspoon salt, adjust to taste - 1/2 teaspoon black pepper The spices are key to good flavor. Ground cumin adds warmth. Chili powder brings a bit of spice. Onion powder enhances the onion flavor. Salt and black pepper balance everything. Adjust salt to your taste for a perfect dish. - 1 cup heavy cream, or a dairy-free alternative - 1/2 cup sour cream, optional for extra creaminess - Fresh cilantro, for garnish - Lime wedges, for serving For a richer chili, add heavy cream. You can swap it for coconut cream if you want dairy-free options. Sour cream adds tanginess. Garnish with cilantro for freshness, and add lime for a zesty kick. {{ingredient_image_1}} Layering your ingredients in the crockpot is simple. Start by placing the boneless chicken breasts at the bottom. This helps them cook evenly. Next, add the drained white beans. They provide a great texture. Then, pour in the diced green chilies for a mild kick. Toss in the diced onion and minced garlic for flavor. Lastly, add the corn kernels for sweetness. Now it's time to combine the broth and spices. Pour the low-sodium chicken broth over the layered ingredients. This helps everything cook nicely. Sprinkle in the ground cumin, chili powder, onion powder, salt, and black pepper. Stir gently to mix all the flavors. This step is key for a tasty chili. You can choose how long to cook your chili. If you have time, cook on low for 6-7 hours. This lets the flavors develop fully. If you need it sooner, cook on high for 3-4 hours. The chicken should be fully cooked and tender when it’s done. After cooking, it’s time to shred the chicken. Carefully take the chicken breasts out of the crockpot. Use two forks to pull the chicken apart. This method works best for shredding. Once shredded, return the chicken to the chili. It adds heartiness and flavor. For a rich and creamy finish, add heavy cream and sour cream. Stir them into the chili until well combined. This step makes the chili smooth and luscious. Let it warm for an extra 15-30 minutes on low. This helps the flavors blend together. When serving, ladle the creamy white chicken chili into bowls. Garnish each bowl with fresh cilantro for color. A squeeze of lime juice adds brightness. This chili is perfect for a cozy meal or gathering. Enjoy every spoonful! To make your chili pop with flavor, pay attention to cooking time. Cooking on low heat for 6-7 hours lets the chicken absorb all the spices. If you’re short on time, cooking on high for 3-4 hours works too. Just remember, longer cooking times blend the flavors better. If you want to switch up the protein, there are many great options. You can use shredded rotisserie chicken for a quick fix. If you prefer a meat-free choice, try using tofu or chickpeas. Both options add unique textures and flavors while keeping it hearty. If you like a thicker chili, there are a few tricks. You can mash some of the white beans into the chili after cooking. This adds creaminess without affecting the flavor. Another option is to stir in a cornstarch slurry. Mix equal parts cornstarch and cold water, then add it to the pot. Cook for a few minutes until it thickens. Pro Tips Use Fresh Ingredients: Fresh herbs and quality chicken will enhance the flavor of your chili significantly. Consider using fresh cilantro and lime for garnish. Adjust the Spice Level: If you prefer a spicier chili, add a diced jalapeño or increase the amount of chili powder to suit your taste. Make It Ahead: This chili tastes even better the next day! Make a big batch and store leftovers in the refrigerator for an easy meal later in the week. Experiment with Toppings: Top with avocado slices, shredded cheese, or tortilla chips for added texture and flavor. Each topping can bring a new twist to your dish! {{image_2}} You can make this chili spicy by adding jalapeños. Just chop one or two jalapeños and add them to the crockpot with the other ingredients. The heat level will depend on how many you use. For a milder kick, remove the seeds before adding. If you want a vegetarian version, swap the chicken for extra beans or lentils. Use vegetable broth instead of chicken broth. For creaminess, consider using coconut cream or cashew cream. This keeps the dish rich while making it meat-free. Toppings can take your chili to the next level. Some great ideas include: - Shredded cheese for added flavor. - Avocado slices for creaminess. - Fresh cilantro for a burst of freshness. - Lime wedges for a zesty finish. These toppings not only add flavor but also brighten up the dish visually. Store your chili in a sealed container. This keeps it fresh for up to five days. If you plan to eat it soon, just put it in the fridge. Make sure it cools first. Divide it into smaller portions. This makes it easy to grab a bowl later. Want to keep some for later? You can freeze it! Use freezer-safe containers or bags. Leave some space at the top, as liquids expand when frozen. It stays good for up to three months. To reheat, thaw it overnight in the fridge. Then heat it in a pot on low. Stir often until warm. Got leftovers? Use them in fun ways! Try making a chili burrito. Wrap the chili in a tortilla with cheese or veggies. You can also top baked potatoes with it. Add sour cream and chives for a tasty twist. Another option is to mix it with pasta for a creamy dish. Be creative! You can use coconut cream instead of heavy cream. For sour cream, use a dairy-free option made from nuts or soy. These substitutes keep the chili creamy without dairy. Yes, you can use frozen chicken breasts. Just add them directly to the crockpot. Increase the cooking time to about 8 hours on low or 4-5 hours on high. This will ensure they cook fully and remain tender. This chili pairs well with several sides. Here are some great options: - Cornbread - Tortilla chips - Rice - Fresh salad - Avocado slices You can also top the chili with cheese, jalapeños, or fresh lime juice for added flavor. This blog post covered how to make creamy white chicken chili. We discussed the key ingredients like chicken breasts, white beans, and green chilies. You learned about spices that enhance flavor and techniques for cooking and shredding chicken. Tips on variations and storage were also shared. In closing, enjoy experimenting with this recipe. Tailor it to your taste and ingredients. Your chili will be delicious, satisfying, and easy to prepare. Happy cooking!
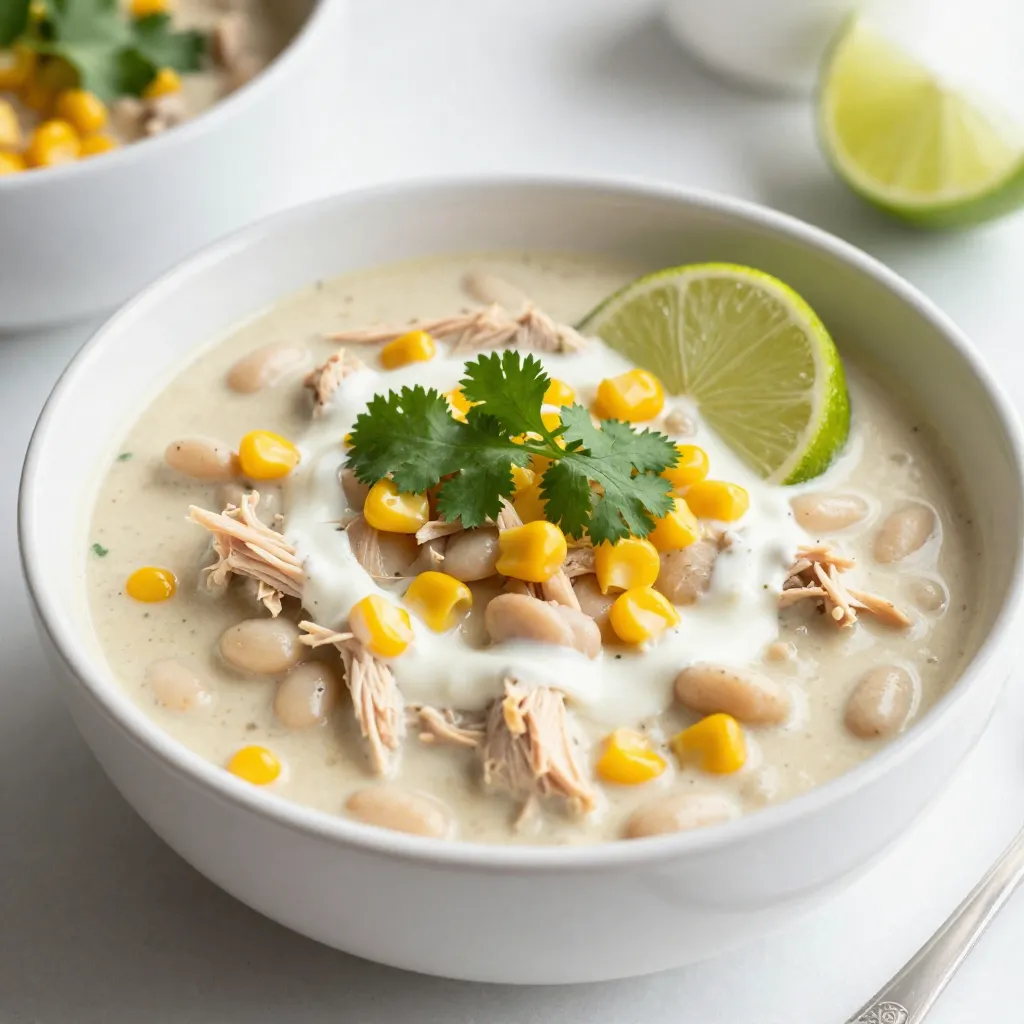
Crockpot Creamy White Chicken Chili Hearty and Simple
Welcome to a cozy kitchen adventure! In this post, I’ll show you how to make my favorite Crockpot Creamy White Chicken Chili. It’s hearty, simple,
- 12 oz cheese tortellini - 1 tablespoon olive oil - 3 cloves garlic, minced - 1 can (14 oz) crushed tomatoes - 1 cup heavy cream - 1 cup fresh basil leaves, chopped - 1 teaspoon dried oregano - Salt and pepper to taste - ½ cup grated Parmesan cheese (plus extra for serving) In this dish, cheese tortellini is the star. It brings a rich, hearty flavor. The olive oil adds a nice touch of warmth and a hint of fruitiness. Garlic is key here, as it gives a bold taste. Crushed tomatoes create a vibrant base, while heavy cream brings smoothness. Fresh basil leaves add a burst of flavor and aroma. Dried oregano gives depth, making each bite special. Finally, salt and pepper enhance the taste, while Parmesan cheese melts in to tie it all together. - Additional Parmesan cheese - Fresh basil leaves For garnish, I suggest adding more Parmesan cheese on top. It adds a nice salty kick. Fresh basil leaves are perfect to sprinkle on as well. They not only look great but also boost the flavor. Together, these garnishes make each serving look like a work of art. Enjoy your creamy tomato basil tortellini with these simple touches! {{ingredient_image_1}} To cook the tortellini, start by boiling salted water. Use a large pot for this. Bring the water to a rolling boil. This step is key for flavor. Next, add the cheese tortellini to the boiling water. Cook them according to the package instructions. This usually takes about 3 to 5 minutes. Stir gently to prevent sticking. Once cooked, drain the tortellini and set them aside. In the same pot, heat one tablespoon of olive oil over medium heat. Add three minced garlic cloves. Sauté for about one minute. You want the garlic fragrant but not browned. Now, pour in a can of crushed tomatoes. Let them simmer for about five minutes. This allows the flavors to mix well. After that, reduce the heat to low. Stir in one cup of heavy cream. Mix until it’s well blended. This will make the sauce creamy and rich. Next, add one cup of chopped fresh basil and one teaspoon of dried oregano. Season with salt and pepper to taste. Stir everything together, letting the sauce come alive with flavor. Now it’s time to fold in the cooked tortellini. Toss them gently in the sauce. Make sure each piece is well coated. Finally, add half a cup of grated Parmesan cheese. Stir until it melts and becomes creamy. Let everything heat through for another minute. This dish is now ready to serve! To make your sauce really pop, taste as you go. You can add salt, pepper, or even a pinch of sugar if it's too tart. If you like more flavor, try adding a dash of red pepper flakes. This adds a nice kick! For creaminess, make sure your heavy cream is fresh. It blends better and gives a rich taste. If you want extra creaminess, stir in more Parmesan cheese at the end. This makes the sauce even thicker and more delicious. When cooking tortellini, follow the package instructions closely. This helps you avoid overcooking. Overcooked pasta can become mushy and lose flavor. To check if it's done, taste a piece! If you want a fun twist, you can use other types of pasta. Bowtie or penne can work well too. Just remember to adjust the cooking time as needed. Pair your creamy tomato basil tortellini with a slice of crusty bread. This balances the meal nicely. A fresh salad with mixed greens also adds a nice crunch. For drinks, a light white wine like Pinot Grigio complements the dish perfectly. Its crisp flavor contrasts with the creamy sauce. If you prefer non-alcoholic options, try sparkling water with lemon. It’s refreshing and keeps it light! Pro Tips Use Fresh Basil: For the best flavor, use fresh basil leaves instead of dried. Add them at the end of cooking to retain their vibrant taste and aroma. Don't Overcook Tortellini: Follow the package instructions carefully to avoid mushy tortellini. They should be al dente for the best texture in the dish. Add a Kick: If you like a little heat, consider adding a pinch of red pepper flakes when you sauté the garlic for an extra layer of flavor. Make it Lighter: For a lighter version, substitute half-and-half or whole milk for heavy cream. This will reduce the richness while still keeping the dish creamy. {{image_2}} For a vegetarian twist, I suggest substituting protein sources. Use chickpeas or lentils for added protein. These legumes blend well with the creamy tomato sauce. They also boost nutrition while keeping the dish plant-based. You can also add vegetables for more flavor and texture. Spinach, zucchini, or bell peppers work great. Simply sauté them with garlic before adding the tomatoes. This way, you enhance both taste and nutrition. If you need gluten-free options, choose gluten-free tortellini. Many brands offer tasty alternatives made from rice or chickpeas. Check the package for cooking instructions, as they may differ from regular tortellini. For lactose-free options, try using coconut cream instead of heavy cream. It gives a rich texture without dairy. Additionally, find lactose-free cheese for a cheesy flavor without the lactose. To elevate the dish, add spices like red pepper flakes for heat. A pinch can make a big difference. You might also enjoy a dash of smoked paprika for a unique twist. Experimenting with other herbs can also be fun. Try thyme or parsley alongside basil. These herbs can give the dish a fresh, new flavor profile. Don't hesitate to mix and match based on what you have at home! You can keep creamy tomato basil tortellini in the fridge for up to three days. Store it in an airtight container to keep it fresh. I like to use glass containers, as they do not stain or retain odors. Make sure to let it cool down before sealing it up. This helps prevent excess moisture inside the container. You can freeze creamy tomato basil tortellini before or after cooking. If you freeze it before cooking, prepare the tortellini and sauce separately. Place them in freezer bags or containers. If you freeze it after cooking, let it cool first, then pack it away. To thaw, move the frozen tortellini to the fridge overnight. Reheat it in a pot over low heat. Stir gently and add a splash of cream or water if needed. This helps make the sauce creamy again. Enjoy your delicious meal anytime! Yes, you can use fresh tortellini. Fresh tortellini cooks faster than frozen. Make sure to follow the package instructions for cooking times. Fresh options often have a softer texture, which blends well with the creamy sauce. I love using fresh tortellini when I can find it. It adds a nice touch to the dish. You can use half-and-half or whole milk as a substitute. To keep the creaminess, add a little cornstarch to thicken. You might also consider cashew cream for a dairy-free option. Just blend soaked cashews with water until smooth. This keeps the dish rich and tasty without heavy cream. You can cook the tortellini and the sauce separately. Store them in airtight containers in the fridge. When you are ready to eat, combine them in a pot and heat gently. This method keeps the flavors fresh. You can also prepare the sauce in advance and add the tortellini later. Yes, you can make a vegan version. Use plant-based tortellini and substitute heavy cream with coconut milk or cashew cream. Nutritional yeast adds a cheesy flavor without dairy. Fresh basil enhances the taste, keeping it bright and fresh. This version is just as delicious! This dish combines cheese tortellini with a rich, creamy sauce. You start with simple ingredients like garlic, crushed tomatoes, and heavy cream. I shared tips to make your sauce perfect and ideas for serving. You can even modify it for various diets. Always remember, proper storage keeps your dish fresh for longer. Enjoy mixing flavors and trying new variations. A warm bowl of creamy tortellini never disappoints.
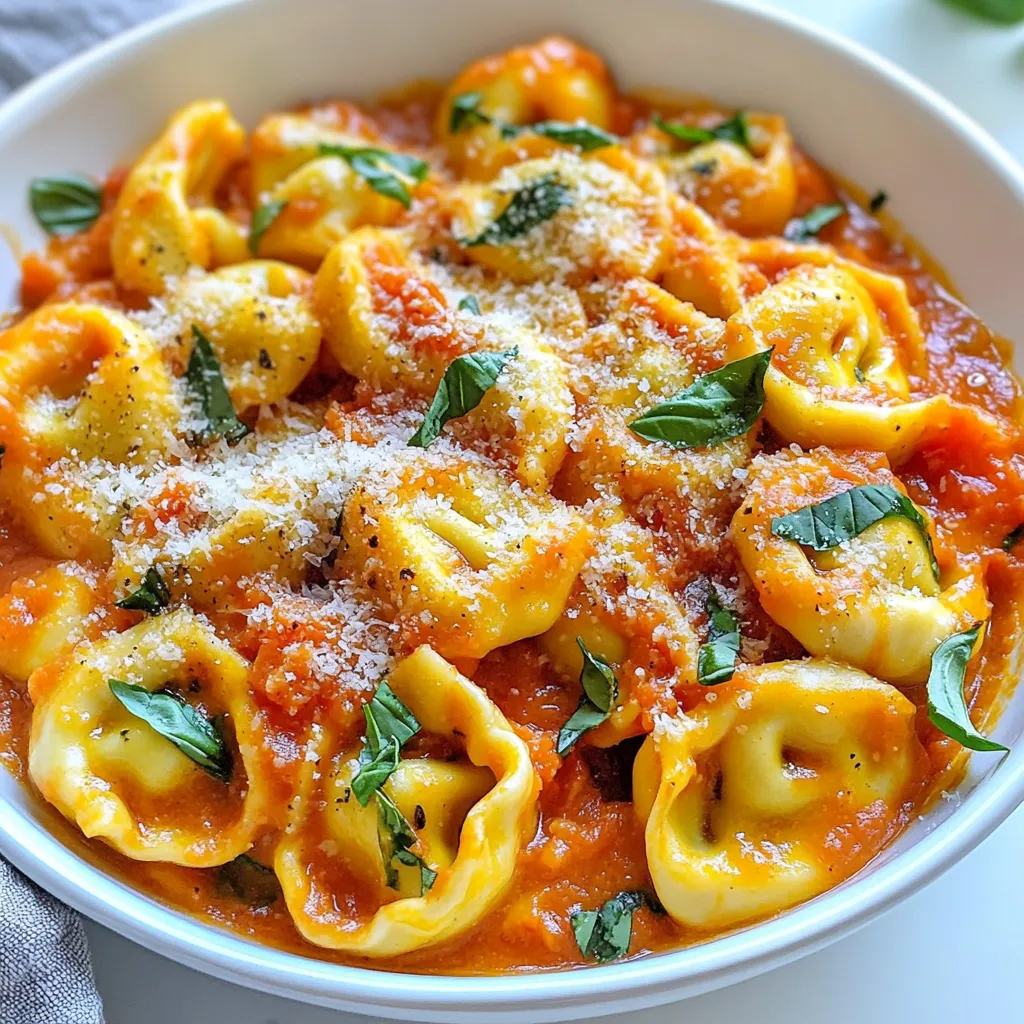
Creamy Tomato Basil Tortellini Easy Dinner Delight
If you’re searching for a quick and delicious dinner idea, look no further! This Creamy Tomato Basil Tortellini will delight your taste buds without keeping