Dinner

To create a delicious Million Dollar Chicken Casserole, gather the following ingredients: - 3 cups cooked, shredded chicken - 1 cup cream cheese, softened - 1 cup sour cream - 1 cup shredded cheddar cheese - 1 can (10.5 oz) cream of chicken soup - ½ cup green onions, chopped - 1 tablespoon garlic powder - 1 teaspoon onion powder - 2 cups frozen mixed vegetables (peas, carrots, corn) - 2 cups crushed buttery crackers (such as Ritz) - ½ cup melted butter - Salt and pepper to taste - Fresh parsley for garnish (optional) These ingredients blend together to form a creamy, savory dish. The chicken provides protein, while the cream cheese and sour cream add richness. The cheddar cheese gives it a nice flavor and melt. The cream of chicken soup acts as a binder, bringing everything together. Using frozen mixed vegetables makes this recipe quick. You can pick your favorites or use what's on hand. The buttery crackers on top add a crunchy finish. They create a lovely contrast to the creamy filling. Make sure to measure everything accurately. This way, you get the perfect balance of flavors. If you want to add your twist, consider mixing in some spices or fresh herbs. Enjoy the process of making this cozy family dish! {{ingredient_image_1}} - Preheat your oven to 350°F (175°C). This is key for even cooking. - In a large bowl, combine 1 cup of softened cream cheese, 1 cup of sour cream, and 1 can of cream of chicken soup. Mix until smooth. - Next, stir in 3 cups of cooked, shredded chicken, 1 cup of shredded cheddar cheese, and ½ cup of chopped green onions. - Add 1 tablespoon of garlic powder and 1 teaspoon of onion powder. Then, mix in 2 cups of frozen mixed vegetables. - Season the mix with salt and pepper. Make sure everything is well combined. - Spread the chicken mixture evenly into a greased 9x13-inch baking dish. Use a spatula for an even layer. - In a separate bowl, combine 2 cups of crushed buttery crackers with ½ cup of melted butter. Mix well until the crackers are coated. - Sprinkle this cracker mix evenly over the chicken mixture in the baking dish. - Bake the casserole in your preheated oven for 30-35 minutes. Look for it to be bubbly and the top golden brown. - Once done, let it cool for about 5 minutes before serving. This helps the flavors set. To make Million Dollar Chicken Casserole great, start with cream cheese. Ensure it is softened. This helps it blend smoothly with the other ingredients. If it is cold, the mixture may be lumpy. Next, taste as you go. Adjust the seasoning to fit your family's preferences. You can add more garlic powder for a stronger flavor or more salt for a savory kick. Don’t be afraid to experiment! When serving, pair the casserole with a side salad or garlic bread. The salad adds freshness, while the bread offers a nice crunch. These sides balance the dish well. Presentation matters too! Serve the casserole in individual bowls for a warm touch. A sprinkle of extra shredded cheddar and fresh parsley on top makes it look fancy. Adding these garnishes also enhances the flavor and color of the dish. Feel free to explore more ideas to elevate your serving game! Pro Tips Use Rotisserie Chicken: For a quicker option, use store-bought rotisserie chicken instead of cooking your own. It saves time and adds great flavor. Customize Vegetables: Feel free to swap out the frozen mixed vegetables for your favorites like broccoli or bell peppers. This adds a personal touch! Make Ahead: Prepare the casserole in advance and store it in the refrigerator. Just bake it when you're ready for a quick meal! Perfectly Golden Topping: For an extra crispy topping, broil the casserole for the last 2-3 minutes of baking. Keep a close eye to avoid burning! {{image_2}} You can change up the veggies in this dish. Try adding bell peppers, zucchini, or broccoli. Each adds its own flavor and color. If you want it dairy-free, use cashew cream instead of cream cheese. For sour cream, try coconut yogurt. Both options keep the dish creamy. If you don’t have chicken, use cooked, shredded turkey. It works great with the same flavors. You can also use shredded beef for a heartier meal. Just ensure it's well-cooked and seasoned before mixing in. To make this casserole gluten-free, choose gluten-free crackers. Brands like Schär or Crunchmaster offer tasty options. You can also crush gluten-free bread for a similar topping. Just make sure to check the labels for any hidden gluten. To store leftovers, first let the casserole cool. Then, cover it tightly with plastic wrap or aluminum foil. You can also use an airtight container. In the fridge, it lasts about 3 to 4 days. Make sure to label it with the date. This way, you know when to eat it. If you want to freeze the casserole, first cool it completely. Cut it into individual portions for easy reheating. Wrap each piece in plastic wrap, then place it in a freezer bag. This helps save space and keep it fresh. It can last up to 3 months in the freezer. When you’re ready to eat, thaw it in the fridge overnight. To reheat, place it in a preheated oven at 350°F (175°C) until hot, about 20-30 minutes. You can also microwave it if you're in a hurry. Just ensure it heats evenly. Enjoy your meal! Million Dollar Chicken Casserole is a creamy, savory dish. It blends tender chicken, rich cheeses, and veggies. The dish is named for its rich taste and comforting vibe. While its origin is not clear, it has become a favorite in many homes. Families enjoy it for its ease and great flavor. You can prepare Million Dollar Chicken Casserole a day ahead. Start by mixing all the ingredients in a bowl. Place the mixture in a baking dish and cover it with plastic wrap. Store it in the fridge until you are ready to bake. When you are ready, just remove the wrap and bake as usual. This saves time and makes meal planning easy! Yes, you can adjust the recipe. For a smaller batch, cut the ingredients in half. Use a smaller baking dish for best results. If you need a larger batch, double the ingredients. Use a bigger dish to fit it all. This dish is great for gatherings or family dinners! You learned how to make Million Dollar Chicken Casserole with easy steps and tips. This dish blends creamy flavors and crunchy toppings. Remember, you can adjust the ingredients to fit your taste. Try different proteins or make it gluten-free. Store leftovers properly to enjoy later. This recipe is simple, delicious, and great for any meal. Now, gather your ingredients and bake a warm, tasty dish for your family!
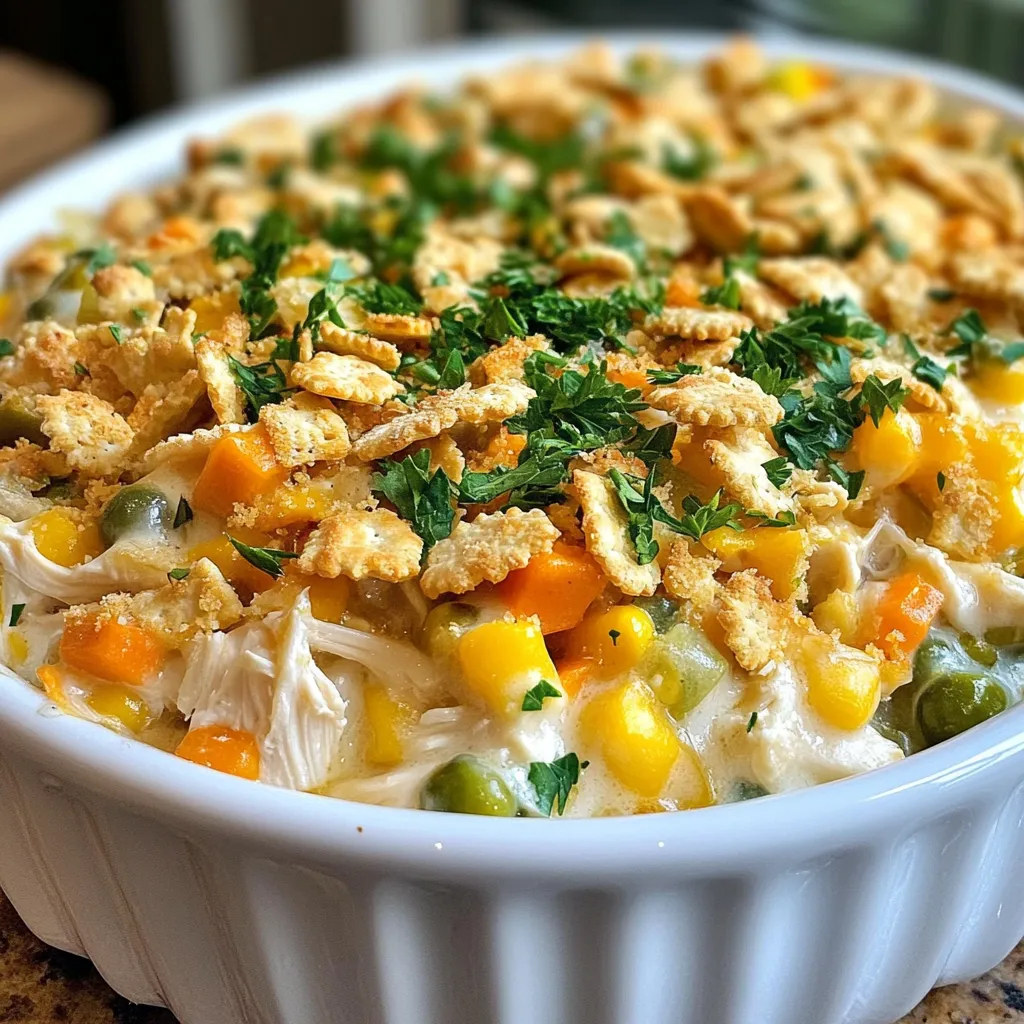
Million Dollar Chicken Casserole Easy Family Dish
Are you looking for a delicious, easy dinner that your whole family will enjoy? The Million Dollar Chicken Casserole is the answer! This comforting dish
To make Greek meatballs, gather these ingredients: - 1 pound ground beef - 1 cup breadcrumbs (preferably whole wheat) - 1/2 cup feta cheese, crumbled - 1/4 cup fresh parsley, finely chopped - 2 cloves garlic, minced - 1 teaspoon dried oregano - 1 teaspoon cumin - 1/2 teaspoon salt - 1/4 teaspoon black pepper - 1 egg, beaten - 1/4 cup milk - 1 tablespoon olive oil (for cooking) - Tzatziki sauce (for serving) You can swap some ingredients for a different taste: - Use ground lamb instead of beef for a richer flavor. - Try gluten-free breadcrumbs if you need a gluten-free dish. - Substitute goat cheese for feta cheese for a tangy twist. - Use fresh dill instead of parsley for a unique flavor. - Replace cumin with paprika for a milder taste. To make these meatballs, you need some key kitchen tools: - A large mixing bowl for combining ingredients. - A skillet to cook the meatballs. - A spatula for turning the meatballs in the skillet. - A baking sheet lined with paper towels to drain excess oil. - Measuring cups and spoons for accurate ingredient amounts. These ingredients and tools will help you create tasty Greek meatballs. Enjoy the process and have fun cooking! {{ingredient_image_1}} To start, grab a large mixing bowl. Add 1 pound of ground beef. Then, add 1 cup of breadcrumbs. Whole wheat is best. Next, crumble in 1/2 cup of feta cheese. This adds a lovely flavor. Chop 1/4 cup of fresh parsley finely. Add it to the bowl. Then, mince 2 cloves of garlic and toss them in too. Now, sprinkle in 1 teaspoon of dried oregano and 1 teaspoon of cumin. Add 1/2 teaspoon of salt and 1/4 teaspoon of black pepper. These spices will make your meatballs pop. Finally, pour in 1 beaten egg and 1/4 cup of milk. Mix everything well. You can use your hands for the best blend. Now it's time to shape your meatballs. Take a small scoop of the mixture. Aim for about 1 inch in diameter. Roll it gently between your hands. Place each meatball on a clean plate. Make sure they are not touching. This way, they will cook evenly later. Heat a large skillet over medium heat. Add 1 tablespoon of olive oil once the skillet is hot. Carefully place the meatballs in the skillet. Do this in small batches so you don't overcrowd the pan. Cook for about 5 to 7 minutes. Turn the meatballs occasionally. You want them browned all over and fully cooked. Once done, take them out and place them on a paper towel to drain any extra oil. Serve your meatballs hot. Pair them with tzatziki sauce for a tasty dip. To get the best texture for your Greek meatballs, use the right mix. Ground beef gives a nice flavor. Adding breadcrumbs makes them light and fluffy. Whole wheat breadcrumbs work well for extra taste. Keep the mixture moist by adding milk and an egg. Don't overmix; just blend until combined. This helps them stay tender and juicy. You can boost the meatball flavor with fresh herbs. Try using dill or mint for a twist. Garlic adds a nice kick, while feta cheese gives a creamy taste. Don’t forget the spices! Oregano and cumin add warmth and depth. For extra zing, serve with tzatziki sauce. It complements the meatballs wonderfully. You can cook Greek meatballs in different ways. The skillet method is quick and easy. It gives a nice brown crust. Baking is another great option. It uses less oil and is healthier. If you like grilling, that works too! Grilling adds a smoky flavor. Choose the method you enjoy most for delicious results. Pro Tips Use Fresh Herbs: Fresh parsley can elevate the flavor of your meatballs, making them more aromatic and vibrant. Consider adding mint for an extra Mediterranean touch! Don’t Overmix: When combining the ingredients, be careful not to overmix the meat. This can lead to tough meatballs; mix just until combined for a tender texture. Cooking in Batches: To ensure even cooking, cook the meatballs in batches. Overcrowding the pan can cause steaming instead of browning, leading to less flavorful meatballs. Experiment with Spices: Feel free to customize the spices based on your taste preferences. Adding a pinch of cinnamon or smoked paprika can give your meatballs a unique twist! {{image_2}} You can use many proteins for Greek meatballs. Instead of beef, try ground lamb. Lamb has a rich flavor that pairs well with herbs. Ground turkey or chicken works too. These meats are leaner, but they still taste great. Adjust the cooking time slightly for these lighter meats. They should cook quickly, so keep an eye on them. Want a meat-free version? Use chickpeas or lentils as a base. Mash them up and mix with breadcrumbs, feta, and herbs. You can also add grated zucchini for moisture. This adds flavor and keeps the mix light. Use the same spices for a tasty twist. Shape into balls and cook just like the meat version. You can change the flavors in your meatballs easily. Add sun-dried tomatoes for a burst of flavor. Fresh mint or dill can give a refreshing taste. If you like spice, mix in some red pepper flakes. For a smoky flavor, try smoked paprika. These simple changes make each batch unique. Experiment and find your favorite combination! You can keep leftover meatballs in an airtight container. Place them in the fridge. They stay fresh for up to three days. Let them cool before sealing. This helps keep them from getting soggy. To freeze cooked meatballs, let them cool completely. Then, arrange them in a single layer on a baking sheet. Place the sheet in the freezer for about an hour. Once firm, transfer the meatballs to a freezer bag. They can last for up to three months. Make sure to label your bags with the date. When you are ready to eat your frozen meatballs, thaw them overnight in the fridge. You can reheat them in the oven or on the stovetop. For the oven, preheat it to 350°F. Place the meatballs in a baking dish with a bit of sauce. Bake for about 15-20 minutes. On the stovetop, heat them in a skillet over medium heat, adding a splash of water or sauce to keep them moist. This method makes them taste fresh and delicious. Greek meatballs pair well with tzatziki sauce, which adds a cool touch. You can also serve them with pita bread for a nice wrap. Fresh salad, rice, or roasted vegetables make great sides too. The flavors blend well, making a tasty meal. Yes, you can make Greek meatballs ahead of time. Prepare the meat mixture and shape the balls. Place them on a tray and freeze for later use. Once frozen, store them in a bag. When ready, cook them straight from the freezer or thaw first. To keep Greek meatballs juicy, use a mix of ground beef and feta cheese. The cheese adds moisture. Don't overcook them; aim for a nice brown crust. Adding milk to the mix keeps them soft. Using fresh herbs also enhances flavor and moisture. This article covered all the steps to make great Greek meatballs. We discussed ingredients, cooking methods, and tasty tips. You can try different proteins and textures to find what you like best. Remember to store any leftovers properly and reheat them well. Meatballs can be a fun dish to share and enjoy. Now, it’s your turn to give these recipes a shot and impress everyone with your cooking skills!
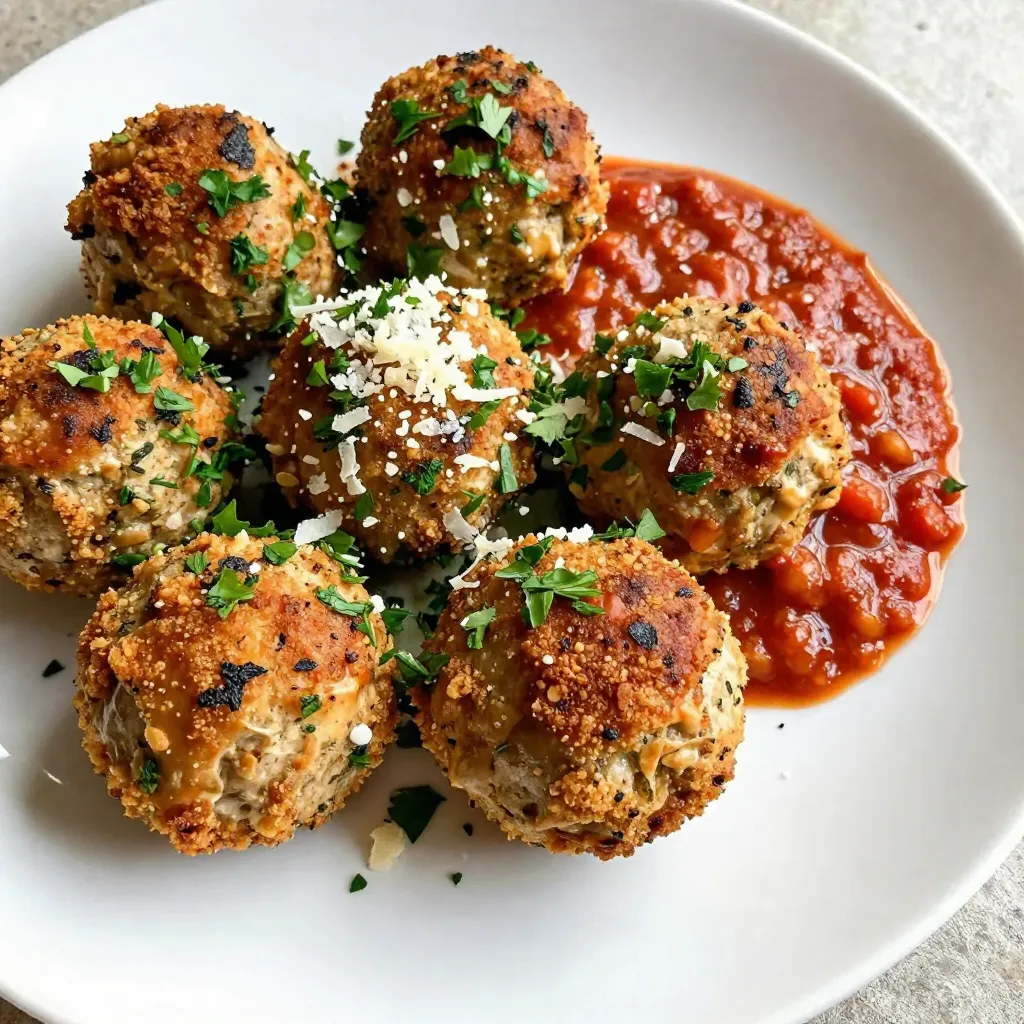
Greek Meatballs Flavorful and Easy Recipe Guide
Are you ready to bring the vibrant flavors of Greece to your kitchen? In this guide, I’ll show you how to create delicious Greek meatballs
To make garlic herb chicken meatballs, gather these items: - 1 lb ground chicken - 1/2 cup breadcrumbs - 1/4 cup grated Parmesan cheese - 1/4 cup fresh parsley, chopped - 2 cloves garlic, minced - 1 teaspoon dried oregano - 1 teaspoon dried thyme - 1/2 teaspoon salt - 1/4 teaspoon black pepper - 1 large egg - 2 tablespoons olive oil for frying - Marinara sauce for serving (optional) When cooking, using fresh and high-quality ingredients matters. Fresh parsley adds a bright flavor. Use real Parmesan cheese for richness. Choose good ground chicken with a bit of fat for moisture. Fresh garlic gives a strong taste, while dried herbs need to be fragrant. Always check the expiration dates on your spices. You can easily swap out some ingredients. If you have gluten issues, use gluten-free breadcrumbs. For a dairy-free option, skip the cheese or use a vegan substitute. If you want a leaner meat, ground turkey works well. Always adjust spices to fit your taste. {{ingredient_image_1}} Start by gathering your ingredients. You will need ground chicken, breadcrumbs, Parmesan cheese, parsley, garlic, oregano, thyme, salt, pepper, and an egg. In a large bowl, add the ground chicken. Next, sprinkle in the breadcrumbs and Parmesan cheese. Chop the parsley and add it in. Then, mince the garlic and mix it into the bowl. Add the oregano, thyme, salt, and pepper. Finally, crack the egg into the mixture. Use your hands to mix everything until it is well blended. This step is key for great flavor. Once your chicken mixture is ready, it's time to shape the meatballs. Take a small amount of the mixture in your hands. Roll it into a ball about one inch wide. Repeat this process until all the mixture is shaped into meatballs. This step can be fun! You can make them bigger or smaller if you like, but keep them even in size for even cooking. Now, heat a large skillet over medium heat. Add olive oil to the pan and let it warm up. Once the oil is hot, add the meatballs in batches. Do not overcrowd the skillet. This helps them cook evenly. Cook the meatballs for 6 to 8 minutes. Turn them occasionally to get a nice golden brown color. When they are cooked through, you can remove them from the skillet. If you want, let them drain on paper towels. You can serve them with marinara sauce for dipping or on top of spaghetti. Enjoy your flavorful dinner! You can cook these meatballs in different ways. Baking is a great option. Preheat your oven to 400°F. Place the meatballs on a baking sheet lined with parchment paper. Bake for 20-25 minutes. This method makes them crispy outside and tender inside. Grilling also works well. Use skewers to hold the meatballs. Grill them for about 10-12 minutes, turning often. This adds a nice smoky flavor. To keep your meatballs moist, do not overmix the chicken. Just blend the ingredients until combined. Adding breadcrumbs helps too. They soak up moisture and keep meatballs soft. Use fresh parsley and garlic for flavor. These ingredients also hold moisture. Lastly, avoid cooking them too long. Check for doneness after 6-8 minutes. Having the right tools makes cooking easier. Here are some must-haves: - Large mixing bowl: For combining ingredients. - Skillet: A non-stick skillet works best for frying. - Spatula: Use this to flip the meatballs gently. - Baking sheet: If you choose to bake, you need one. - Meat thermometer: This helps check if the meatballs are done. These tools help you create perfect garlic herb chicken meatballs every time! Pro Tips Keep It Moist: To ensure your chicken meatballs remain juicy, avoid overmixing the meat mixture and handle it gently when forming the balls. Flavor Boost: For an extra kick, consider adding red pepper flakes or a splash of lemon juice to the mixture for added depth of flavor. Cook Evenly: Make sure your meatballs are uniform in size to ensure they cook evenly. A standard cookie scoop can help with this. Batch Cooking: These meatballs freeze well. After cooking, let them cool and freeze in a single layer before transferring to a freezer bag for easy meal prep. {{image_2}} You can change the flavor of your meatballs by adding herbs and spices. For a zesty kick, try adding fresh basil or rosemary. These herbs can brighten up the taste. If you love heat, a pinch of red pepper flakes works well. Just remember to start small; you can always add more if you want. Mixing in spices like paprika or cumin can give your meatballs a unique twist. Experiment with what you like! Veggies can make your meatballs even better. Finely chopped spinach or zucchini adds moisture and nutrients. Grated carrots can also sweeten the mix. You can sneak in more fiber this way. Just be sure to squeeze out extra moisture from the veggies. This step helps keep your meatballs firm. Adding vegetables makes the meal colorful and healthy. If you want to switch up the protein, ground turkey or beef works great, too. Turkey gives a lighter taste, while beef adds richness. You can use the same amount, just like with chicken. Each option has its own flavor, so choose what you love. This flexibility allows you to cater to different dietary needs. Remember to adjust cooking times if you use a different kind of meat. To store leftover meatballs, let them cool first. Place them in an airtight container. You can keep them in the fridge for up to three days. Make sure to label the container with the date. If you want to keep them longer, consider freezing. To freeze your garlic herb chicken meatballs, first cool them completely. Then, arrange them in a single layer on a baking sheet. Freeze them for about one hour until firm. After that, transfer the meatballs to a freezer-safe bag. Remove as much air as you can before sealing. You can freeze them for up to three months. Reheating meatballs is easy. You can use the microwave or the oven. For the microwave, place meatballs on a plate and cover with a damp paper towel. Heat for 1-2 minutes until warm. For the oven, preheat to 350°F. Place meatballs on a baking sheet and heat for 10-15 minutes. Serve them with marinara sauce for extra flavor. Yes, you can use ground turkey instead of chicken. Ground turkey has a similar texture. It will also soak up the garlic and herbs well. Just make sure to check the cooking time. Ground turkey may cook a bit differently than chicken. You can make meatballs ahead of time easily. First, prepare the meatballs as the recipe says. After shaping them, place them on a baking sheet. Freeze the meatballs for about one hour. Once firm, transfer them to a bag. You can store them in the freezer for up to three months. When you're ready, cook them from frozen, adding a few more minutes to the cooking time. There are many great sides for garlic herb meatballs. Some tasty options include: - Spaghetti with marinara sauce - A fresh green salad - Garlic bread - Steamed vegetables - Mashed potatoes These sides will complement the flavors of the meatballs well. Choose what you like best! This post covered everything you need for delicious garlic herb meatballs. We looked at the best ingredients, key cooking steps, and useful tips. You can even explore fun variations and smart storage options. Remember, these meatballs can fit various diets and preferences. Your cooking journey can be simple, tasty, and satisfying. Enjoy these meatballs with your favorite sides and make mealtime fun!
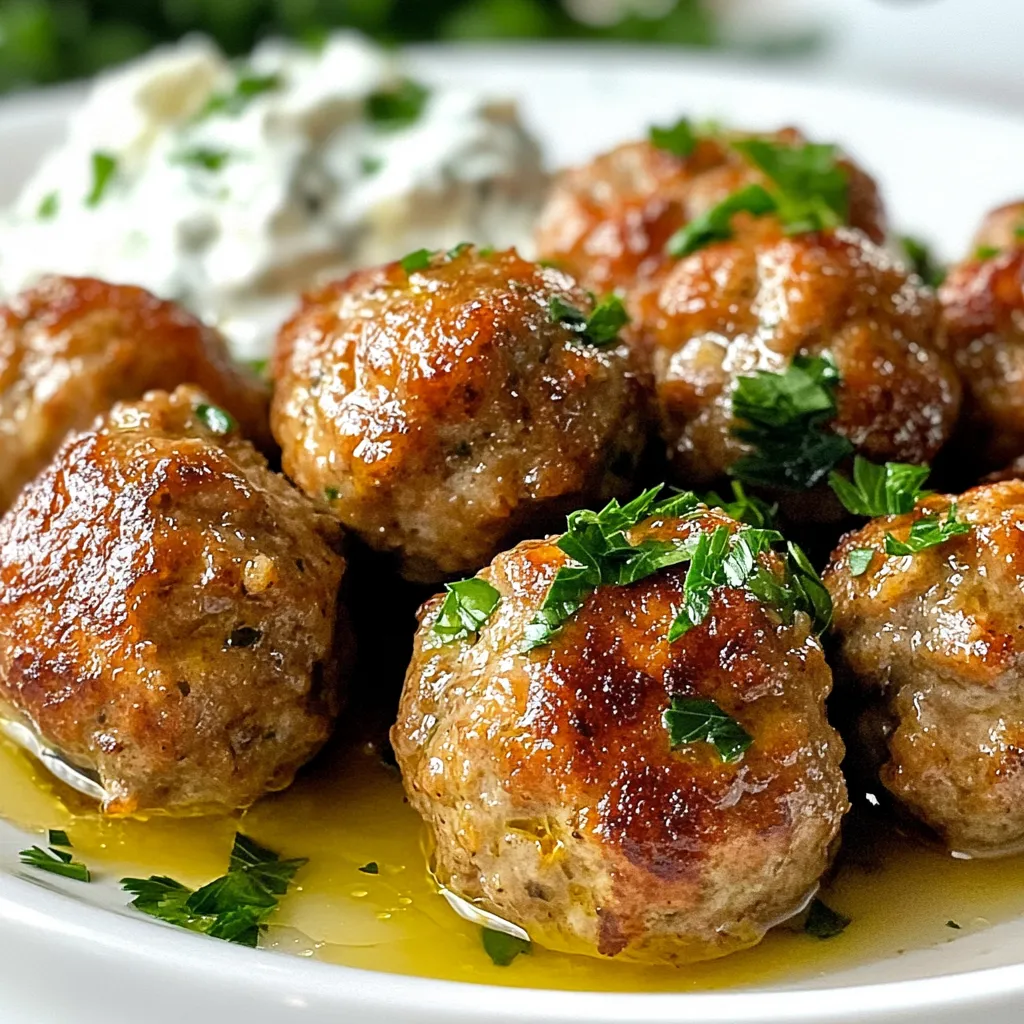
Garlic Herb Chicken Meatballs Flavorful Dinner Idea
Want a simple, tasty dinner? Garlic Herb Chicken Meatballs are your answer! Packed with flavor, these meatballs come together quickly and satisfy everyone at the
When making sheet pan chicken fajitas, you need fresh and tasty ingredients. Here’s what you will use: - 1 lb boneless, skinless chicken breasts, sliced into thin strips - 1 red bell pepper, sliced - 1 yellow bell pepper, sliced - 1 green bell pepper, sliced - 1 red onion, sliced - 3 tablespoons olive oil - 2 teaspoons chili powder - 1 teaspoon cumin - 1 teaspoon garlic powder - 1 teaspoon onion powder - 1 teaspoon smoked paprika - Salt and pepper to taste - 8 small flour tortillas - Fresh cilantro, chopped (for garnish) - Lime wedges (for serving) Each ingredient plays a role in adding flavor and texture. The chicken is the star, while the peppers and onion add crunch. The spices bring warmth and depth to your dish. Use fresh ingredients for the best taste. You can find most of these items at your local grocery store. {{ingredient_image_1}} First, preheat your oven to 425°F (220°C). This high heat helps to cook the chicken and veggies fast. Next, grab a large baking sheet and line it with parchment paper. This makes for an easy cleanup later. In a large bowl, combine the sliced chicken, red bell pepper, yellow bell pepper, green bell pepper, and red onion. Make sure everything is evenly mixed. Now, drizzle 3 tablespoons of olive oil over the mixture. Next, add the spices: 2 teaspoons of chili powder, 1 teaspoon of cumin, 1 teaspoon of garlic powder, 1 teaspoon of onion powder, and 1 teaspoon of smoked paprika. Finally, season with salt and pepper to taste. Toss all the ingredients together until they are well coated with the oil and spices. Spread the chicken and vegetable mixture in a single layer on the prepared baking sheet. This helps everything cook evenly. Bake in the preheated oven for 20-25 minutes. Check the chicken’s internal temperature; it should reach 165°F (74°C). The veggies should be tender and slightly charred. Be sure to toss the mixture halfway through for even cooking. While the chicken and veggies bake, warm the flour tortillas in a dry skillet over medium heat. Heat them for about 30 seconds on each side until they are soft and pliable. Once your chicken and veggies are done, take the baking sheet out of the oven and let it cool for a few minutes. Serve the chicken and veggies in the warm tortillas. Don’t forget to garnish with fresh cilantro and serve lime wedges on the side for a zesty kick! Choosing the right chicken Use boneless, skinless chicken breasts. They cook fast and stay juicy. Slice them into thin strips. This helps them cook evenly and absorb flavors well. Best vegetables for flavor Bell peppers and red onion work best. Use red, yellow, and green bell peppers for color and taste. They add sweetness and crunch to your fajitas. Red onion gives a nice sharpness that balances the dish. Achieving the right char Bake your fajitas at 425°F (220°C). This high heat helps create a nice char. Spread the chicken and veggies in a single layer on the sheet. Avoid overcrowding; this lets them brown properly. How to avoid dry chicken Toss the chicken with olive oil and spices before baking. This keeps it moist. Check the chicken's internal temperature; it should reach 165°F (74°C). Tossing halfway through cooking also helps keep it juicy. Pro Tips Marinate for Extra Flavor: For even more flavorful chicken, marinate it in the spices and olive oil for at least 30 minutes or up to overnight in the fridge. Use Fresh Ingredients: Fresh bell peppers and onions not only add vibrant colors but also enhance the dish's overall flavor and texture. Toss for Even Cooking: Remember to toss the chicken and veggies halfway through baking to ensure they cook evenly and develop a nice char. Customize Your Toppings: Feel free to add your favorite toppings like avocado, sour cream, or cheese to enhance your fajitas! {{image_2}} You can easily swap chicken for other proteins. Try using shrimp or beef for a change. Both options add unique flavors. Shrimp cooks fast, while beef can add a nice chew. If you prefer plant-based meals, use tofu or tempeh. Both soak up flavors well. Just marinate them like chicken before baking. Spice up your fajitas with extra seasonings. You can add cayenne pepper for heat or smoked paprika for depth. Other spices like oregano or coriander also work great. For veggies, try adding zucchini or mushrooms. These will add more texture and taste. Mix and match to find your favorite combination. Pair your fajitas with tasty sides. Rice or beans make excellent options. You can also serve them with a fresh salad. For toppings, consider guacamole or sour cream. Fresh salsa adds a nice kick too. Don't forget to sprinkle some cheese for extra creaminess. Enjoy your meal with lime wedges for a zesty finish! To store leftovers, let the fajitas cool first. Place them in an airtight container. Make sure to separate the chicken and veggies from the tortillas. Store them in the fridge for up to three days. Label the container with the date. This helps you remember when you made them. To freeze the fajitas, let them cool completely. Put the chicken and veggies in a freezer-safe bag. Remove as much air as you can to prevent freezer burn. You can freeze them for up to three months. For tortillas, wrap them in plastic wrap and freeze in a separate bag. When ready to eat, thaw in the fridge overnight. To reheat, you can use the oven or a skillet. If using the oven, preheat it to 350°F (175°C). Spread the chicken and veggies on a baking sheet. Heat for about 10-15 minutes until warm. If using a skillet, add a splash of water and cover with a lid. This helps keep the fajitas moist. Enjoy the great flavor! To check if the chicken is done, use a meat thermometer. Insert it into the thickest part of the chicken. The safe internal temperature is 165°F (74°C). This ensures your chicken is cooked through and safe to eat. If you don’t have a thermometer, cut into the chicken. The meat should be white, not pink. Yes, you can prep the chicken and veggies ahead. Slice the chicken and vegetables the night before. Store them in a sealed container in the fridge. You can also mix the spices in advance. When you’re ready, just toss everything together and bake. This saves time on busy nights. You can serve chicken fajitas with many sides. Some great options include: - Mexican rice - Black beans - Corn salad - Guacamole - Salsa - Sour cream For drinks, try a fresh limeade or a light beer. These pair well with the flavors of fajitas. This blog post covers how to make delicious chicken fajitas from start to finish. We discussed the key ingredients, preparation steps, and cooking techniques to create the best flavors. You learned about variations and smart storage tips for leftovers. In the end, making fajitas can be simple and fun. Experiment with different proteins and spices to match your tastes. Enjoy this dish as a crowd-pleaser for any meal!
Sheet Pan Chicken Fajitas Quick and Flavorful Meal
Get ready for a quick and tasty dinner with my Sheet Pan Chicken Fajitas! This recipe combines juicy chicken and colorful veggies, all cooked on
- 3-4 pounds chuck roast - 2 tablespoons vegetable oil - 1 cup onion, sliced - 4 cloves garlic, minced - 1 tablespoon ginger, minced - 1/3 cup gochujang (Korean chili paste) - 1/4 cup soy sauce - 1/4 cup honey - 2 cups beef broth - 3 medium carrots, cut into chunks - 2 cups baby potatoes, halved - 1 tablespoon sesame oil - Salt and pepper to taste - Sliced green onions and sesame seeds for garnish Gochujang is key. This Korean chili paste adds heat and a touch of sweetness. It gives the roast its unique flavor. You can find gochujang in Asian markets or online. Soy sauce adds umami and saltiness. Honey balances the heat. Sesame oil adds rich, nutty flavor. If you cannot find gochujang, you can use Sriracha or red pepper flakes. For soy sauce, low-sodium soy sauce works. You can swap honey with maple syrup or brown sugar. If you prefer a different meat, beef brisket or pork shoulder are good choices. {{ingredient_image_1}} To start, gather all your ingredients. You will need: - 3-4 pounds chuck roast - 2 tablespoons vegetable oil - 1 cup onion, sliced - 4 cloves garlic, minced - 1 tablespoon ginger, minced - 1/3 cup gochujang - 1/4 cup soy sauce - 1/4 cup honey - 2 cups beef broth - 3 medium carrots, cut into chunks - 2 cups baby potatoes, halved - 1 tablespoon sesame oil - Salt and pepper to taste - Sliced green onions and sesame seeds for garnish Next, season the chuck roast well with salt and pepper. Make sure to cover all sides. This step enhances the flavor of the meat. Now, heat the vegetable oil in a large Dutch oven over medium-high heat. Once hot, add the chuck roast. Sear it for 4-5 minutes on each side until it's a nice brown color. This step locks in the juices. Remove the roast and set it aside. In the same pot, add the onion, garlic, and ginger. Sauté these for about 3-4 minutes. You want the onion to become soft and clear. Next, stir in the gochujang, soy sauce, and honey. Cook for another 2-3 minutes. This mix will give your pot roast a sweet and spicy kick! Pour in the beef broth and scrape the pot's bottom. This will lift any tasty bits stuck to the pot. Put the seared chuck roast back into the pot along with the carrots and halved potatoes. Make sure everything is covered by the liquid. Bring the pot to a boil, then lower the heat. Cover and let it simmer for about 3 hours. The meat will become soft and easy to shred. After cooking, take the roast out of the pot. Let it rest for 10 minutes. This helps the juices settle. While it rests, stir in the sesame oil into the pot juices. This adds a rich flavor to the dish. Now, slice the pot roast against the grain. Serve it over rice or noodles. Drizzle the sauce from the pot on top. Garnish with sliced green onions and sesame seeds. Enjoy your Korean style pot roast! To get tender meat, start with a good cut. I like chuck roast because it has fat. The fat melts during cooking, making the meat juicy and soft. Sear the roast well before cooking. This locks in flavor and moisture. Cook it low and slow for the best results. Aim for three hours of simmering. This helps break down the tough fibers. When done, let the roast rest. This step keeps the juices in the meat. If you want more heat, add more gochujang. Start with a little and taste as you go. You can also mix in some red pepper flakes for extra kick. If it becomes too spicy, balance it with honey. Honey adds sweetness and helps reduce heat. Always remember to season to your taste. Food should be fun and enjoyable! Leftovers can be a treasure! Use them in sandwiches or tacos. Shred the meat and mix it with some sauce. You can add it to rice or noodles for a quick meal. Make a soup by adding broth and veggies. It’s a great way to use what you have. Don’t waste food; get creative and enjoy! Pro Tips Choose the Right Cut: Opt for a chuck roast, as it has the perfect amount of fat and marbling, ensuring a tender and flavorful pot roast. Don't Skip the Sear: Searing the roast before braising enhances the flavor and adds depth to the overall dish. Adjust Spice Level: If you prefer a milder taste, reduce the amount of gochujang or balance it with additional honey. Rest the Meat: Allowing the roast to rest before slicing helps retain its juices, resulting in a more succulent meal. {{image_2}} You can make a plant-based version of this dish. Start by using a large portobello mushroom or jackfruit as your "meat." Both options absorb flavors well. Cook them in the same way as the chuck roast. Replace beef broth with vegetable broth for a rich base. Use the same seasonings to keep that Korean kick. The gochujang will provide the needed spice, and the honey can be swapped for maple syrup for a vegan option. While chuck roast is great, you can try different meats. Brisket is one choice; it gets tender and juicy. Round roast works too but may be leaner. If you want chicken, thighs are best as they stay moist. For a leaner option, use pork shoulder. Each meat will change the taste but keep the dish delicious. Remember to adjust cooking times based on the meat you choose. You can customize the flavor of your pot roast easily. If you like it spicy, add more gochujang or some red pepper flakes. For a sweeter taste, increase the honey. If you want a deeper flavor, toss in some mushrooms or add a splash of rice wine. You can also mix in sesame seeds for extra crunch. Each tweak can create a new twist on this classic dish, making it uniquely yours. To store unused portions, first let the pot roast cool. Cut the roast into slices. Place the slices in an airtight container. Pour some of the pot juices over the meat to keep it moist. Seal the container well. Store it in the fridge if you plan to eat it in 3 to 4 days. To reheat, take the pot roast out of the fridge. Place the slices in a pan. Add a splash of beef broth or water to keep it moist. Heat on low over the stove until warm. You can also use the microwave. Cover the roast with a damp paper towel. Microwave in short bursts until hot. If you want to save the pot roast for later, freezing is a great option. Cut the roast into serving sizes. Wrap each piece tightly in plastic wrap. Then place the wrapped portions in a freezer bag. Remove as much air as possible from the bag. Label it with the date. You can freeze it for up to three months. Gochujang is a thick, red chili paste. It adds a unique sweet and spicy flavor to dishes. It contains chili powder, fermented soybeans, and salt. You can find gochujang in Asian markets or online. Many grocery stores also sell it in the international aisle. Look for jars or packets that are labeled “gochujang.” Yes, you can cook this recipe in a slow cooker. First, sear the chuck roast in a pan as the recipe says. Then, place it in the slow cooker. Add the onions, garlic, ginger, gochujang, soy sauce, honey, beef broth, carrots, and potatoes. Cook on low for 8 hours or on high for 4 hours. This makes the meat very tender and full of flavor. You can serve many side dishes with Korean Style Pot Roast. Here are some ideas: - Steamed rice or jasmine rice - Kimchi for a spicy kick - Pickled vegetables for crunch - Sautéed greens like spinach or bok choy - Simple cucumber salad for freshness These sides balance the rich flavors of the pot roast. Enjoy experimenting with different combinations! This blog post covered key ingredients, cooking steps, and handy tips for your dish. Understanding special Korean ingredients like gochujang can enhance your flavors. We also explored storage methods to keep leftovers fresh. Remember, cooking is about creativity. Adjust spices and experiment with proteins or vegan options. With these pointers, you can make a delicious meal that fits your taste. Enjoy the cooking process and share it with others! Your culinary journey in Korean cooking starts here.
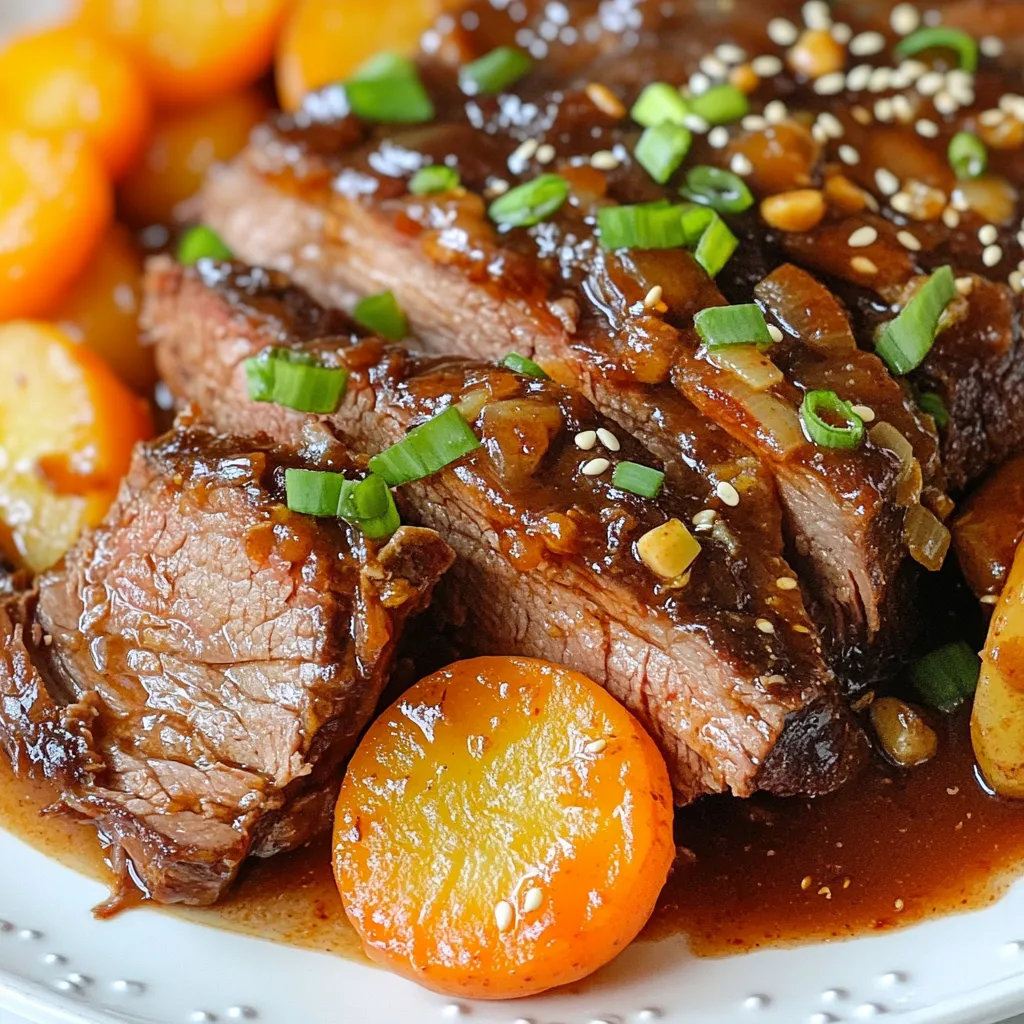
Korean Style Pot Roast Flavorful Comfort Meal
If you’re craving a warm, flavorful meal, Korean Style Pot Roast will hit the spot. This dish blends rich flavors and tender meat for a
- 4 bone-in, skin-on chicken thighs - 1 teaspoon salt - 1/2 teaspoon black pepper - 1 teaspoon garlic powder - 1 teaspoon onion powder - 1 large onion, sliced - 2 cloves garlic, minced - 1 bell pepper, sliced (any color) - 2 cups low-sodium chicken broth - 1 cup heavy cream - 1 tablespoon Worcestershire sauce (optional) - 1 teaspoon smoked paprika - Fresh parsley for garnish When I make Southern Smothered Chicken, I always start with the chicken. The thighs bring great flavor and tenderness. I use bone-in and skin-on for the best results. Next, I season them well. I mix salt, black pepper, garlic powder, and onion powder. This combination gives a nice balance of flavor. Now let's talk about the veggies. I love using a large onion, sliced thick. The onion adds sweetness as it cooks down. I also use two cloves of minced garlic for that rich aroma. A bell pepper adds color and crunch. You can choose any color you like, but I lean towards green or red. Now for the gravy, which makes everything special. I use low-sodium chicken broth to control the saltiness. I add heavy cream for a rich, creamy texture. If you want a little kick, Worcestershire sauce is a great option. I finish it off with smoked paprika for a deep flavor. Finally, fresh parsley makes a lovely garnish. It adds color and a hint of freshness. This dish is all about layers of flavor and comfort. Each ingredient plays a role in creating the amazing taste that makes Southern Smothered Chicken a family favorite. {{ingredient_image_1}} - Season the Chicken First, I mix salt, black pepper, garlic powder, and onion powder in a small bowl. This blend gives the chicken great flavor. I rub this mix all over the chicken thighs. I make sure to get some under the skin for extra taste. - Brown the Chicken Next, I heat vegetable oil in a large skillet over medium-high heat. Once the oil is hot, I add the seasoned chicken thighs skin-side down. I let them cook for about 5 to 7 minutes until the skin is golden brown. Then, I flip the chicken and cook for another 5 minutes. After browning, I remove the chicken from the skillet and set it aside. - Sauté the Vegetables In the same skillet, I add the sliced onion, minced garlic, and bell pepper. I sauté these for about 5 minutes. I want the onions to be soft and translucent. This step builds a nice base for the gravy. - Pour in Chicken Broth After the vegetables are ready, I pour in the low-sodium chicken broth. I use a spatula to scrape any browned bits from the bottom. This adds great flavor to the gravy. - Stir in Heavy Cream and Seasonings Next, I stir in the heavy cream, Worcestershire sauce (if I choose to use it), and smoked paprika. I bring this mixture to a gentle simmer. The cream makes the gravy rich and smooth. - Return the Chicken to the Skillet I carefully place the browned chicken thighs back into the skillet, skin-side up. This helps keep the skin crispy. - Cover and Simmer I cover the skillet and let it simmer on low heat for about 25 to 30 minutes. This time allows the chicken to cook through and become tender. - Adjust Seasoning and Thickness Once the chicken is cooked, I taste the gravy. I adjust the seasoning if needed. If I want a thicker gravy, I let it simmer uncovered for an extra 5 to 10 minutes. - Serve with Garnish Finally, I remove the skillet from the heat. I sprinkle fresh parsley on top before serving. This adds a nice pop of color and freshness. To boost the flavor of your Southern smothered chicken, consider these spices: - 1 teaspoon cayenne pepper for heat - 1 teaspoon dried thyme for earthiness - 1 teaspoon paprika for sweetness You can also marinate the chicken for extra flavor. Try a mix of buttermilk and hot sauce. Let it sit for at least 2 hours, or overnight. For even browning, heat your skillet properly. Use medium-high heat and don’t overcrowd the pan. Cook chicken thighs skin-side down first. This gives the skin a nice golden color. To achieve perfect gravy consistency, let it simmer gently. If it’s too thin, remove the lid and let it cook longer. Stir often to avoid burning. Serve your smothered chicken over fluffy rice or creamy mashed potatoes. This helps soak up the rich gravy. Add a side of collard greens or cornbread for a true Southern feast. Garnish with fresh parsley to add color and freshness. You can also add thinly sliced green onions for an extra pop. Pro Tips Season Generously: Don’t be shy with the seasoning! Ensure the chicken is well-coated with spices to enhance the overall flavor of the dish. Use a Cast Iron Skillet: For the best browning and flavor development, use a cast iron skillet. It retains heat well and gives the chicken a beautiful crust. Let it Rest: After cooking, let the chicken rest for a few minutes before serving. This allows the juices to redistribute, making the chicken extra tender. Thicken the Gravy: If you prefer a thicker gravy, whisk in a cornstarch slurry (1 tablespoon cornstarch mixed with 2 tablespoons cold water) during the last few minutes of cooking. {{image_2}} If you want to switch things up, consider using boneless chicken thighs or breasts. They cook faster and still taste great. Just remember, boneless cuts may need less cooking time. You can also try different vegetables. Swap the bell pepper for zucchini or mushrooms. Each choice adds new flavor and texture. You can make the sauce creamy or keep it lighter. Use heavy cream for a rich taste. If you want less fat, skip the cream and use more broth. Adding spices or hot sauce can bring the heat. A pinch of cayenne or a dash of hot sauce can spice up the dish. Adjust it to your taste for the perfect kick. For gluten-free options, use gluten-free broth and check your seasonings. Most spices are safe, but always verify. To go dairy-free, replace heavy cream with coconut milk or a nut milk blend. These swaps keep the dish creamy while making it suitable for different diets. To store leftovers safely, let the chicken cool down first. Place it in an airtight container. This keeps bacteria out and preserves flavor. Store it in the fridge for up to three days. Use glass or plastic containers with tight-fitting lids. They help keep your food fresh and safe. For the best texture, reheat the chicken in the oven. Preheat it to 350°F (175°C). Place the chicken in a baking dish and cover it with foil. Heat for about 20 minutes. If you're reheating gravy, use a saucepan. Warm it on low heat, stirring often to keep it smooth. Add a splash of broth if it gets too thick. You can freeze cooked chicken for later meals. Let it cool completely and place it in a freezer-safe bag. Squeeze out the air to avoid freezer burn. Label the bag with the date and use it within three months. To thaw, move it from the freezer to the fridge overnight. Reheat as mentioned earlier for the best taste. What can I serve with Southern Smothered Chicken? You can serve this dish with fluffy rice or creamy mashed potatoes. Both options soak up the tasty gravy well. You might also try it with collard greens or cornbread for a true Southern feast. Can I make this dish in a slow cooker? Yes, you can use a slow cooker. After browning the chicken, add all ingredients to the slow cooker. Cook on low for about 6-8 hours. This will keep the chicken tender and flavorful. What can I use instead of heavy cream? If you want a lighter option, use half-and-half or whole milk. You can also blend silken tofu for a dairy-free option. This will change the texture, but it will still taste great. Is Worcestershire sauce necessary? Worcestershire sauce is not a must. It adds depth to the gravy, but you can skip it. If you want, try soy sauce or a splash of vinegar for similar flavor notes. How can I make the chicken tender? To ensure tender chicken, simmer it gently. The low heat allows the meat to cook without drying out. Also, let it rest after cooking to keep juices locked in. What should I do if the gravy is too thin? If your gravy is too thin, let it simmer uncovered for a few minutes. This will help it thicken. You can also make a cornstarch slurry by mixing cornstarch with water and stirring it into the gravy. In this article, we explored how to make delicious Southern Smothered Chicken. We covered essential ingredients like chicken, vegetables, and gravy components. I shared step-by-step instructions and tips for perfect flavor and presentation. Remember, you can adapt the recipe for dietary needs or make tasty variations. With these easy steps, you’ll serve up a meal that impresses everyone. Dive in, enjoy cooking, and create your own family favorites!
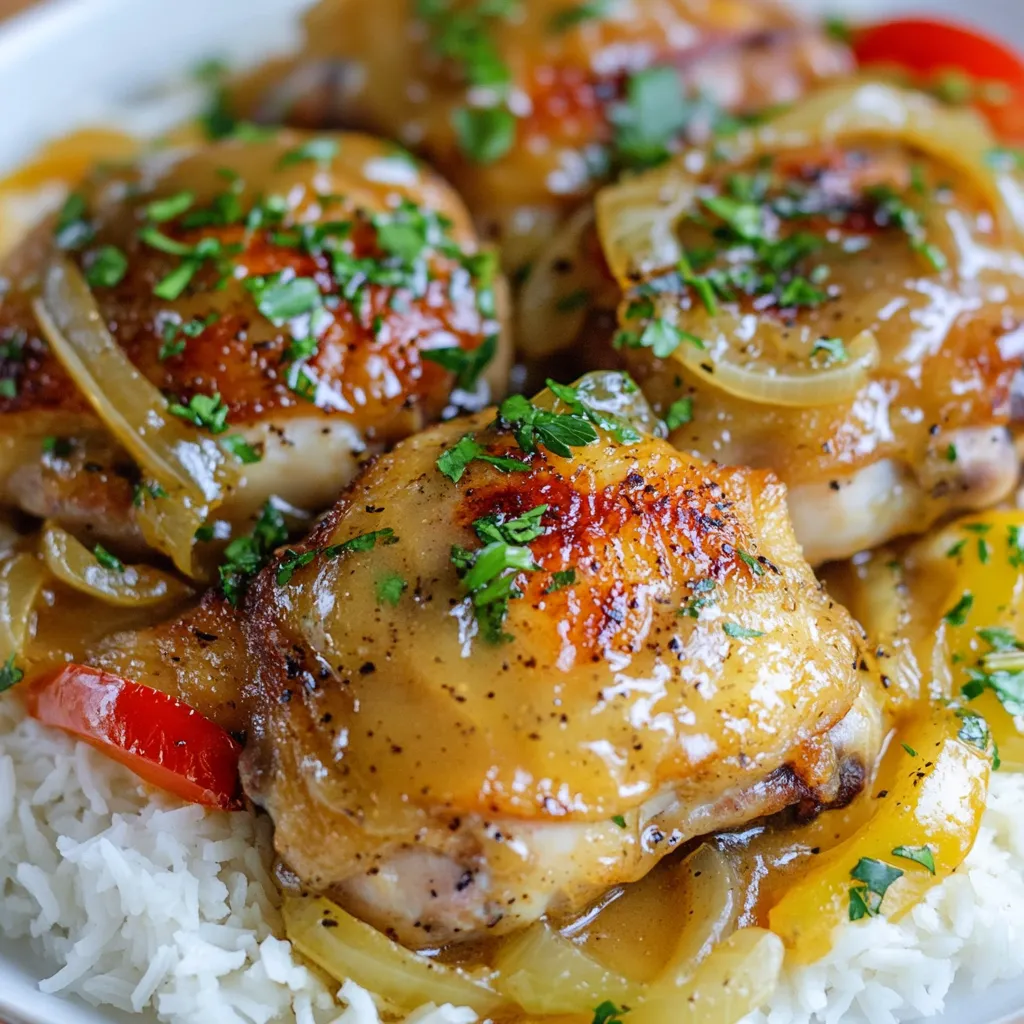
Southern Smothered Chicken Flavorful Comfort Meal
Ready to satisfy your cravings with a plate of comfort? Southern Smothered Chicken is your answer! This dish combines juicy, seasoned chicken with rich gravy
To make this tasty dish, gather these ingredients: - 1 cup orzo pasta - 2 Italian sausages (mild or spicy, casings removed) - 1 tablespoon olive oil - 1 medium onion, finely chopped - 2 cloves garlic, minced - 1 red bell pepper, diced - 1 zucchini, diced - 1 teaspoon dried oregano - 1 teaspoon dried basil - 4 cups chicken or vegetable broth - 1 cup cherry tomatoes, halved - 1 cup fresh spinach - Salt and pepper to taste - Grated Parmesan cheese (for serving) For those who need conversions: - 1 cup = 240 milliliters - 1 tablespoon = 15 milliliters - 1 teaspoon = 5 milliliters When picking Italian sausage, aim for quality. Look for sausages with fresh herbs and spices. Check the label for natural ingredients. Choose mild if you prefer less heat. Go for spicy for a kick. For orzo, opt for whole grain if you want more fiber. It is nutty and delicious. Check the package for cooking time to avoid overcooking. {{ingredient_image_1}} Before you start cooking, gather all your ingredients. This makes the process smooth. You need: - 1 cup orzo pasta - 2 Italian sausages (mild or spicy, casings removed) - 1 tablespoon olive oil - 1 medium onion, finely chopped - 2 cloves garlic, minced - 1 red bell pepper, diced - 1 zucchini, diced - 1 teaspoon dried oregano - 1 teaspoon dried basil - 4 cups chicken or vegetable broth - 1 cup cherry tomatoes, halved - 1 cup fresh spinach - Salt and pepper to taste - Grated Parmesan cheese (for serving) Chop your veggies and measure out the broth. This saves time later. 1. Heat a large skillet over medium heat. Add the olive oil. 2. Add the Italian sausages, breaking them apart with a wooden spoon. Cook for 5-7 minutes until browned. 3. Remove the sausage from the skillet and set aside. 4. In the same skillet, add the chopped onion and minced garlic. Cook for 3-4 minutes until soft. 5. Add the diced red bell pepper and zucchini. Sauté for another 5 minutes until tender. 6. Stir in the dried oregano and dried basil. Mix well. 7. Pour in the chicken or vegetable broth and bring to a boil. 8. Add the orzo pasta and cook for 8-10 minutes, stirring often. 9. When the orzo is al dente, add the cherry tomatoes, cooked sausage, and fresh spinach. 10. Stir until the spinach wilts, about 2 minutes. 11. Season with salt and pepper to taste. 12. Serve hot, topped with grated Parmesan cheese. Cooking on the stovetop takes about 30 minutes total. If you use an Instant Pot, it will save time. Cook the sausage first, then add all other ingredients. Set it for 5 minutes on high pressure. After that, let it release naturally for 5 minutes. This method gives you a similar result but cuts the time down. To get the best texture for your orzo, follow these steps: - Use plenty of water: Ensure you have enough water in the pot. This helps the orzo cook evenly. - Stir often: Stirring prevents the orzo from clumping together. It keeps it light and fluffy. - Cook until al dente: Follow the package instructions. Al dente orzo has a slight bite and is perfect in this dish. - Do not rinse: Rinsing orzo removes the starch. This starch helps the sauce cling to the pasta. Enhancing the flavor of your Italian Sausage Orzo is easy. Here are some ideas: - Fresh herbs: Add fresh basil or parsley at the end for a bright flavor. - Chili flakes: For a kick, sprinkle in some chili flakes while cooking. - Lemon zest: A bit of lemon zest brightens the dish. Just a small amount goes a long way. - Parmesan cheese: Mixing in grated Parmesan adds a nice depth. You can also sprinkle more on top when serving. Pairing sides with your Italian Sausage Orzo makes the meal special. Consider these options: - Garlic bread: A slice of warm garlic bread complements the dish well. - Simple salad: A fresh salad with greens and cherry tomatoes works great. - Roasted vegetables: Serve some seasonal roasted veggies on the side for extra flavor and nutrition. - Wine pairing: Enjoy a glass of Chianti or a light white wine for a perfect match. Pro Tips Use Fresh Ingredients: Always opt for fresh vegetables and herbs to enhance the flavors in your dish. Fresh produce can elevate the taste and texture of your orzo. Customize the Heat: If you prefer a spicier dish, use hot Italian sausage or add red pepper flakes to the sautéed vegetables for an extra kick. Cook the Orzo Properly: Stir the orzo frequently while it cooks to prevent it from sticking together. This will ensure a creamy and well-integrated dish. Garnish with Fresh Herbs: Finish your dish with a sprinkle of fresh basil or parsley before serving to add a pop of color and fresh flavor. {{image_2}} You can easily make Italian Sausage Orzo fit your diet. For a gluten-free version, swap orzo for gluten-free pasta. Many brands offer great options that taste just as good. If you're vegetarian, replace the sausage with plant-based sausage. You can also use mushrooms for a hearty texture. They add umami flavor, making your dish rich and satisfying. You can control the heat in this dish. For a spicy kick, use hot Italian sausage. If you prefer mild flavors, stick with sweet Italian sausage. You can also add red pepper flakes for extra heat. Just sprinkle them in while cooking the sausage. This way, you get a warm, flavorful dish that suits your taste. Seasonal veggies can add color and nutrition to your orzo. In spring, add peas or asparagus. These veggies brighten the dish and add freshness. In summer, try adding corn or diced tomatoes. They bring sweetness and juiciness. In fall, butternut squash or kale work well, giving a hearty feel. Each season offers great options to keep this dish exciting and tasty. To store leftover Italian Sausage Orzo, let it cool down first. Once cooled, place it in an airtight container. Make sure to cover it well. This helps keep it fresh. You can store it in the fridge for up to three days. If you want to keep it longer, freezing is a great option. When you’re ready to eat the leftovers, you need to reheat them. You can use a skillet or microwave. If using a skillet, add a splash of broth or water. This keeps the orzo from drying out. Heat it over medium heat until warm. If using the microwave, put it in a bowl with a lid. Heat in short bursts, stirring in between. This ensures even heating. To freeze Italian Sausage Orzo, first, let it cool completely. Then, scoop it into freezer-safe bags or containers. Make sure to remove as much air as you can. Label the bags with the date. You can freeze it for up to three months. When you’re ready to eat it, thaw it in the fridge overnight. Reheat as mentioned above for best results. Yes, you can make Italian Sausage Orzo ahead of time. Just cook it fully and let it cool. Store in an airtight container in the fridge. It will last for up to three days. When ready to eat, simply reheat it on the stove or in the microwave. Italian Sausage Orzo pairs well with many dishes. Consider serving it with a fresh salad or garlic bread. A side of steamed vegetables also complements the flavors nicely. You can even top it with extra grated Parmesan cheese for a richer taste. Orzo is cooked perfectly when it is al dente. This means it should be firm to the bite but not crunchy. Follow the package instructions, usually around 8-10 minutes. Taste a piece to check if it’s done. It should not be mushy. Absolutely! You can use other types of sausage in this recipe. Chicken, turkey, or even plant-based sausage work well. Adjust the spices to match the flavor of the sausage you choose. Each type will give a unique twist to the dish. Yes, Italian Sausage Orzo is great for meal prep. It stores well and reheats easily. Portion it out into containers for quick lunches or dinners. This dish also keeps its flavor, making it a perfect choice for a busy week ahead. This blog post covered all you need for Italian Sausage Orzo. We discussed key ingredients, step-by-step cooking, and storage methods. You learned tips for perfect texture and flavor. Plus, we shared variations to meet your needs. Take these ideas and create your own delicious dish. Enjoy the process and make it yours! With practice, you’ll master this tasty meal in no time. Your kitchen adventure awaits!
Italian Sausage Orzo Delightful and Easy Recipe
If you’re looking for a simple, tasty meal, you’ve found it! My Italian Sausage Orzo recipe is packed with flavor and comfort. This dish combines
For these tasty skewers, you will need: - 1.5 pounds boneless, skinless chicken breasts, cut into 1-inch cubes - 1/4 cup freshly squeezed lemon juice - Zest of 1 lemon - 3 tablespoons olive oil - 3 cloves garlic, minced - 1 tablespoon fresh rosemary, chopped - 1 tablespoon fresh thyme, chopped - 1 teaspoon dried oregano - Salt and pepper to taste - 1 bell pepper (any color), cut into squares - 1 red onion, cut into squares - Wooden or metal skewers These ingredients create a bright and fresh flavor. The chicken is the star here, and the herbs add depth. The lemon juice and zest bring a zesty kick. The marinade is key to great flavor. It includes lemon juice, zest, olive oil, garlic, and herbs. Each ingredient plays a role: - Lemon juice: Adds acidity, which tenderizes the chicken. - Lemon zest: Boosts the lemon flavor, making it more vibrant. - Olive oil: Keeps the chicken moist and flavorful. - Garlic: Adds a savory kick. - Herbs: Rosemary, thyme, and oregano give a fresh, aromatic taste. Marinating for at least 30 minutes allows the flavors to soak in. For best results, marinate for up to 2 hours. You can customize your skewers! Here are some fun ideas: - Vegetables: Add zucchini, mushrooms, or cherry tomatoes for variety. - Spices: Try adding red pepper flakes for heat. - Protein: Swap chicken for shrimp or tofu for a different twist. - Herbs: Use basil or cilantro instead of rosemary and thyme. These changes can help you make the dish your own. Enjoy experimenting! {{ingredient_image_1}} Start by making the marinade. In a medium bowl, combine these ingredients: - 1/4 cup freshly squeezed lemon juice - Zest of 1 lemon - 3 tablespoons olive oil - 3 cloves garlic, minced - 1 tablespoon fresh rosemary, chopped - 1 tablespoon fresh thyme, chopped - 1 teaspoon dried oregano - Salt and pepper to taste Whisk everything together until it blends well. This mix gives the chicken a bright and fresh flavor. Next, add 1.5 pounds of cubed chicken breasts to the marinade. Make sure each piece is coated with the mix. Cover the bowl and place it in the fridge. Let the chicken marinate for at least 30 minutes. If you want extra flavor, leave it for up to 2 hours. If you use wooden skewers, soak them in water for 30 minutes. This helps prevent burning. Preheat your grill to medium-high heat. Now, it’s time to thread the chicken onto the skewers. Alternate pieces of chicken with squares of bell pepper and red onion. This adds color and taste. Grill the skewers for about 10-15 minutes. Turn them occasionally so everything cooks evenly. The chicken is done when it reaches 165°F (75°C) inside, and the veggies should be slightly charred. Once cooked, take them off the grill and let them rest for a few minutes. This helps all the juices stay inside. To make juicy chicken skewers, start with the right cut of meat. Use boneless, skinless chicken breasts. Cut them into 1-inch cubes for even cooking. Marinate the chicken for at least 30 minutes. This helps the flavors soak in. If you have time, let it marinate for up to 2 hours. The longer, the better! Always season with salt and pepper before grilling. This adds flavor and helps keep the moisture in. Preheat your grill to medium-high heat. This ensures the chicken cooks evenly. If you use wooden skewers, soak them in water for 30 minutes first. This keeps them from burning on the grill. When grilling, turn the skewers every few minutes. This helps them cook on all sides and get nice grill marks. Aim for 10-15 minutes of grilling. Check that the chicken reaches an internal temperature of 165°F (75°C). This keeps it safe to eat and perfectly cooked. Serve your lemon herb grilled chicken skewers on a large platter. Add lemon wedges for a fresh touch. A sprinkle of fresh herbs like parsley or cilantro makes it pop. Pair the skewers with a side salad or grilled veggies. You can also serve them with rice or quinoa for a filling meal. For a fun twist, try serving them with a yogurt sauce or a spicy dip. This adds extra flavor and makes the meal more exciting. Enjoy! Pro Tips Marinate Longer for Flavor: For the best flavor, marinate the chicken for at least 2 hours. If time allows, overnight marination will yield even more delicious results. Use a Meat Thermometer: To ensure the chicken is perfectly cooked, use a meat thermometer to check that it has reached an internal temperature of 165°F (75°C). Vegetable Variations: Feel free to customize the vegetables on your skewers. Zucchini, cherry tomatoes, or mushrooms work great and add more color to your dish. Rest Before Serving: Let the skewers rest for a few minutes after grilling. This allows the juices to redistribute, making the chicken more tender and juicy. {{image_2}} You can swap chicken for other meats. Pork works great, too. Use pork tenderloin cut into cubes. Beef is another option; just choose a tender cut like sirloin. For seafood lovers, shrimp adds a nice touch. Just coat them with the same lemon herb marinade. Each protein brings a unique flavor, making your skewers exciting. Try making vegetarian skewers for a fresh twist. Use firm tofu cut into cubes. Marinate it just like chicken. You can also use hearty vegetables, like zucchini or mushrooms. They grill well and soak up all the flavors. Even fruit like pineapple can add a sweet touch. These options cater to everyone. Want to turn up the heat? Add red pepper flakes to your marinade. This will give your skewers a spicy kick. You can also brush them with a spicy sauce while grilling. For a sweet twist, mix honey or maple syrup into the marinade. This balances the lemon's tartness and makes each bite delicious. Adjust these flavors to match your taste. To store leftover skewers, let them cool first. Place them in an airtight container. Keep them in the fridge for up to 3 days. If you have a lot, divide them into smaller portions. This makes it easy to grab a quick meal later. Reheat the skewers in the oven for the best taste. Set your oven to 350°F (175°C). Place the skewers on a baking sheet and cover with foil. Heat them for about 10-15 minutes. You can also use a microwave for quick reheating. Just make sure to cover them to keep moisture in. Heat for 1-2 minutes, checking often. Freezing is a great option for meal prep. To freeze, first cool the skewers completely. Wrap each skewer in plastic wrap. Then, place them in a freezer bag. This keeps them fresh for up to 3 months. When ready to eat, thaw them in the fridge overnight. Reheat as mentioned before. Enjoy your tasty meal even after freezing! You should marinate chicken for at least 30 minutes. If you want more flavor, marinate it for up to 2 hours. This time allows the chicken to soak up the lemon and herbs. The longer the marination, the tastier the chicken will be. Just be careful not to marinate for too long, as the acid can change the texture. To check if the chicken is cooked through, use a meat thermometer. The internal temperature should reach 165°F (75°C). This is the safe temperature for chicken. If you don't have a thermometer, cut a piece open. The meat should be white, and the juices should run clear. Avoid undercooked chicken, as it can cause foodborne illness. Yes, you can use a grill pan if you don't have an outdoor grill. Preheat the grill pan over medium-high heat. Add a bit of oil to prevent sticking. Cook the skewers for about 10-15 minutes, turning often. This method gives you nice grill marks and keeps the chicken juicy. Lemon herb grilled chicken skewers offer great flavor and easy preparation. We discussed essential ingredients, marinade steps, and tips for juicy results. You learned about variations, substitutions, and storage methods for leftovers. By using these ideas, you can create meals your family will love. Enjoy your cooking, experiment with flavors, and make this dish your own. Remember, it’s all about fun in the kitchen and sharing good food with loved ones. Try it out and see how these skewers can elevate your meals!
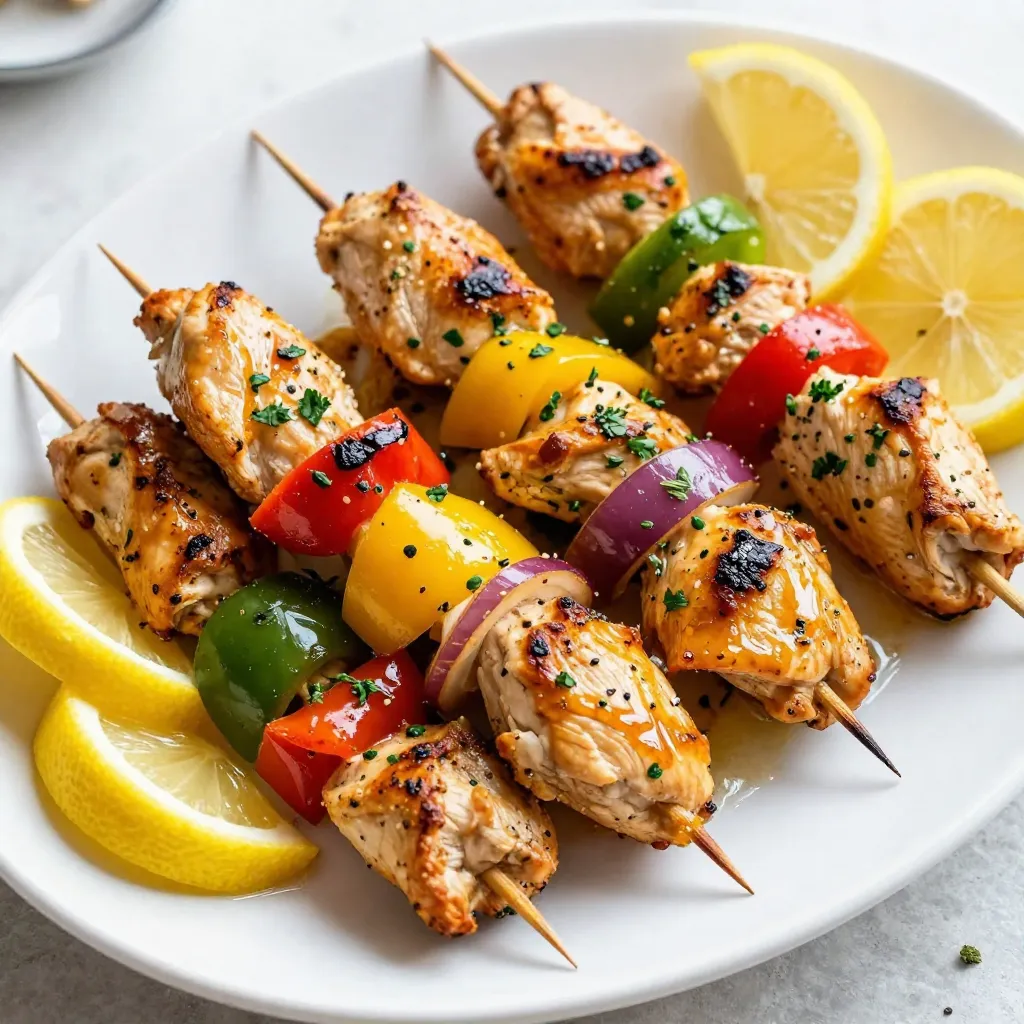
Lemon Herb Grilled Chicken Skewers Tasty and Easy Meal
Looking for a quick and tasty meal? You’ll love these Lemon Herb Grilled Chicken Skewers! They are easy to make and bursting with fresh flavors.
- 1 pound ground turkey - 1 cup cooked brown rice - 1 small onion, diced - 2 cloves garlic, minced - 1 bell pepper (red or green), diced - 1 cup black beans, drained and rinsed - 1 cup corn (fresh or frozen) - 1 can (14.5 oz) diced tomatoes with green chilies - 1 teaspoon cumin - 1 teaspoon smoked paprika - 1 teaspoon chili powder - Salt and pepper to taste - 2 tablespoons olive oil The main ingredients make this dish quick and tasty. Ground turkey gives you lean protein. I love using cooked brown rice for texture. Onions and bell peppers add sweetness and crunch. The garlic gives a nice aroma. Black beans and corn bring heartiness. Diced tomatoes with green chilies add flavor and a little heat. For the spices, cumin, smoked paprika, and chili powder create a warm taste. Salt and pepper help tie all the flavors together. Olive oil is key for sautéing the veggies and turkey. - Fresh cilantro, for garnish - Avocado slices, for serving Garnishes make meals look and taste better. Fresh cilantro adds a pop of color and fresh flavor. Avocado slices bring creaminess and balance to the dish. You can add these at the end for a beautiful and tasty finish. {{ingredient_image_1}} - First, heat 2 tablespoons of olive oil in a large skillet over medium heat. - Next, add 1 small diced onion and 1 diced bell pepper. Sauté them for 3-5 minutes until they start to soften. - After that, add 2 minced garlic cloves to the skillet. Cook for 1 more minute until you smell that lovely garlic aroma. - Now, raise the heat to medium-high. Add 1 pound of ground turkey to the skillet. - Use a spatula to break the turkey apart. Cook it for about 6-8 minutes, or until it's browned and cooked through. - Stir in 1 teaspoon of cumin, 1 teaspoon of smoked paprika, and 1 teaspoon of chili powder. Add salt and pepper to taste. Make sure the turkey is well coated in the spices. - Pour in 1 can of diced tomatoes with green chilies, 1 cup of black beans (drained and rinsed), and 1 cup of corn. - Also, mix in 1 cup of cooked brown rice. Stir everything until well combined and heated through, which should take about 5 minutes. - Taste your dish and adjust the seasoning if needed. This quick and flavorful meal is ready to serve! To ensure great flavor, mix spices well. I use cumin, smoked paprika, and chili powder. These add warmth and depth. Don’t skip the salt and pepper; they bring everything together. Taste your dish as you cook. Adjust seasoning if needed. This step makes a big difference. For cooking time, ground turkey needs just 6-8 minutes. Ensure it is browned and cooked through. Use a spatula to break it apart as it cooks. Proper browning helps develop rich flavors. If you overcook it, the turkey can dry out, so keep an eye on it. For sides, I love serving this dish with a green salad. The fresh crunch balances the warm skillet. You can also try tortilla chips for added crunch. A side of guacamole pairs well too. For toppings, fresh cilantro adds a nice touch. Avocado slices make it creamy. You can also add a dollop of sour cream or Greek yogurt. These toppings add flavor and texture. Enjoy mixing and matching! Pro Tips Use Lean Turkey: Opt for lean ground turkey to reduce fat content while maintaining flavor. Customize the Spice Level: Adjust the amount of chili powder and diced tomatoes with green chilies to suit your heat preference. Add More Veggies: Enhance nutrition by adding additional vegetables like zucchini or spinach to the skillet. Meal Prep Friendly: This dish can be made in advance and stored in the fridge for up to 3 days, making it perfect for meal prep! {{image_2}} You can swap out the ground turkey with other meats. Ground chicken or beef works well. If you want a lighter option, try ground turkey. Each meat brings a unique flavor. You can also use plant-based meat for a vegetarian dish. For veggies, you can change what you use. Try zucchini, carrots, or spinach instead of bell peppers. You can also add mushrooms for a hearty touch. Mixing different veggies makes the dish colorful and fun. Adjusting the heat level is easy. If you like spice, add more chili powder or jalapeños. For milder flavors, skip the chili powder. You can also reduce the diced tomatoes with green chilies. Experiment with different cuisine themes. Try adding curry powder for an Indian twist. Or, add soy sauce and ginger for an Asian flair. Each change brings new tastes to the skillet. Enjoy exploring flavors! You can store your Ground Turkey Dinner Skillet in the fridge. Use an airtight container. It stays fresh for up to three days. Before storing, let the dish cool. This helps it stay tasty and safe. When you are ready to eat, just reheat it on the stove or in the microwave. To freeze, place the cooled skillet meal in a freezer-safe container. You can also use freezer bags. Remove as much air as possible to prevent freezer burn. Label the container with the date. It will keep well for up to three months. To reheat, thaw the skillet in the fridge overnight. Heat it in a skillet over medium heat. Stir it often until hot. You can also use the microwave, but stir halfway through. Enjoy your quick and flavorful meal anytime! You can serve this dish with many sides. Here are some great options: - Salad: A fresh green salad adds crunch. - Tortillas: Warm corn or flour tortillas are perfect for wraps. - Sliced Avocado: Creamy avocado makes it richer. - Sour Cream: A dollop of sour cream adds creaminess. - Cheese: Shredded cheese brings extra flavor. These sides can enhance your meal and make it more filling. Yes, you can prepare this dish ahead of time. Cook the turkey and mix in other ingredients. Then let it cool before storing. Keep it in an airtight container in the fridge. It stays fresh for about three days. Reheat it on the stove or microwave before serving. This makes busy nights easier. Yes, this recipe is gluten-free. Ground turkey, beans, and rice do not contain gluten. Just be sure to check labels on canned items. Some diced tomatoes may have additives. Always choose gluten-free brands to be safe. To add heat to your skillet, try these tips: - Add more chili powder: Use an extra teaspoon. - Include fresh jalapeños: Dice them and cook with the veggies. - Use hot sauce: Drizzle it on top when serving. - Experiment with spices: Try cayenne pepper or crushed red pepper flakes. Adjust the heat to fit your taste, and enjoy the kick! This blog post covered how to create a tasty ground turkey dinner skillet. We looked at main ingredients and cooking steps, plus some helpful tips. You can customize the dish with different meats and flavors. Storing and reheating is easy too. Remember, cooking can be fun and creative! Get started and enjoy a delicious meal your way.
Ground Turkey Dinner Skillet Quick and Flavorful Meal
Looking for a quick and tasty dinner option? The Ground Turkey Dinner Skillet is here to save your evening! This one-pan dish combines lean ground
- 1 package (9 oz) cheese tortellini - 8 oz Italian sausage (mild or spicy, casing removed) - 1 tablespoon olive oil The cheese tortellini adds a creamy texture that pairs well with savory sausage. You can choose mild for a gentle flavor or spicy for a kick. The olive oil helps to sauté the ingredients, bringing out their best flavors. - 1 small onion, finely chopped - 1 bell pepper (red or green), diced - 1 zucchini, diced Onions add sweetness and depth. Bell peppers bring color and crunch. Zucchini adds a fresh taste and absorbs the dish's flavors well. - 1 can (14 oz) diced tomatoes, undrained - 1 cup vegetable broth - 1 teaspoon Italian seasoning Diced tomatoes provide acidity and moisture. Vegetable broth adds richness without overpowering. Italian seasoning blends herbs that enhance the dish's essence. {{ingredient_image_1}} - Heating the oil: Start by pouring one tablespoon of olive oil into a large skillet. Set the heat to medium. Wait for the oil to shimmer. This means it's hot enough. - Cooking the sausage: Next, take eight ounces of Italian sausage. Remove the casing and add the sausage to the skillet. Use a spoon to break it apart. Cook it for about five to seven minutes. You want it to turn brown and be fully cooked. - Incorporating onion, bell pepper, and zucchini: After the sausage is ready, chop one small onion, one bell pepper, and one zucchini. Add these to the skillet. Stir and let them cook for three to four minutes. You want them to soften. - Cooking until softened: Keep stirring often. This helps to mix the flavors. The veggies should be tender by now. - Adding garlic and seasoning: Now, take two cloves of minced garlic. Add them to the pan along with one teaspoon of Italian seasoning. Cook for one more minute. This step makes your kitchen smell great! - Introducing tomatoes and broth: Next, open a can of diced tomatoes (14 oz) and add them, juice and all, to the pan. Pour in one cup of vegetable broth. Stir everything together and bring it to a simmer. - Adding tortellini and simmering: Once simmering, grab a package of cheese tortellini (9 oz). Add it to the skillet and mix gently. Cook for four to five minutes. The tortellini should be tender and cooked through. Now, you're almost there! Next, you'll add fresh spinach and season to taste. Enjoy the process! How to perfectly brown sausage To brown sausage well, use medium heat. This helps the sausage cook evenly. Break the sausage into small pieces with a spoon. Cook for 5 to 7 minutes until it's brown. Stir it often. This keeps it from sticking and burning. Tips for cooking tortellini Cook tortellini when the dish is almost done. Add it to the skillet with the broth. This way, it soaks up the flavors. Stir gently to avoid breaking the pasta. Cook for about 4 to 5 minutes until tender. Keep an eye on it. Overcooking makes it mushy. Suggested seasonings Italian seasoning brings a lot of flavor to this dish. You can also add crushed red pepper for heat. A pinch of garlic powder boosts the garlic flavor. If you like herbs, add fresh parsley or oregano. Best toppings to use Grated Parmesan cheese is a must. It adds creaminess and saltiness. Fresh basil on top gives a nice color and taste. You can also sprinkle some black pepper for a little kick. Prep time hacks Chop your onion and bell pepper ahead of time. You can do this the night before. This way, the cooking goes faster. Use a timer to keep track of cooking times. This helps you stay organized. Using pre-chopped ingredients Consider buying pre-chopped vegetables at the store. They save a lot of time. You can find diced onions and peppers in the produce section. This makes putting the dish together super easy. Pro Tips Tip for Tortellini Cooking: Cook the tortellini just until al dente, as they will continue to cook slightly in the hot sauce. Tip for Sausage Flavor: If you want a deeper flavor, consider browning the sausage a bit longer until it's nicely caramelized. Tip for Added Vegetables: Feel free to add other vegetables like mushrooms or broccoli for extra nutrition and flavor. Tip for Creaminess: For a creamier dish, stir in a splash of heavy cream or a dollop of ricotta cheese just before serving. {{image_2}} You can switch out the sausage for chicken or turkey. Both options work well and keep the dish tasty. Ground chicken or turkey will cook fast and soak up the flavors. For a vegetarian version, try using plant-based sausage or beans. These will add protein and a nice texture. You can also use lentils for a hearty touch. You can add more veggies to boost nutrition. Think about spinach, kale, or broccoli. Carrots or peas also work well for color and crunch. Seasonal veggies are great too. In summer, add fresh tomatoes or corn. In fall, try butternut squash or pumpkin. Each season brings new flavors to explore. You can choose between a creamy or tomato-based sauce. A creamy sauce gives a rich taste, while a tomato sauce adds brightness. If you want a deeper flavor, adjust the broth. You can mix in chicken broth or add a splash of wine for more depth. Both options will make your dish shine. To store leftovers, let them cool before putting them in the fridge. Use airtight containers to keep the tortellini fresh. This helps keep flavors strong and prevents drying out. Leftovers can last up to three days in the fridge. Recommended storage containers include glass or BPA-free plastic. These types seal well and keep food safe. They also help you see the contents easily. The best methods for reheating are on the stove or in the microwave. On the stove, add a little water or broth to keep it moist. Heat on low to avoid burning. Stir often for even warming. To reheat in the microwave, use a microwave-safe bowl. Add a splash of water and cover loosely. Heat for one minute, then stir. Repeat until hot. This will help avoid sogginess in the tortellini. For longer storage, you can freeze this dish. First, let it cool completely. Then, place it in a freezer-safe container. Make sure to leave some space for expansion. Label the container with the date. It can last up to three months in the freezer. When you're ready to eat, thaw the dish in the fridge overnight. For quicker thawing, you can use the microwave. Heat on the defrost setting until soft. Then, reheat on the stove or microwave as described. Can I use frozen tortellini? Yes, you can use frozen tortellini. Just add a few extra minutes to the cooking time. Check the package for specific cooking instructions. Frozen tortellini cooks well in the same skillet. How long does it take to cook tortellini? It takes about 4-5 minutes to cook tortellini. You will know they are done when they float to the top of the pan. Make sure to stir gently to avoid sticking. What can I use instead of Italian sausage? You can use chicken or turkey sausage for a lighter option. If you want a vegetarian dish, try using lentils or mushrooms. These choices can add great flavor and texture. Can I use a different type of cheese tortellini? Absolutely! You can use any cheese tortellini you like. Try spinach or mushroom tortellini for a fun twist. Just keep the cooking time the same. Is this recipe gluten-free? No, this recipe is not gluten-free due to the tortellini. However, you can find gluten-free tortellini made from rice or corn flour. This will make the dish safe for gluten-free diets. Can it be made dairy-free? Yes, you can make it dairy-free. Use dairy-free cheese or omit the cheese altogether. This way, everyone can enjoy the dish without dairy. In this post, we explored a simple recipe for one pan tortellini with sausage. We covered the key ingredients like cheese tortellini and Italian sausage, along with fresh veggies like zucchini. I shared step-by-step instructions to make cooking easy. You'll find tips for enhancing flavor and time-saving strategies, plus variations to suit your taste. Finally, I included storage and reheating tips to enjoy leftovers. This dish is quick, tasty, and adaptable. Enjoy making it your own!
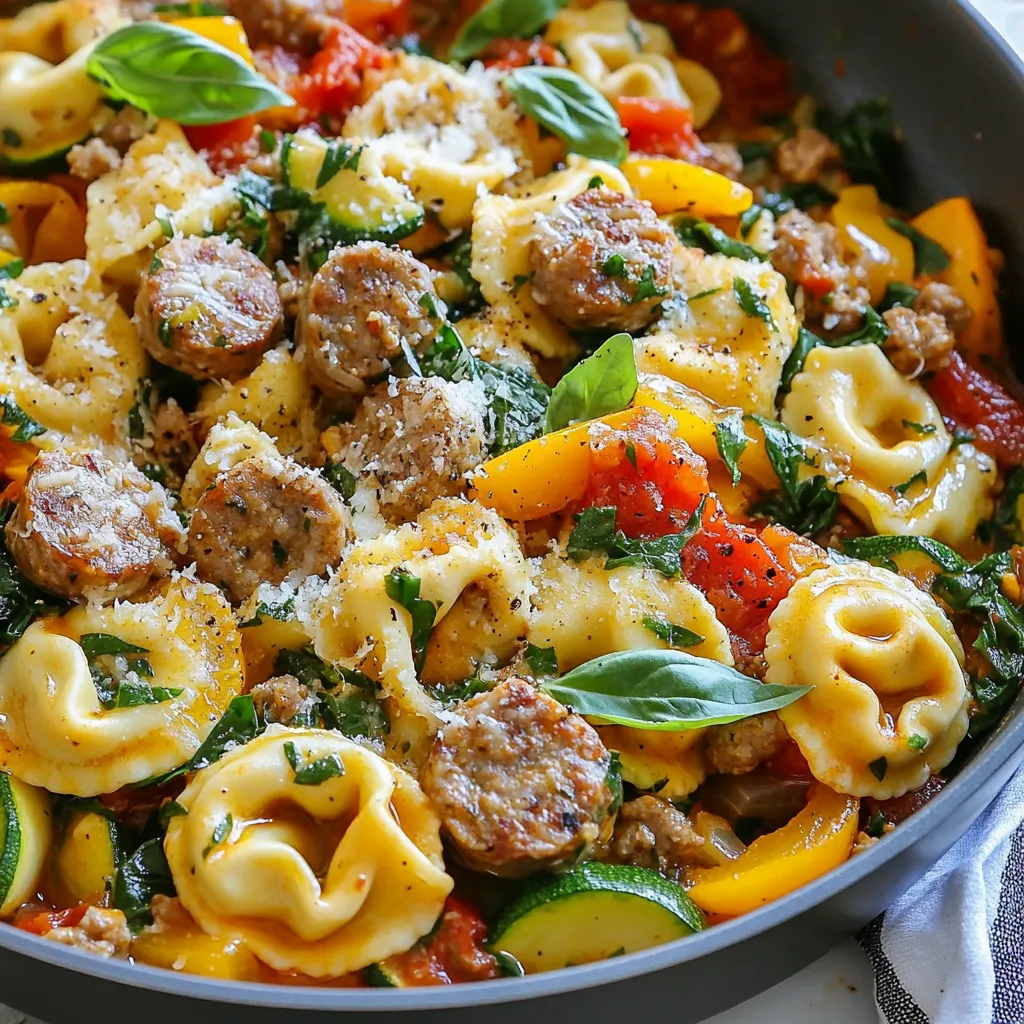
One Pan Tortellini with Sausage Easy Dinner Recipe
If you’re searching for a quick, delicious dinner idea, look no further! This One Pan Tortellini with Sausage recipe is a game changer. It combines