Dinner

To make Lemon Veggie Orzo Chicken, you will need: - 1 cup orzo pasta - 1 lb boneless, skinless chicken breast, cut into bite-sized pieces - 2 tablespoons olive oil - 1 small onion, diced - 2 cloves garlic, minced - 1 zucchini, diced - 1 bell pepper (any color), diced - 1 cup cherry tomatoes, halved - 3 cups chicken broth - Zest of 1 lemon - Juice of 1 lemon - 1 teaspoon dried oregano - Salt and pepper to taste - Fresh parsley, chopped for garnish You can add these items to boost taste: - 1 teaspoon red pepper flakes for heat - 1/2 cup feta cheese for creaminess - Fresh basil leaves for extra freshness - A splash of white wine for depth If you have dietary needs, try these swaps: - Use quinoa or rice instead of orzo for gluten-free. - Swap chicken with firm tofu for a vegetarian dish. - Replace chicken broth with vegetable broth for vegan options. - Use olive oil or avocado oil for a healthier fat choice. {{ingredient_image_1}} Start by gathering all your ingredients. You'll need: - 1 cup orzo pasta - 1 lb boneless, skinless chicken breast, cut into bite-sized pieces - 2 tablespoons olive oil - 1 small onion, diced - 2 cloves garlic, minced - 1 zucchini, diced - 1 bell pepper (any color), diced - 1 cup cherry tomatoes, halved - 3 cups chicken broth - Zest of 1 lemon - Juice of 1 lemon - 1 teaspoon dried oregano - Salt and pepper to taste - Fresh parsley, chopped for garnish Chop the onion, garlic, zucchini, and bell pepper. This helps the dish cook evenly. In a large pot, heat the olive oil over medium heat. Add the diced onion and minced garlic. Sauté them until the onion looks clear, about 3-4 minutes. This step builds the flavor base. Next, toss in the chicken pieces. Season them with salt, pepper, and oregano. Cook the chicken until it turns brown and is cooked through, around 5-7 minutes. Make sure to stir often for even cooking. Now, add the zucchini and bell pepper to the pot. Cook for another 3-4 minutes until the veggies start to soften. Then, stir in the orzo pasta. Pour in the chicken broth, lemon zest, and lemon juice. Mix everything well to combine. Bring the pot to a boil. Once boiling, lower the heat and cover it. Let it simmer for about 10-12 minutes. Stir occasionally to keep the orzo from sticking. In the last few minutes, add the halved cherry tomatoes. This warms them without making them mushy. When the orzo is cooked and has soaked up most of the liquid, take it off the heat. Taste and adjust seasoning with more salt and pepper if needed. Serve warm and finish with a sprinkle of fresh parsley for a pop of color. Enjoy your Lemon Veggie Orzo Chicken! To get the best orzo texture, cook it until it’s al dente. This means it should be firm but not hard. Stir the orzo often while it cooks. This helps prevent it from sticking together. If the orzo absorbs too much broth, add a splash of water. This keeps it moist and tender. You can boost the flavor in many ways. Try adding fresh herbs like basil or thyme. For a kick, add red pepper flakes. You can also use different veggies. Broccoli or spinach works well too. If you want a richer taste, add a bit of grated Parmesan cheese before serving. A large pot is key for this dish. It should be deep enough for the orzo and broth. A wooden spoon helps mix everything well. A cutting board and sharp knife are great for prepping veggies and chicken. Having measuring cups and spoons ensures you get the right amounts. Pro Tips Use Fresh Ingredients: Fresh vegetables and herbs can significantly enhance the flavor of this dish. Opt for seasonal produce whenever possible. Don't Overcook the Orzo: Keep an eye on the orzo while it simmers to ensure it remains al dente. It will continue to cook slightly after being removed from heat. Customize the Veggies: Feel free to swap or add other vegetables like spinach, broccoli, or asparagus based on your preference or what you have on hand. Enhance with Cheese: For an extra layer of flavor, consider stirring in some grated Parmesan cheese just before serving. {{image_2}} To make Lemon Veggie Orzo Chicken vegetarian, skip the chicken. You can add more veggies instead. Try mushrooms, spinach, or carrots. Use vegetable broth in place of chicken broth. This keeps the dish rich in flavor. To make this dish gluten-free, swap orzo pasta for gluten-free pasta. You can find many brands that taste great. Also, check your chicken broth. Some brands add gluten, so look for gluten-free labels. Want more nutrients in your meal? Add chickpeas or lentils for protein. You can also toss in kale or broccoli for extra vitamins. Fresh herbs like basil or dill elevate the dish’s flavor and nutrition. You can store your Lemon Veggie Orzo Chicken in the fridge. Use an airtight container for best results. It keeps well for about 3 to 4 days. Make sure it cools before sealing it. This helps avoid moisture build-up. If you want to freeze it, use a freezer-safe container. This dish freezes well for about 2 to 3 months. Divide it into single servings if you like. Just remember to leave some space in the container. This allows for expansion as it freezes. To reheat, you can use the microwave or stovetop. If using a microwave, cover it to keep moisture in. Heat in short bursts, stirring in between. This helps it heat evenly. On the stovetop, add a splash of chicken broth to keep it moist. Heat over low, stirring often. Enjoy your meal again! Yes, you can use other pastas in this dish. I suggest using small shapes like ditalini or mini shells. These work well because they catch the sauce nicely. Avoid larger pasta shapes, as they need more time to cook. Just keep an eye on the cooking time. Adjust it based on the pasta you choose. To add heat, try these simple changes. First, add red pepper flakes while cooking the onion and garlic. You can also add diced jalapeño or fresh chili peppers. For a smoky flavor, try smoked paprika. Each of these will give your dish a nice kick without overpowering the lemon flavor. This dish pairs well with many sides. A fresh green salad brings a nice contrast. You could serve it with garlic bread for extra flavor. If you want something warm, try roasted vegetables. They add color and nutrients to your meal. This blog post covered key aspects of making Lemon Veggie Orzo Chicken. We discussed the essential ingredients, optional enhancements, and substitutes for dietary needs. I shared step-by-step instructions for preparing and cooking the dish, plus tips to get the best flavor and texture. Variations like vegetarian and gluten-free options help everyone enjoy it. Lastly, proper storage and reheating advice keep leftovers fresh. With these insights, you can create a delicious meal that suits your taste while enjoying the cooking process.
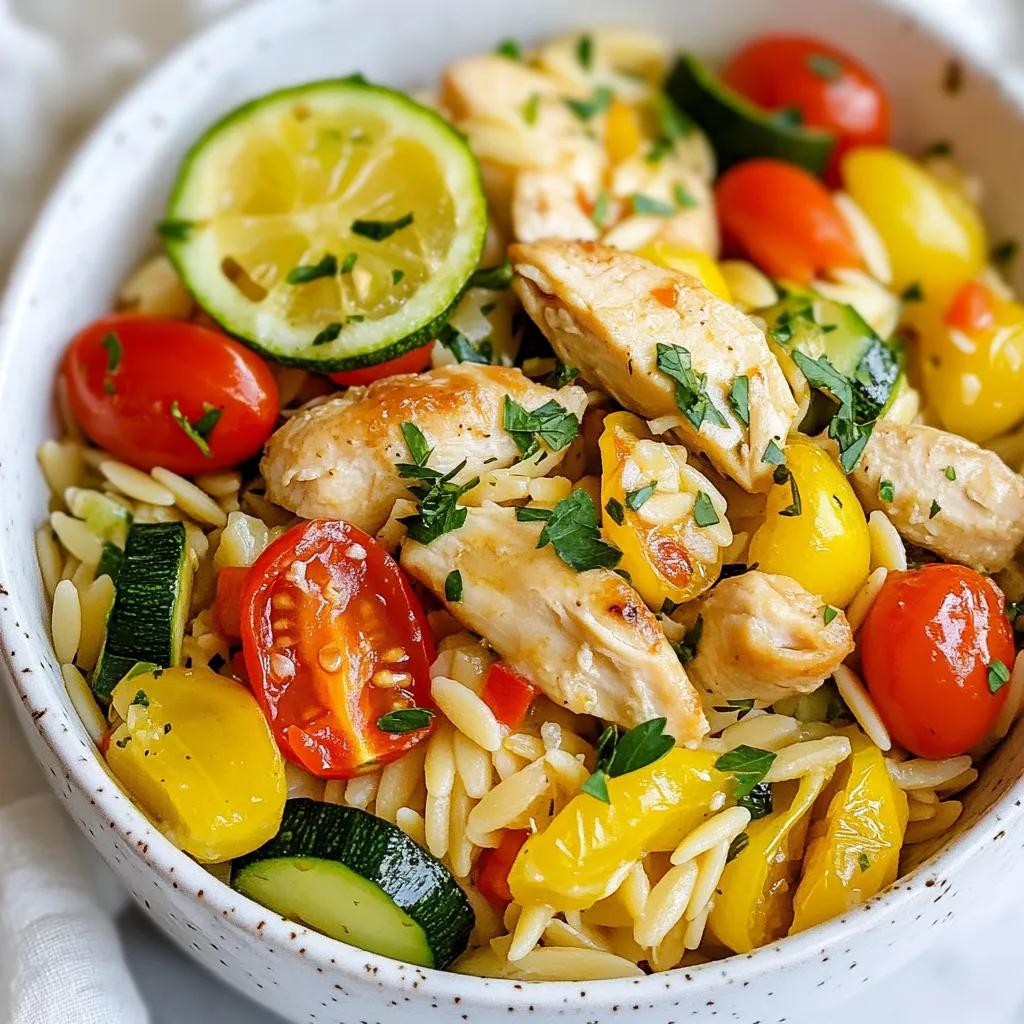
Lemon Veggie Orzo Chicken Tasty and Simple Recipe
Ready to try a dish that is both tasty and easy? My Lemon Veggie Orzo Chicken is a hit! This recipe blends zesty lemon, fresh
For these tasty turmeric ginger immunity shots, you need the following: - 1 cup fresh orange juice - 2 tablespoons freshly grated ginger - 2 tablespoons ground turmeric (or 1 tablespoon fresh grated turmeric) - 1 tablespoon raw honey (adjust to taste) - 1 tablespoon lemon juice - A pinch of black pepper (to enhance turmeric absorption) - 1/2 teaspoon cayenne pepper (optional, for an extra kick) - Fresh orange juice: This juice is packed with vitamin C. It helps boost your immune system and keeps you hydrated. - Ginger: Ginger fights inflammation and helps with digestion. It can also ease nausea and improve your immune response. - Turmeric: Turmeric has curcumin, which is a powerful antioxidant. It may help reduce inflammation and support overall health. - Raw honey: Honey adds natural sweetness and has antibacterial properties. It can soothe your throat and help you feel better when sick. - Lemon juice: Lemon juice is high in vitamin C. It helps detox your body and supports your immune health. - Black pepper: This spice boosts the absorption of turmeric. It helps you get the most out of your shots. - Cayenne pepper: Cayenne adds heat and can help clear your sinuses. It may also boost your metabolism. If you need to make swaps, consider these options: - Orange juice: Use grapefruit juice or apple juice for a different flavor. - Ginger: Ground ginger can work in a pinch, but fresh is best. - Turmeric: If you can't find fresh turmeric, ground turmeric is a good alternative. - Raw honey: Maple syrup or agave nectar can replace honey for a vegan option. - Lemon juice: Lime juice can be used instead for a zesty twist. - Black pepper: You can skip this if you prefer a milder shot, but it really helps! - Cayenne pepper: Omit this for a milder shot, or use less if you want just a hint of spice. {{ingredient_image_1}} To make your turmeric ginger immunity shots, start with the ingredients. You need: - 1 cup fresh orange juice - 2 tablespoons freshly grated ginger - 2 tablespoons ground turmeric (or 1 tablespoon fresh grated turmeric) - 1 tablespoon raw honey (adjust to taste) - 1 tablespoon lemon juice - A pinch of black pepper - 1/2 teaspoon cayenne pepper (optional) First, gather all your ingredients. Then, in a blender, pour in the fresh orange juice. Next, add the grated ginger, ground turmeric, raw honey, and lemon juice. Blend everything on high for about 30 seconds. Make sure all the ingredients mix well and the mixture becomes smooth. Blending is key to making these shots tasty. To get the best flavor, blend the ingredients for at least 30 seconds. If you want a sweeter shot, taste the mixture. You can add more honey for sweetness. If you like heat, add a bit of cayenne pepper. Blend again until everything combines well. Once your mixture is smooth, it’s time to strain it. Use a fine-mesh sieve over a bowl or pitcher. This step removes any pulp for a smoother shot. Pour the strained liquid into shot glasses or small containers for easy serving. You can store these shots in the fridge for up to three days. Before you drink, shake well to mix everything again. Enjoy your healthy boost! To make your turmeric ginger shots taste even better, try these tips: - Use fresh ingredients: Fresh orange juice and ginger give the best flavor. - Experiment with spices: You can add more cayenne for heat or a pinch of cinnamon for warmth. - Adjust sweetness: Add more honey if you like your shots sweeter. Storing your immunity shots correctly keeps them fresh. Here’s how: - Use airtight containers: This helps keep air out and flavor in. - Keep in the fridge: Store your shots in the fridge for up to three days. - Shake before drinking: Always shake well to mix the ingredients again. You can easily change this recipe to fit your needs. Here’s how: - Make it vegan: Replace raw honey with maple syrup or agave nectar. - Skip the spice: If you don’t like heat, leave out the cayenne pepper. - Use other juices: Swap out orange juice for apple or grapefruit juice for a new twist. Pro Tips Use Fresh Ingredients: For the best flavor and health benefits, use fresh ginger and turmeric. Fresh roots provide more potency than dried spices. Adjust Sweetness: The sweetness of the shots can vary based on the oranges used. Start with the suggested honey amount and adjust to your taste. Storage Tips: Store the immunity shots in airtight containers to keep them fresh and prevent any loss of nutrients. Shake well before consuming. Spice It Up: If you enjoy a bit of heat, don’t hesitate to increase the cayenne pepper. It not only adds flavor but also boosts metabolism! {{image_2}} You can switch up the juice in your immunity shots. Fresh juices bring unique flavors and benefits. Try these options: - Pineapple Juice: Adds sweetness and contains bromelain, which can help with digestion. - Apple Juice: A milder choice that pairs well with ginger and turmeric. - Beet Juice: Great for detox and adds a vibrant color. These juices can mix well with the ginger and turmeric, keeping your shots exciting and tasty. Boost your immunity shots with some extra ingredients. Here are a few to try: - Chia Seeds: Packed with omega-3s and fiber. Just add a teaspoon for a healthy twist. - Lemon Zest: Adds a fresh kick and more vitamin C. - Coconut Water: Hydrating and rich in electrolytes. Swap it for the orange juice for a tropical flair. These additions not only enhance flavors but also pack in more nutrients. You can adjust the spice level of your shots. If you like it hot, try these tips: - Increase Cayenne Pepper: Add more for a stronger kick. - Add Jalapeño: A small piece can bring heat and flavor. - Try Ground Black Pepper: This helps turmeric absorb better and adds warmth. Experiment until you find your perfect balance of flavor and heat. It’s best to store your turmeric ginger immunity shots in the fridge. Use small glass containers or shot glasses. Make sure the lids are tight to keep air out. This helps keep flavors fresh. Always label your shots with the date you made them. This way, you know when they were made. These shots last about 3 days in the fridge. After that, they begin to lose their taste and health benefits. Always check the date before drinking. If you notice any changes in taste or smell, it's best to toss them out. Freshness is key for getting all the benefits. Look for a few signs to tell if your shots have gone bad. If the color changes or the mixture looks cloudy, it may not be good. A sour smell is another sign. If you see mold, throw it away right away. Trust your senses; they are your best guide. Turmeric and ginger are great for your health. They both help fight sickness. Turmeric has curcumin, which reduces inflammation. This can lower your chance of getting sick. Ginger helps with digestion and can ease nausea. Together, they boost your immune system, making you feel better overall. Yes, you can find premade turmeric ginger immunity shots at many stores. They are often in the health food section. However, making your own is fresher and more fun. You can control the taste and adjust the sweetness or spice. Plus, homemade shots are free from preservatives. Most people can enjoy turmeric and ginger safely. But some may have mild side effects. These can include stomach upset or heartburn. If you are on medication, check with your doctor. This is important if you take blood thinners. Always listen to your body and adjust as needed. I recommend having one shot a day. This can help keep your immune system strong. You can also enjoy it more often during cold and flu season. Just remember to listen to your body and adjust as needed. Consistency is key for the best results. This blog post covered key aspects of turmeric ginger immunity shots. We discussed essential ingredients, their health benefits, and smart substitutions. You learned step-by-step how to prepare and serve these shots for best results. I shared tips to enhance flavor and storage practices to keep them fresh. We explored variations to suit your taste and dietary needs. In conclusion, these shots are a simple way to boost your immunity. Enjoy making them and benefit from their natural powers. You hold the key to your wellness with every sip.
Turmeric Ginger Immunity Shots Boost Your Health Today
Are you ready to supercharge your health? Turmeric Ginger Immunity Shots can do just that! Packed with tasty and powerful ingredients, these shots can give
- 1 cup long-grain rice - 1 can (15 oz) black beans, drained and rinsed - 1 can (15 oz) diced tomatoes with green chilies - 1 cup corn kernels (fresh or frozen) - 1 bell pepper (red or green), diced - 1 medium onion, chopped - 2 cloves garlic, minced - 2 teaspoons chili powder - 1 teaspoon cumin - 2 cups vegetable broth - 1 cup shredded cheese (cheddar or Mexican blend) - Salt and pepper to taste - 1 tablespoon olive oil - Fresh cilantro for garnish (optional) Each ingredient plays a key role in this dish. The long-grain rice acts as the base, soaking up all the flavors. Black beans add protein and texture. Diced tomatoes with green chilies bring a nice kick. Corn adds sweetness and crunch. Bell pepper and onion provide freshness. Garlic gives a rich aroma. Chili powder and cumin add warmth. Vegetable broth ties everything together. Shredded cheese makes it creamy. Salt and pepper enhance the taste. Olive oil helps with sautéing. Fresh cilantro is optional but adds a lovely touch. This mix of ingredients creates a vibrant, colorful meal. You'll want to keep them on hand for quick and easy dinners. {{ingredient_image_1}} First, heat 1 tablespoon of olive oil in a large pot over medium heat. Add 1 medium onion, chopped, and 1 diced bell pepper. Sauté these for about 5 minutes. You want them soft and sweet. Next, stir in 2 cloves of minced garlic. Cook for an extra 1 to 2 minutes. The garlic should smell strong and tasty. Now, it's time to mix your spices with the rice. Add 1 cup of long-grain rice, 2 teaspoons of chili powder, and 1 teaspoon of cumin to the pot. Don't forget to season with salt and pepper. Stir everything well to coat the rice with the spices. Then, pour in 2 cups of vegetable broth. Add 1 can of drained black beans, 1 can of diced tomatoes with green chilies, and 1 cup of corn kernels. The mixture will look colorful and inviting. Bring the pot to a boil. Once it bubbles, reduce the heat to low and cover it. Let the casserole simmer for about 20 to 25 minutes. Check the rice after 20 minutes. It should be tender and have absorbed most of the liquid. If it needs more time, cover it again and wait a few more minutes. When the rice is ready, take the pot off the heat. Stir in 1 cup of shredded cheese until it melts through the dish. Let the casserole sit for 5 minutes. This helps the flavors blend together nicely. If you like, garnish with fresh cilantro before serving. Enjoy your flavorful One-Pot Mexican Rice Casserole! To make your One-Pot Mexican Rice Casserole even tastier, try adding more spices. You can include smoked paprika or cayenne for a nice kick. A pinch of oregano or cumin can also boost the flavors. Using homemade broth instead of store-bought can make a big difference. It adds freshness and depth to your dish. To avoid mushy rice, rinse it before cooking. This removes excess starch. Use long-grain rice for the best texture. The optimal simmering time is about 20 to 25 minutes. Keep the pot covered during this time. This traps steam and helps the rice cook evenly. This casserole pairs well with a simple green salad. Try a side of guacamole or tortilla chips for crunch. For a pop of color, garnish your dish with fresh cilantro. Squeeze a bit of lime juice on top for extra flavor. Pro Tips Use Fresh Ingredients: Whenever possible, opt for fresh vegetables to enhance the flavor and nutrition of your casserole. Adjust the Spice Level: Feel free to modify the amount of chili powder to suit your taste; add more for extra heat or reduce it for a milder dish. Let it Rest: Allowing the casserole to sit for a few minutes after cooking helps the flavors to meld and makes it easier to serve. Garnish Wisely: Fresh cilantro adds a burst of flavor; consider adding avocado or a squeeze of lime for an extra fresh twist. {{image_2}} You can easily add protein to this casserole. Chicken, beef, or tofu work great. - Chicken: Use cooked, shredded chicken for a hearty meal. - Beef: Ground beef brings a rich flavor. Brown it before adding rice. - Tofu: Use firm tofu for a plant-based option. Cube it and sauté with vegetables. Adding protein makes the dish filling and satisfying for everyone at the table. To make this dish fully plant-based, skip the cheese or use vegan cheese. You can also add more veggies like zucchini or mushrooms. - Vegetarian: Keep the cheese or use a dairy-free option. - Vegan: Replace cheese with avocado or cashew cream for creaminess. This way, you cater to different diets while keeping the flavor strong. You can adjust the spice level to fit your taste. Whether you like it mild, medium, or hot, it’s easy to change. - Mild: Use less chili powder or skip the spicy tomatoes. - Medium: Stick to the recipe as is for a balanced kick. - Hot: Add jalapeños or extra chili powder for more heat. These small tweaks let you customize the dish for your family’s preferences. To store leftover casserole, let it cool first. Use a clean, airtight container. This helps keep it fresh. Place the container in the fridge. It will last for about three to four days. Make sure to label the container with the date. This way, you always know when it was made. Freezing this casserole is easy. First, let it cool completely. Then, cut it into portions. Wrap each piece tightly in plastic wrap. Place the wrapped portions in a freezer-safe bag. Squeeze out as much air as you can before sealing. This method helps prevent freezer burn. You can keep it frozen for up to three months. To reheat without drying out, use the oven or microwave. For the oven, preheat it to 350°F (175°C). Place the casserole in an oven-safe dish. Cover it with foil to keep moisture in. Bake for about 20-25 minutes. If using a microwave, cover with a damp paper towel. Heat in short bursts, checking often. This keeps the dish nice and moist. You can use brown rice, but you need to change the cooking time. Brown rice takes longer to cook than white rice. It usually needs about 40-45 minutes. You should also add more liquid. Try using 2 and a half cups of vegetable broth instead of 2 cups. Yes, this dish can be gluten-free. Just check the labels on your ingredients. Some canned goods use gluten in their processing. Look for gluten-free black beans and broth. The other ingredients are naturally gluten-free. You can prepare this dish in advance. Cook it fully, then let it cool. Store it in the fridge for up to three days. When ready to serve, reheat it in a pot over low heat. Add a splash of broth to keep it moist. You can also freeze it for up to three months. Just thaw it overnight before reheating. This blog post covered a tasty casserole recipe with rice, beans, and veggies. You learned how to prepare ingredients, combine them, and cook the dish. Tips helped enhance flavor and avoid mistakes. We explored variations for different diets and spice levels. In the end, this dish is flexible and easy to make. Enjoy experimenting to find your perfect version. Trust me, you’ll want to make it again!
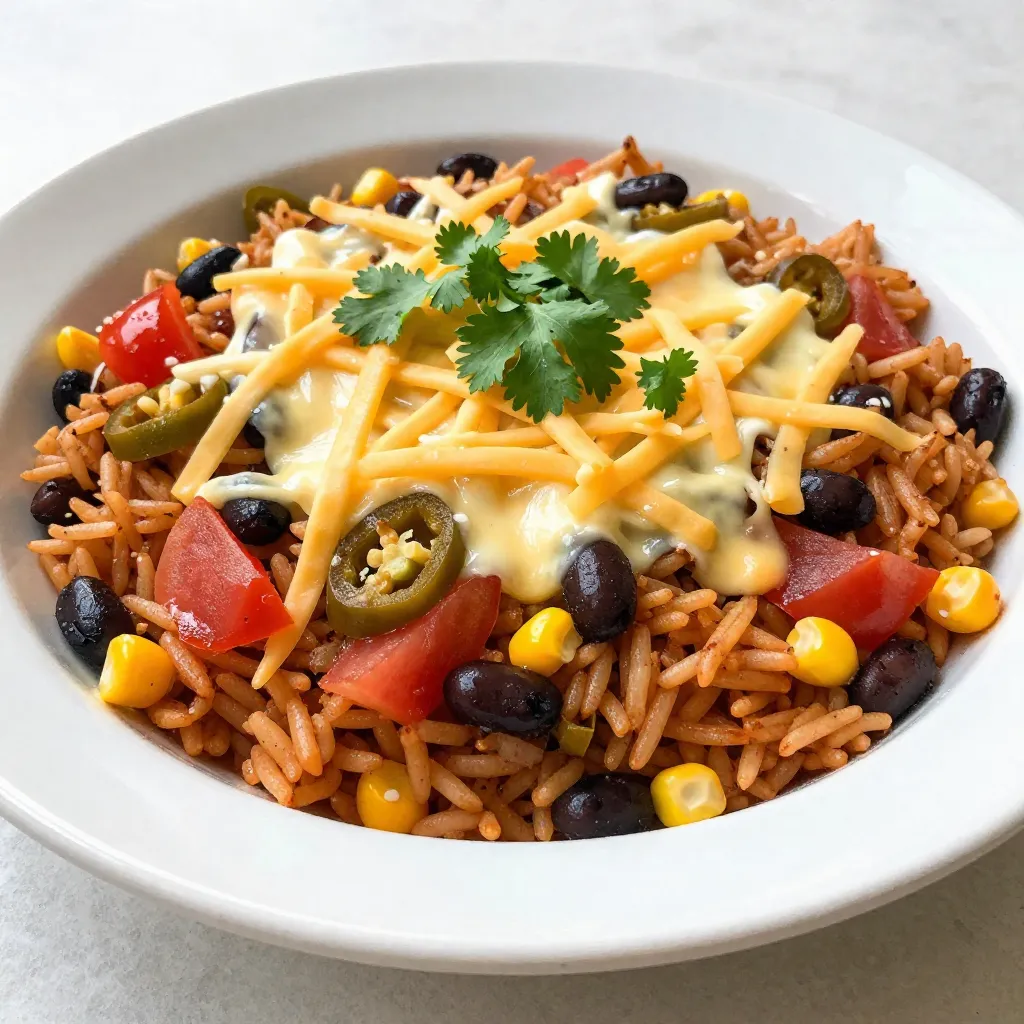
One-Pot Mexican Rice Casserole Tasty Family Meal
Looking for a quick, tasty meal for your family? My One-Pot Mexican Rice Casserole is here to save the day! Packed with flavor and made
- 1 pound boneless, skinless chicken breasts - 1 can (15 oz) black beans, rinsed and drained - 1 can (15 oz) corn, drained - 1 can (14.5 oz) diced tomatoes with green chilies - 1 can (6 oz) tomato paste - 1 medium onion, diced - 2 cloves garlic, minced - 1 bell pepper (any color), diced You need fresh chicken for this soup. I like using boneless, skinless chicken breasts. They cook well and shred easily. Canned goods help make this soup quick. Black beans, corn, diced tomatoes, and tomato paste add great flavor. Onion and garlic are crucial for a rich taste. I use a medium onion and two cloves of garlic. Add some color with a bell pepper. You can pick any color you like. - 1 packet taco seasoning - 1 cup shredded cheddar cheese (for topping) - 1/2 cup sour cream (for topping) - Fresh cilantro (for garnish) - Salt and pepper to taste - Olive oil To bring all the flavors together, taco seasoning is a must. It adds spice and depth. For toppings, I recommend shredded cheddar cheese, a dollop of sour cream, and fresh cilantro. Olive oil helps sauté the veggies. Salt and pepper are key for adjusting the taste. Keep these ingredients ready, and your Chicken Taco Soup will be a hit! {{ingredient_image_1}} Sautéing vegetables Start by heating 1 tablespoon of olive oil in a large pot over medium heat. Add 1 medium diced onion and 1 diced bell pepper. Sauté these for about 5 minutes. You want them to soften and release their flavor. Next, stir in 2 minced garlic cloves. Cook for another minute until you smell that great garlic aroma. Adding the chicken and broth Now, it’s time to add 1 pound of boneless, skinless chicken breasts to the pot. Sprinkle in 1 packet of taco seasoning. Then pour in 4 cups of chicken broth. Finally, add 1 can of rinsed black beans, 1 can of drained corn, 1 can of diced tomatoes with green chilies, and 1 can of tomato paste. Stir everything well to mix the flavors together. Simmering the soup Bring the soup mixture to a gentle boil. Once it's boiling, reduce the heat to low. Cover the pot and let it simmer for about 20 to 25 minutes. This will cook the chicken through and blend the flavors nicely. Shredding the chicken After simmering, take out the chicken breasts. Use two forks to shred the chicken. Once shredded, put the chicken back into the pot. Stir everything to combine. Taste the soup and add salt and pepper as needed. Plating the soup Ladle the soup into bowls. The warm, hearty soup looks great and smells amazing! Adding toppings and garnishes Top each bowl with shredded cheddar cheese. Add a dollop of sour cream. Finish with a sprinkle of fresh cilantro. For extra flair, serve with tortilla chips on the side. You can also add a lime wedge for a fresh touch. Enjoy your savory Chicken Taco Soup! - To ensure perfect chicken texture, use boneless, skinless chicken breasts. - Sauté the chicken in olive oil before adding it to the soup. This adds flavor. - Shred the chicken after cooking. This keeps it tender and easy to eat. - Adjusting seasoning is simple with salt and pepper. Start with a little and taste. - Add more taco seasoning if you want a bolder flavor. Mix well to blend. - Serve with crispy tortilla chips for a crunchy side. - Fresh lime wedges add zest. They brighten each spoonful. - Garnish with extra cilantro for color and flavor. - Use bowls that show off the vibrant colors of the soup. - Top each bowl with shredded cheese and sour cream for creaminess. Pro Tips Use Rotisserie Chicken: For a quicker preparation, use pre-cooked rotisserie chicken. Just shred it and add it to the soup at the end for a delicious flavor boost. Customize Your Spice Level: If you prefer a spicier soup, consider adding chopped jalapeños or a dash of hot sauce along with the taco seasoning to kick up the heat. Make It Ahead: This soup freezes well! Make a double batch and store half in the freezer for a quick meal on busy nights. Garnish Creatively: Enhance your presentation by adding sliced avocado, diced red onion, or crushed tortilla chips on top for extra texture and flavor. {{image_2}} You can switch proteins in this soup. Try turkey if you want a lighter dish. If you prefer plant-based meals, use beans like black beans or pinto beans. They add protein and fiber. For those avoiding dairy, skip the cheese and sour cream. Instead, use avocado for creaminess. You can also use cashew cream for a rich texture. To spice things up, add chili powder or jalapeños. These will give your soup a kick. If you like it mild, skip the heat. You can also customize the soup with more veggies. Add corn, zucchini, or spinach. Fresh ingredients enhance flavor and texture. Just chop them up and toss them in! To store Chicken Taco Soup, let it cool first. Use an airtight container. This keeps the soup fresh. Place the soup in the fridge. It will last for about 3 to 4 days. Check for any off smells or changes in color before eating. If you want to enjoy it later, freezing is a great option. Freezing Chicken Taco Soup is simple. First, cool the soup completely. Then, pour it into freezer-safe bags. Remove as much air as you can. This helps prevent freezer burn. You can store it for up to 3 months. When you're ready to eat, take it out of the freezer. Thaw it overnight in the fridge. To reheat, warm it on the stove over low heat. Stir occasionally until hot. You can also use a microwave. Heat in short bursts, stirring in between, until it's warm throughout. Can I use frozen chicken? Yes, you can use frozen chicken. Just add it directly to the pot. Cook the soup a bit longer to ensure the chicken cooks through. It’s a great time-saver! How can I make this soup spicier? To add some heat, include diced jalapeños or a splash of hot sauce. You can also add more taco seasoning for extra spice. Adjust to your taste! Caloric content and serving size Each serving of Chicken Taco Soup has about 300 calories. This recipe makes about six servings. Enjoy it as a hearty meal or a light starter. Dietary considerations This soup is naturally gluten-free, as all the main ingredients are gluten-free. Always check labels on canned goods to be sure. It can also be made dairy-free by skipping cheese and sour cream. You now have a full guide to making Chicken Taco Soup. We covered ingredients, cooking steps, and storage tips. You learned how to sauté, simmer, and serve this tasty dish. Plus, we explored variations and answered common questions. Enjoy making this soup your way. It’s healthy, easy, and satisfying. Share it with family and friends. You’ll love the flavors and the smiles it brings.
Savory Chicken Taco Soup Quick and Easy Recipe
Looking for a quick and easy dinner that bursts with flavor? This Savory Chicken Taco Soup is just what you need! With simple ingredients like
- 1 lb chicken breast, cooked and shredded - 1 can (15 oz) white beans (like Great Northern or Cannellini), drained - 1 can (4 oz) chopped green chilies - 1 medium onion, diced - 3 cloves garlic, minced - 1 tsp ground cumin - 1 tsp chili powder - 1/2 tsp smoked paprika - 4 cups chicken broth - 1 cup heavy cream - 1/2 cup sour cream - 1 cup corn kernels (fresh or frozen) - 2 tbsp olive oil - Salt and pepper to taste - Fresh cilantro and lime wedges for garnish Each ingredient brings a special taste. You can use rotisserie chicken for quick prep. If you want beans, feel free to swap with black beans or pinto beans. Green chilies add a nice kick, but you can use jalapeños for more heat. If you don't have chicken broth, vegetable broth works too. For a dairy-free version, use coconut cream instead of heavy cream and sour cream. To boost the flavor, use fresh garlic instead of pre-minced. Fresh herbs, like cilantro, add brightness at the end. Using smoked paprika gives a rich, deep taste. Squeeze fresh lime juice before serving for a zesty lift. Don't skip the salt; it enhances all the flavors. For extra creaminess, try adding a bit more sour cream or cream. {{ingredient_image_1}} Gather all your ingredients first. This makes cooking easier. Here’s what you need: - 1 lb chicken breast, cooked and shredded - 1 can (15 oz) white beans, drained - 1 can (4 oz) chopped green chilies - 1 medium onion, diced - 3 cloves garlic, minced - 1 tsp ground cumin - 1 tsp chili powder - 1/2 tsp smoked paprika - 4 cups chicken broth - 1 cup heavy cream - 1/2 cup sour cream - 1 cup corn kernels - 2 tbsp olive oil - Salt and pepper to taste - Fresh cilantro and lime wedges for garnish Make sure your chicken is cooked and shredded. This helps it blend well in the chili. Dice the onion and mince the garlic. Drain the beans to remove excess liquid. Set everything aside for easy access. Heat 2 tablespoons of olive oil in a large pot over medium heat. Add the diced onion and sauté for about 5 minutes. You want the onion to turn translucent. Next, stir in the minced garlic for one minute. This step releases a nice aroma. Now, add the shredded chicken, white beans, green chilies, cumin, chili powder, and smoked paprika. Season with salt and pepper. Stir well to combine all the flavors. Pour in the chicken broth and bring the mix to a gentle boil. Lower the heat and let it simmer for 20 minutes. This allows the flavors to meld beautifully. After 20 minutes, stir in the corn, heavy cream, and sour cream. Mix until everything is well combined. Let it simmer for another 10 minutes. Check the seasoning and adjust with salt and pepper as needed. Serve the chili hot in bowls. Garnish with fresh cilantro and lime wedges. The lime adds a bright flavor. This chili pairs well with crusty bread or tortilla chips. Enjoy it with family and friends for a warm meal. I often see people skip the sauté step. Sautéing the onion and garlic builds flavor. Make sure not to rush this part. Cooking the onion until it is soft is key. Also, avoid adding all the cream at once. This can cause the chili to become too rich. Instead, add it slowly and taste as you go. Lastly, be careful with salt. Always taste before adding more. To make your chili extra creamy, use more heavy cream. You can also mix in cream cheese for richness. Another trick is to blend some of the white beans. This adds creaminess without changing the taste. For a lighter option, use Greek yogurt instead of sour cream. It gives the same tang with less fat. Want to boost the flavor? Add more spices! A pinch of cayenne pepper brings heat. You can also try adding a splash of lime juice for brightness. If you like it smoky, increase the smoked paprika. Fresh cilantro adds a bright taste when served. Don’t forget to adjust according to your taste buds! Pro Tips Use Rotisserie Chicken: For a quicker preparation, use store-bought rotisserie chicken instead of cooking your own. It adds great flavor and saves time! Adjust the Spice Level: If you prefer a spicier chili, add diced jalapeños or a pinch of cayenne pepper to the mix. Adjust according to your taste! Add Extra Creaminess: For an even creamier texture, consider adding an additional 1/2 cup of heavy cream or a splash of cream cheese when mixing in the sour cream. Garnish for Freshness: Always garnish with fresh cilantro and lime wedges just before serving to enhance the flavor and presentation of your chili. {{image_2}} You can enjoy a tasty vegetarian version of this chili. Simply replace the chicken with more beans. Use two cans of white beans instead of one. Add extra veggies like bell peppers, zucchini, or even spinach. These add color and nutrients. Keep the broth and spices the same for flavor. If you love heat, spice up your chili! Add diced jalapeños or serrano peppers. Mix these in when you cook the onion and garlic. You can also increase the chili powder. A pinch of cayenne pepper adds a nice kick too. Adjust the amount to suit your taste. Using a slow cooker makes this dish even easier. Start by sautéing the onion and garlic in a pan. Then, transfer them to the slow cooker. Add all the other ingredients, except for the cream and sour cream. Cook on low for 6 hours or high for 3 hours. Stir in the cream and sour cream just before serving. This method deepens the flavors and makes it super simple. Store any leftover white chicken chili in an airtight container. Make sure it cools down to room temperature first. This helps keep it fresh. Place it in the fridge where it can last for up to three days. When you want to enjoy it later, just take it out and check the smell and look before eating. You can freeze white chicken chili for longer storage. Use a freezer-safe container or heavy-duty freezer bags. Leave some space at the top for the chili to expand. Label the container with the date. It can stay frozen for up to three months. When ready to eat, move it to the fridge to thaw overnight. Reheat the chili on the stove for even heating. Pour it into a pot and heat it over medium heat. Stir often to prevent sticking. If it seems thick, add a splash of chicken broth or water. You can also use a microwave. Place it in a microwave-safe bowl and cover it. Heat in short bursts, stirring in between, until hot. Enjoy your warm, comforting chili! This chili wins awards due to its rich flavor and creamy texture. I blend spices like cumin and smoked paprika for depth. The combination of chicken, white beans, and green chilies creates a harmony of tastes. Each ingredient plays a key role in making it special. The heavy cream and sour cream add a luscious finish. It warms you up and satisfies your taste buds. People rave about this chili because it feels like a hug in a bowl. Yes, you can use canned chicken. It saves time and effort. Just drain and rinse the chicken before adding it. Canned chicken works well in this recipe. However, fresh cooked chicken has better texture and flavor. If you choose canned, make sure to adjust the cooking time. Stir it in during the last few minutes to heat through. To spice it up, add more chili powder or diced jalapeños. You can also use cayenne pepper for extra heat. A few dashes of hot sauce can add a nice kick too. Another option is to top it with sliced jalapeños or spicy cheese. Experiment with spices to find your perfect heat level. Just remember to balance the flavors so it stays delicious. In this post, I covered the key steps for making the best chili. We discussed essential ingredients, helpful tips, and variations to suit your taste. Remember the prep work and avoid common mistakes. These points will help you craft a dish everyone loves. Don’t shy away from experimenting, whether it’s making it creamier or adding spice. Enjoy your cooking adventures and make that chili your own.
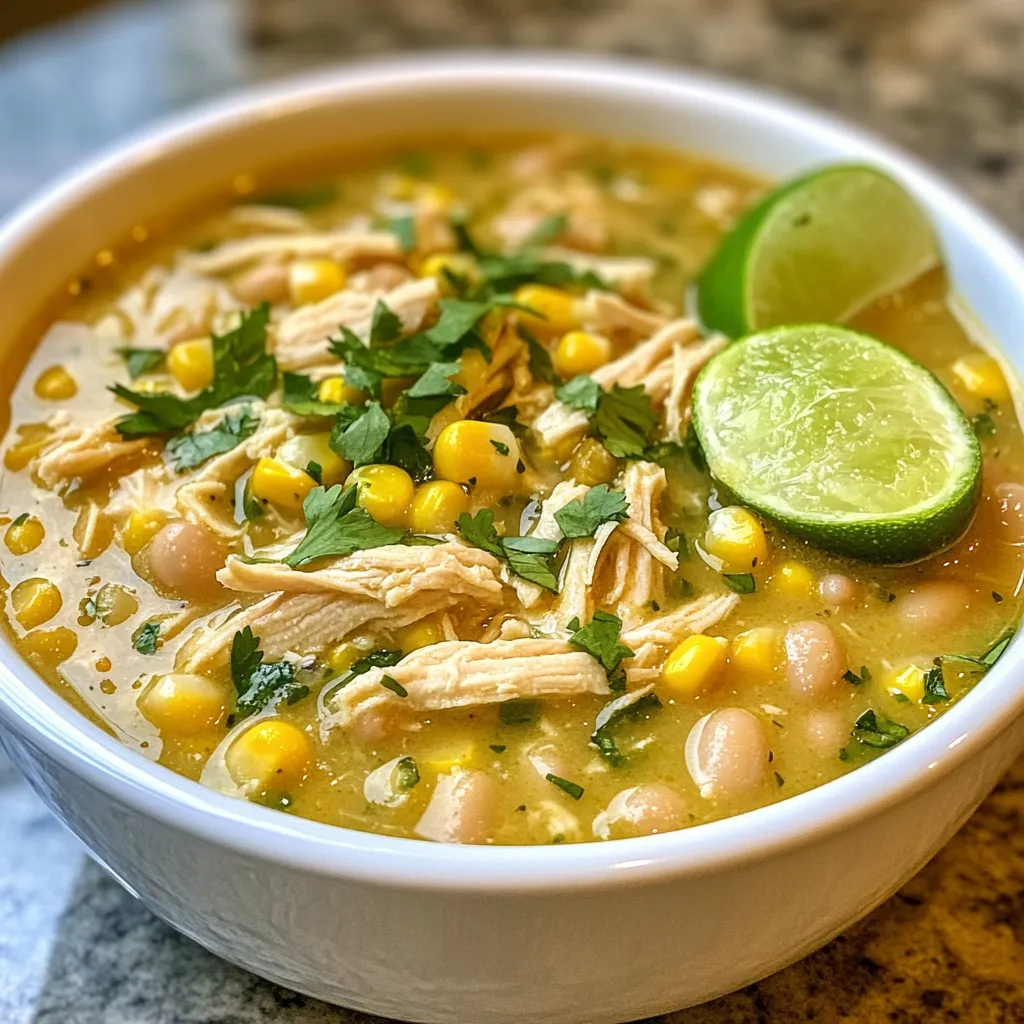
Award Winning White Chicken Chili Flavorful Delight
If you love comfort food, you’re in for a treat with this award-winning white chicken chili! This dish packs a punch of flavor and warmth
- 1 lb (450g) ground beef - 2 medium sweet potatoes, peeled and diced - 1 medium onion, finely chopped - 2 cloves garlic, minced - 1 bell pepper (red or yellow), diced - 1 cup corn kernels (fresh or frozen) - 1 teaspoon smoked paprika - 1 teaspoon cumin - ½ teaspoon chili powder - Salt and pepper to taste - 2 tablespoons olive oil - Fresh cilantro or parsley, for garnish These ingredients bring together a colorful mix of flavors. The ground beef gives a hearty base. Sweet potatoes add natural sweetness and nutrition. Onions and garlic provide a savory kick. Bell peppers add crunch and color. Corn brings sweetness and texture, while spices tie everything together. - 1 cup black beans (canned or cooked) - 1 cup diced zucchini or yellow squash - 1 teaspoon chili flakes for heat - ½ cup shredded cheese (cheddar or Monterey Jack) You can switch things up with these options. Black beans add protein and fiber. Zucchini or squash brings more veggies into the mix. Chili flakes can spice things up if you like heat. Cheese adds creaminess and richness. This dish is healthy and full of nutrients. Each serving offers: - Protein from beef for muscle health. - Fiber from sweet potatoes and corn for digestion. - Vitamins A and C from the bell pepper and sweet potatoes for skin health. - Healthy fats from olive oil to support heart health. Eating this meal means you get a balanced dinner. It’s tasty and good for you, making it a great choice for any night of the week. {{ingredient_image_1}} Start by gathering all your ingredients. You will need: - 1 lb ground beef - 2 medium sweet potatoes, peeled and diced - 1 medium onion, finely chopped - 2 cloves garlic, minced - 1 bell pepper, diced - 1 cup corn kernels - 1 teaspoon smoked paprika - 1 teaspoon cumin - ½ teaspoon chili powder - Salt and pepper to taste - 2 tablespoons olive oil - Fresh cilantro or parsley for garnish Make sure to wash the vegetables well. Dice everything into small, even pieces. This helps them cook evenly. Heat the olive oil in a large skillet over medium heat. Add the chopped onion. Sauté for 3-4 minutes until the onion is soft. Next, stir in the minced garlic and diced bell pepper. Cook this mix for another 2 minutes. You want it to smell great. Now, add the ground beef to the skillet. Use a spoon to break it apart. Cook until the beef is brown, which takes about 5-7 minutes. Season with salt, pepper, smoked paprika, cumin, and chili powder. Mix well. After the beef is brown, add the diced sweet potatoes and corn. Stir it all together. Cover the skillet with a lid and turn down the heat to medium-low. Let the sweet potatoes cook for 15-20 minutes. Stir occasionally. If the mix looks dry, add a splash of water. This will help steam the potatoes. When the sweet potatoes are tender, taste the dish. Adjust the seasoning if needed. Don’t forget to garnish with fresh cilantro or parsley before serving. You can serve this dish straight from the skillet for a cozy look. If you want a fancier touch, scoop servings onto individual plates. Add extra herbs on top for color. This dish works great for family dinners or casual get-togethers. Enjoy your flavorful meal! When picking sweet potatoes, look for firm ones. The skin should be smooth and free from wrinkles. Avoid any with soft spots or blemishes. Choose medium-sized sweet potatoes for even cooking. They will blend well with the beef and add great flavor. Start with a hot skillet. This helps the beef brown well. Use a wooden spoon to break it up as it cooks. Cook until it's no longer pink. This takes about 5 to 7 minutes. Don't rush it! Season the beef as it cooks. This allows the flavors to soak in. To boost flavor, add a dash of Worcestershire sauce while cooking the beef. This adds depth and richness. You can also sprinkle in some fresh herbs at the end. Cilantro or parsley adds brightness. For a bit of heat, add red pepper flakes. Just a pinch can make a big difference. Pro Tips Sweet Potato Selection: Choose firm, smooth sweet potatoes for the best texture and flavor. Avoid any with soft spots or blemishes. Ground Beef Variations: For a leaner option, use ground turkey or chicken instead of beef. Adjust seasonings to enhance the different flavors. One-Pan Cleanup: To make cleanup easier, line your skillet with parchment paper before cooking. This will help prevent sticking and make washing up a breeze. Flavor Boost: Add a splash of lime juice just before serving for a zesty kick that brightens the dish and enhances the overall flavors. {{image_2}} You can make a tasty vegetarian version of this dish. Instead of ground beef, use 1 can of black beans or lentils. Both options add protein and flavor. You can also add extra veggies like mushrooms or zucchini. These will keep the dish hearty and satisfying. If you need gluten-free options, all the ingredients in this recipe are naturally gluten-free. However, check your spices. Some can have hidden gluten. For a low-carb option, skip the sweet potatoes. Use cauliflower instead. It gives a nice texture and absorbs flavors well. To change the taste, try adding different spices. You can use Italian herbs for a fresh twist. Oregano and basil will brighten the dish. For a spicy kick, add diced jalapeños or a splash of hot sauce. If you want a sweeter note, mix in diced apples or a drizzle of honey. To store leftover Beef and Sweet Potato Skillet, let it cool first. Then, place it in an airtight container. This helps keep it fresh. You can store it in the fridge for up to three days. Make sure to label the container with the date. This way, you know when to eat it. Reheat your skillet in a pan over medium heat. Stir it often to heat evenly. You can also use a microwave. Place it in a microwave-safe bowl and cover it. Heat in short bursts, stopping to stir. This will keep the beef and sweet potatoes moist. If you want to freeze the skillet, use a freezer-safe container. Let it cool completely, then transfer it. Label the container with the date and name. You can freeze it for up to three months. When ready to eat, thaw it in the fridge overnight before reheating. Yes, you can use different meats. Ground turkey or chicken works well. You can also use diced beef or pork. Adjust cooking time as needed to ensure meat is fully cooked. Each meat gives a unique taste. Feel free to try what you like! If your sweet potatoes are not cooking fast, try these tips. First, make sure you cut them into small, even pieces. Smaller cubes cook faster. If they still need more time, add a splash of water to the skillet. This creates steam, helping them cook quicker. Keep the lid on to trap steam. Stir occasionally to ensure even cooking. Yes, you can prepare this dish ahead of time. Cook it as directed and let it cool. Then, store it in an airtight container in the fridge. It stays fresh for up to three days. When ready to eat, reheat it in a skillet on low heat. Add a splash of water if it seems dry. Enjoy your meal without the last-minute rush! This article covered the key ingredients and step-by-step instructions for your dish. We explored cooking tips, variations, and storage methods to help you succeed. Understanding these details makes cooking easier and more fun. You can mix and match ingredients to fit any diet. Try different flavors and see what you love best. With thoughtful prep and smart choices, your meal will shine. Enjoy the process and the tasty results!
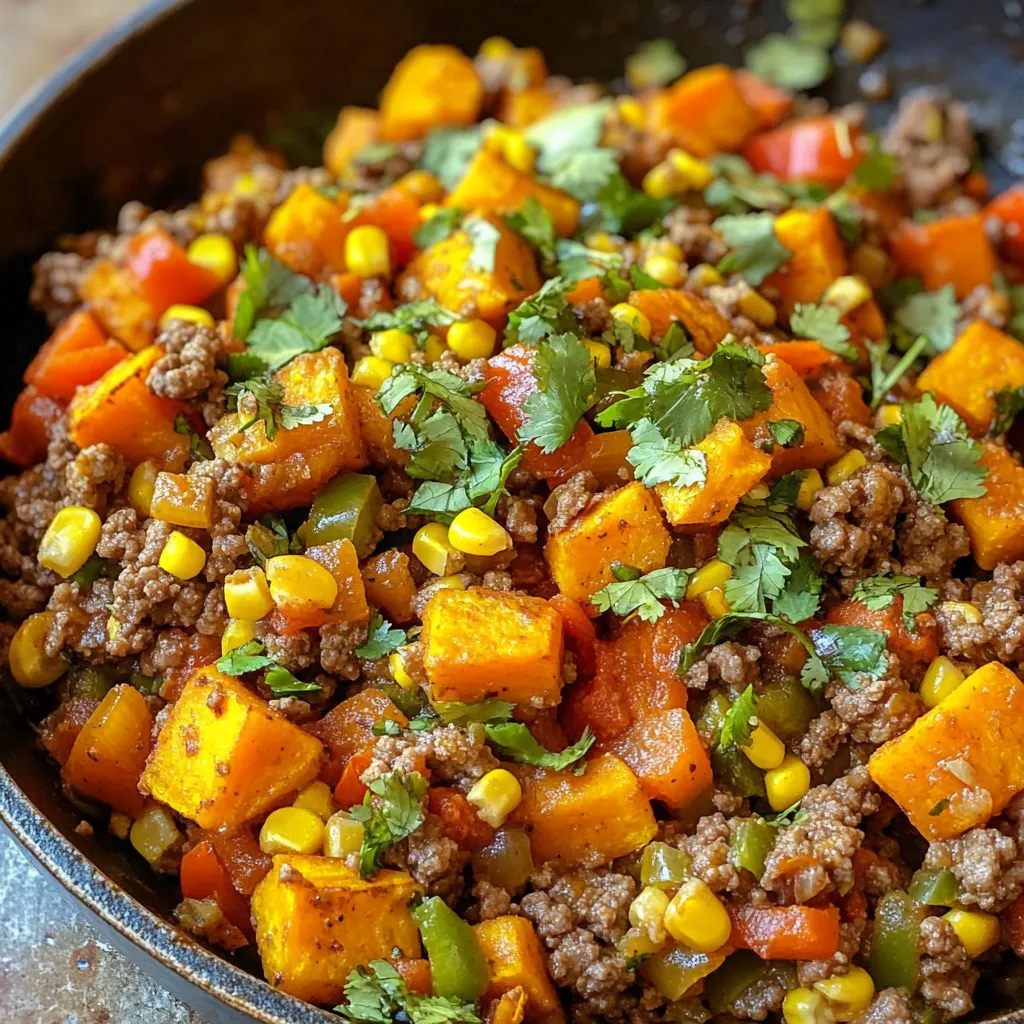
Beef and Sweet Potato Skillet Flavorful Dinner Recipe
If you’re looking for a quick and tasty dinner, this Beef and Sweet Potato Skillet recipe is for you. Packed with flavor and nutrition, it’s
- 8 oz penne pasta - 2 cups shredded cooked chicken - 1 cup buffalo sauce - 1 cup cream cheese, softened - 1 cup shredded mozzarella cheese - 1/2 cup blue cheese crumbles - 1/2 cup chopped green onions - 1 tsp garlic powder - 1/2 tsp onion powder - Salt and pepper to taste - 1/4 cup chopped fresh parsley for garnish Gathering these ingredients sets the stage for a tasty meal. First, the penne pasta acts as the base. It holds all the flavors well. You need cooked chicken for protein. Using shredded chicken makes mixing easier. Buffalo sauce adds a spicy kick. Cream cheese gives a rich texture that blends smoothly. Mozzarella cheese melts beautifully, creating a gooey layer on top. Blue cheese crumbles add a tangy flavor that contrasts nicely. Chopped green onions provide a fresh, crisp bite. Garlic and onion powders enhance the overall taste. Finally, salt and pepper season the dish perfectly. Use fresh parsley for a vibrant finish. Each ingredient plays a key role in creating this dish. By choosing quality items, you ensure a delicious outcome. Enjoy the process of cooking and savor the flavors! {{ingredient_image_1}} - Preheat the oven to 350°F (175°C). - Cook the penne pasta until it is al dente. Follow the package directions for the best results. Drain the pasta and set it aside. - In a large bowl, combine the shredded chicken with buffalo sauce. Mix well until the chicken is coated in sauce. - Next, add the softened cream cheese, garlic powder, onion powder, and half of the mozzarella cheese. Stir until everything blends nicely. - Gently fold in the cooked pasta, blue cheese crumbles, and chopped green onions. Season with salt and pepper to taste. - Transfer this mixture to a greased 9x13 inch baking dish. Spread it out evenly. Then, sprinkle the remaining mozzarella cheese over the top. - Place the dish in the oven and bake for 20-25 minutes. Watch for the cheese to melt and bubble. - Once done, let it cool for a few minutes. Garnish with fresh parsley before serving. Enjoy the tasty blend of flavors! To keep your pasta al dente, follow these steps: - Cook penne pasta just until it's firm, about 1-2 minutes less than the package suggests. - Drain it and rinse with cold water to stop the cooking process. For buffalo sauces, I love these brands: - Frank's RedHot for a classic kick. - Anchor Bar for a thicker, richer taste. - Sweet Baby Ray’s for a sweeter twist. You can change the cheese for fun flavors: - Try cheddar for a sharper taste. - Use pepper jack for some heat. - Goat cheese adds a creamy texture. To get the best cheesiness: - Mix different cheeses together. - Add cheese in layers while baking for a melty goodness. To serve your dish attractively: - Use a bright baking dish to make it pop. - Serve straight from the dish for a homey feel. For garnishing ideas: - Sprinkle chopped parsley for a fresh touch. - Add extra green onions for color and crunch. - Drizzle more buffalo sauce around the plate for flair. Pro Tips Cook Pasta Al Dente: Make sure to cook the penne pasta just until al dente to avoid it becoming mushy during baking. Buffalo Sauce Adjustment: Adjust the amount of buffalo sauce according to your spice preference; you can add more for extra heat or reduce it for a milder dish. Use Leftover Chicken: This recipe is perfect for using up leftover rotisserie or grilled chicken, making it a convenient and tasty option. Garnish Wisely: Garnish with additional green onions and parsley just before serving to enhance the presentation and add freshness. {{image_2}} You can easily make this dish vegetarian. Instead of chicken, use plant-based proteins. Options like chickpeas or tofu work well. These choices soak up the buffalo sauce flavor nicely. You can also add more veggies for texture. Try bell peppers, spinach, or mushrooms. They add color and taste to your bake. Want extra heat? Switch up your hot sauce! Different brands have unique flavors. You can try a smoky chipotle sauce or a fiery habanero sauce. They all add a different twist to your dish. Pair your pasta bake with spicy side dishes too. Think jalapeño cornbread or spicy garlic bread for a kick. You don’t have to stick with penne pasta. Other pasta shapes work great too! Fusilli, rotini, or even shells can hold the sauce well. If you're gluten-free, use gluten-free pasta options. There are many brands that taste just as good. Just cook them according to the package. This way, everyone can enjoy this tasty dish! To store leftover Buffalo Chicken Pasta Bake, let it cool first. Then, place it in an airtight container. Make sure to seal it tightly to keep it fresh. It will last in the fridge for up to three days. You can also cover the dish with plastic wrap if you prefer. For freezing, use a freezer-safe container. Divide the pasta bake into portions for easy meals later. It’s best to freeze it within two hours of cooking. The dish can stay frozen for up to three months. To thaw, move it to the fridge overnight before reheating. Reheat your Buffalo Chicken Pasta Bake in the oven for the best texture. Preheat to 350°F (175°C) and cover the dish with foil. Heat for about 20 minutes until warm. You can also microwave it, but the oven keeps the cheese melty. Make sure it reaches 165°F (74°C) for safe eating. Yes, you can prepare this dish the night before. Here are some tips: - Cook the pasta and let it cool. - Mix the chicken and buffalo sauce in a bowl. - Combine the other ingredients in a separate bowl. - Store everything in the fridge and mix before baking. - Bake it in the morning or right before dinner. You have many great options for sides. Here are some ideas: - A simple green salad with a light dressing. - Garlic bread for a crunchy side. - Roasted vegetables for a healthy touch. - Coleslaw for a cool and crisp contrast. Yes, you can make this dish dairy-free. Here are some great options: - Use dairy-free cream cheese instead of regular cream cheese. - Swap mozzarella for a dairy-free cheese type. - Skip the blue cheese or use a dairy-free alternative. - Adjust the buffalo sauce to ensure it is dairy-free. This Buffalo Chicken Pasta Bake is a simple and tasty meal. We mixed cooked chicken, pasta, and buffalo sauce for great flavor. Using cream cheese and mozzarella makes it creamy and cheesy. You can customize with spices or different cheeses to fit your taste. Store leftovers properly and enjoy them later. Try this recipe for dinner tonight; it’s sure to please everyone! Enjoy cooking and sharing your delicious dish.
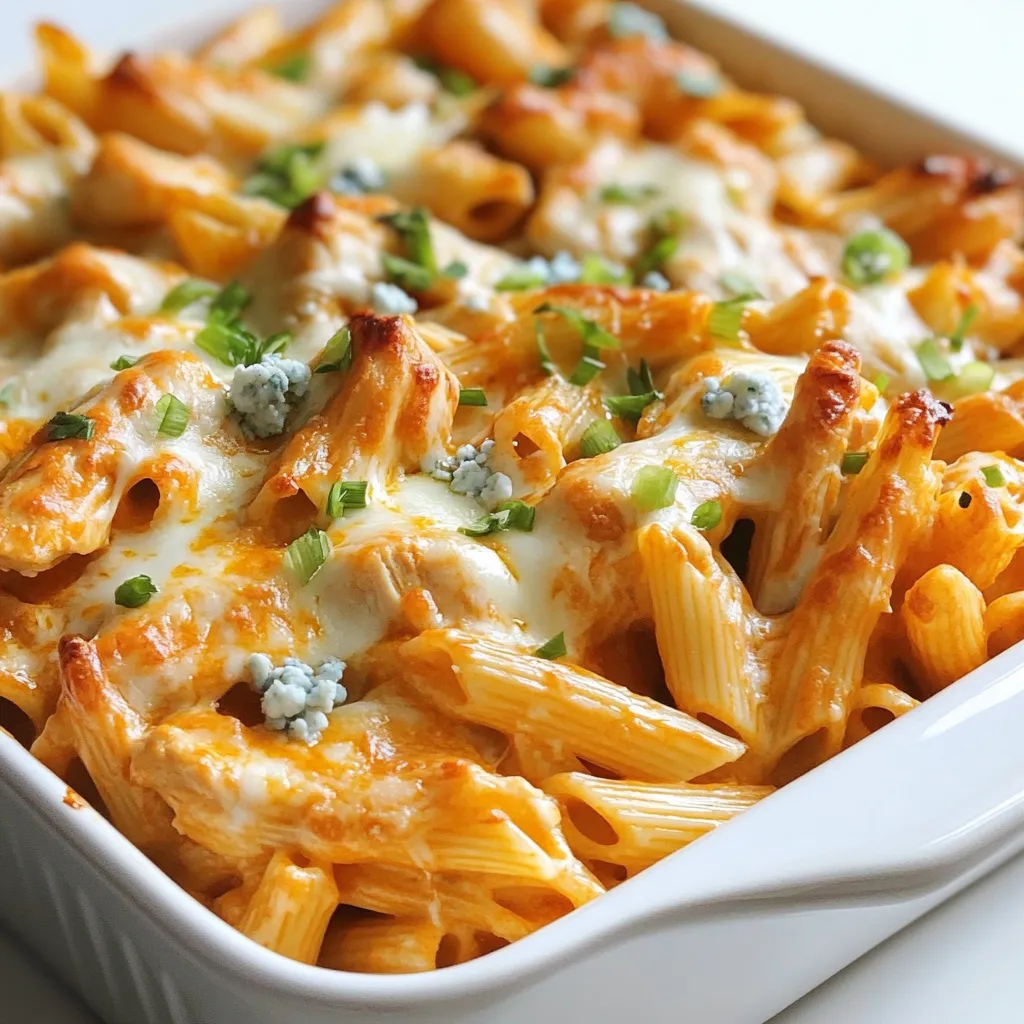
Buffalo Chicken Pasta Bake Easy and Flavorful Dish
Looking for a quick and tasty dish that will impress your family? My Buffalo Chicken Pasta Bake is the perfect solution! This easy recipe combines
To make ricotta stuffed peppers, you need fresh and simple ingredients. Here’s what you will need: - 4 large bell peppers (any color) - 1 cup ricotta cheese - 1/2 cup cooked quinoa - 1/2 cup chopped spinach (fresh or frozen, thawed) - 1/4 cup grated Parmesan cheese - 1 teaspoon garlic powder - 1 teaspoon Italian seasoning - Salt and pepper to taste - 1/2 cup marinara sauce (plus extra for serving) - Fresh basil leaves for garnish Each ingredient plays a key role in the flavor. The bell peppers add sweetness and crunch. Ricotta cheese brings a creamy texture that blends well with the other ingredients. Quinoa adds protein and a nice bite. Spinach gives a healthy touch, while Parmesan adds a savory depth. Garlic powder and Italian seasoning bring in aromatic flavors. Finally, marinara sauce ties everything together with its rich taste. When you gather these ingredients, you set the stage for a tasty dish. You can easily find all these items at your local grocery store. If you want to add your twist, think about other vegetables or spices you enjoy. Cooking should be fun and personal! {{ingredient_image_1}} - Preheat your oven to 375°F (190°C). - Cut the tops off the bell peppers and remove the seeds and membranes. Place them upright in a baking dish. - In a mixing bowl, combine: - 1 cup ricotta cheese - 1/2 cup cooked quinoa - 1/2 cup chopped spinach - 1/4 cup grated Parmesan cheese - 1 teaspoon garlic powder - 1 teaspoon Italian seasoning - Salt and pepper to taste Mix until smooth and well combined. - Spoon the ricotta mixture into each bell pepper, packing it down gently. - Pour 1/2 cup marinara sauce over the stuffed peppers. Make sure they are well coated. - Cover the baking dish with aluminum foil. Bake for 25 minutes. - Remove the foil and bake for another 10-15 minutes. The peppers should be tender and the cheese golden. - Let them cool for a few minutes before serving. - Garnish with fresh basil leaves and serve with extra marinara sauce on the side. To get soft and tender peppers, bake them right. Preheat your oven to 375°F (190°C). Place the peppers cut side up in a dish. Cover them with foil for the first 25 minutes. This keeps the steam inside, making them soft. After that, remove the foil and bake for another 10 to 15 minutes. This gives the cheese a nice golden touch and makes the peppers tender. While ricotta is delightful, you can mix in other cheeses too. Try mozzarella for a stretchy, gooey texture. Feta adds a nice tangy flavor. Goat cheese offers a creamy taste that pairs well. You can even blend in some sharp cheddar for extra richness. Feel free to experiment with flavors that you love. Serve your stuffed peppers with a side salad for a fresh crunch. Garlic bread also pairs well and adds heartiness. You can drizzle extra marinara sauce on top for more flavor. A sprinkle of fresh basil or parsley can brighten the dish. These small touches make your meal even more enjoyable. Pro Tips Choose Colorful Peppers: Using a mix of red, yellow, and green peppers not only adds visual appeal but also different flavor profiles. Make Ahead: Prepare the stuffed peppers in advance and store them in the refrigerator. Bake them just before serving for a quick meal. Extra Flavor: Add chopped sun-dried tomatoes or olives to the filling for an extra burst of flavor. Serve with a Side: Pair your stuffed peppers with a simple green salad or garlic bread for a complete meal. {{image_2}} You can make ricotta stuffed peppers vegetarian by using alternative proteins. Beans are a great choice. Black beans or chickpeas give good texture and protein. You can also add mushrooms for a rich, earthy flavor. Cook the mushrooms first to remove moisture. Mix them into the ricotta filling for extra depth. If you love meat, try adding ground meats. Ground beef or turkey works well. Cook the meat before mixing it with the ricotta. You can season it with spices like cumin or paprika. This adds a savory punch to your peppers. Just remember to adjust cooking times if you use raw meat. For those who enjoy heat, add jalapeños to the filling. Chop them finely and mix them in. This gives a nice kick to the dish. You can also use spicy marinara sauce instead of regular. It will make the whole meal more exciting. Just be careful not to overdo it if you don’t want it too spicy! To keep your ricotta stuffed peppers fresh, store them in an airtight container. Place a layer of plastic wrap on top before sealing. This keeps moisture in and odors out. You can also wrap each pepper in foil for extra protection. If you want to freeze them, place them in a freezer-safe bag. Squeeze out excess air before sealing to prevent freezer burn. To reheat your stuffed peppers, the oven is best. Preheat the oven to 350°F (175°C). Place the peppers in a baking dish with a splash of marinara sauce. Cover with foil to keep them from drying out. Heat for about 20 minutes or until warm. You can also use a microwave. Just place a pepper on a microwave-safe plate. Heat for 2-3 minutes or until hot, checking often. When stored correctly, ricotta stuffed peppers last about 3-4 days in the fridge. If frozen, they can last up to 3 months. Remember to label your containers with the date. This helps you keep track of how long they’ve been stored. Always check for signs of spoilage before eating. If they smell off or look strange, it's best to toss them. Yes, you can mix it up! Try using mozzarella or feta cheese. Both add great flavor. You can even blend cheeses for a unique taste. Just keep the ricotta as your base. It gives the filling a creamy texture. Look for a few key signs. The peppers should be tender but not mushy. The cheese on top should be slightly golden. You can also check the filling's warmth with a fork. If it is hot all the way through, they are ready to eat! Absolutely! You can prep the stuffed peppers a day in advance. Just store them in the fridge before baking. When you are ready, pop them in the oven. Add a few extra minutes to the bake time if they are cold. These stuffed peppers pair well with many sides. A simple green salad adds freshness. Garlic bread is also a great choice for dipping. You could even serve some extra marinara sauce on the side for added flavor. In this blog post, we explored how to make delicious stuffed bell peppers. You learned about the key ingredients, step-by-step instructions, and helpful tips. We also shared fun variations, storage advice, and answered common questions. These stuffed peppers are simple and tasty, making them perfect for your meals. Try using different cheese or add spices for a unique twist. Enjoy making these nutritious peppers that everyone will love!
Ricotta Stuffed Peppers Flavorful and Easy Recipe
Are you ready to create a dish that bursts with flavor and is super easy to make? My Ricotta Stuffed Peppers recipe is just what
- 1 lb boneless, skinless chicken breast, cut into bite-sized pieces - 2 tablespoons sesame oil - 3 tablespoons low-sodium soy sauce - 2 tablespoons honey or maple syrup - 3 cloves garlic, minced - 1 tablespoon ginger, grated - 1 cup broccoli florets - 1 bell pepper, sliced (any color) - 1 carrot, julienned - 2 green onions, sliced - 2 tablespoons sesame seeds - Cooked brown rice or quinoa (for serving) These ingredients come together to create a tasty and healthy dish. Chicken breast gives you lean protein. The sesame oil adds a rich flavor and healthy fats. Low-sodium soy sauce keeps the salt down while still boosting taste. Honey or maple syrup gives a hint of sweetness. Garlic and ginger both add bold flavors and health benefits. Broccoli, bell pepper, and carrot ensure you get your veggies in. Finally, sesame seeds and green onions give a nice crunch and fresh taste. You can swap some ingredients for a lighter twist: - Use skinless turkey breast instead of chicken for fewer calories. - Replace sesame oil with olive oil for a different flavor profile. - Try coconut aminos in place of soy sauce for a soy-free option. - Use agave syrup instead of honey for a plant-based sweetener. - Add spinach or snap peas for more greens and color. These swaps can keep the dish healthy while offering new tastes. - Chicken breast: High in protein, low in fat. Great for muscle health. - Sesame oil: Contains healthy fats and antioxidants. Good for heart health. - Low-sodium soy sauce: Offers flavor with less sodium, helping manage blood pressure. - Honey or maple syrup: Natural sugars that provide energy. - Garlic: Known for boosting the immune system and lowering cholesterol. - Ginger: Aids digestion and has anti-inflammatory properties. - Broccoli: Packed with vitamins C and K, plus fiber for digestion. - Bell pepper: Rich in vitamin A and antioxidants, good for skin health. - Carrot: High in beta-carotene, which is great for vision. - Green onions: Low in calories and provide vitamin K and folate. - Sesame seeds: Full of calcium and healthy fats, great for bone health. - Brown rice or quinoa: Whole grains that offer fiber and help keep you full. Each ingredient adds its own health benefits, making this dish both tasty and nutritious. {{ingredient_image_1}} To start, grab a bowl and whisk together the sesame oil, soy sauce, honey, minced garlic, and grated ginger. This mix creates a tasty marinade. The sesame oil adds rich flavor, while the soy sauce brings saltiness. Honey or maple syrup gives a hint of sweetness. This mix is key to a great sesame chicken. Now, take your chicken pieces and place them in the marinade. Make sure each piece is well-coated. This step is important for flavor. Let the chicken marinate for at least 20 minutes. If you have time, refrigerate it for up to 2 hours. The longer it sits, the better the taste. You have two great options for cooking: a skillet or a wok. If you use a skillet, heat a bit more sesame oil over medium-high heat. Add the marinated chicken in a single layer. If you choose a wok, it will give you more space and heat evenly. Both methods work well, so pick what you have. After cooking the chicken for about 6-8 minutes, it's time to add veggies. Toss in the broccoli, bell pepper, and carrot. Stir-fry them for another 5-7 minutes. You want your vegetables to be tender but still crisp. In the last minute, sprinkle sesame seeds and sliced green onions on top. Toss everything together for a delicious finish. Serve your sesame chicken over brown rice or quinoa for a healthy meal. Enjoy! To get juicy chicken, start with fresh, high-quality meat. Cut the chicken into bite-sized pieces for even cooking. Marinating the chicken for at least 20 minutes helps lock in moisture. Use sesame oil in the marinade for a rich flavor. When cooking, don’t overcrowd the pan. This allows the chicken to brown nicely without steaming. Stir occasionally to ensure even cooking. Aim for a golden brown color on all sides. To boost flavor without adding calories, use fresh herbs and spices. Try adding chopped cilantro or basil for freshness. A splash of rice vinegar can add zing without extra fat. Lemon juice or lime juice also brightens the dish. If you want heat, add crushed red pepper flakes. These changes keep the taste exciting, while staying healthy. Remember, small tweaks can make a big difference in flavor. Meal prep makes weeknight cooking a breeze. Start by marinating the chicken in advance. You can even marinate it the night before. Cut and store vegetables like bell peppers and broccoli ahead of time. Keep them in airtight containers in the fridge. When ready to cook, everything is prepped and ready to go. Cook a larger batch of this sesame chicken. Store leftovers for lunch or dinner the next day. This saves time and keeps you on track with healthy eating. Pro Tips Marinate Longer for Flavor: For an even deeper flavor, marinate the chicken for a couple of hours or overnight in the fridge. This allows the spices and sauces to penetrate the meat better. Use Fresh Vegetables: Fresh vegetables not only enhance the taste but also the nutritional value of the dish. Choose vibrant and crisp veggies for the best texture. Adjust Sweetness to Taste: Depending on your preference, you can adjust the amount of honey or maple syrup in the marinade. Start with a little and add more if needed. Serve with a Side: This dish pairs wonderfully with steamed or sautéed greens, such as bok choy or spinach, for an extra nutrient boost and color on the plate. {{image_2}} You can switch chicken for turkey or tofu. Turkey has a similar taste and is lean. It is a great choice for a healthy meal. Tofu offers a plant-based option. It absorbs flavors well, making it tasty. Just cut the tofu into cubes and press it to remove water. Then marinate it just like chicken. Feel free to swap the vegetables based on what you have. Seasonal veggies add freshness and flavor. Try snap peas, zucchini, or mushrooms. You can even use asparagus in spring! Just remember to cut them into similar sizes for even cooking. Fresh herbs, like basil or cilantro, can also brighten the dish. You can change the sauce to create new flavors. For a spicy kick, add chili paste or sriracha. Want a sweeter touch? Use orange juice instead of honey. You can also try teriyaki sauce for a different taste. Each sauce brings its own unique twist to your healthy sesame chicken. Store any leftover healthy sesame chicken in an airtight container. Make sure it cools down first. Place it in the fridge. It will stay fresh for up to four days. You can freeze this dish for easy meals later. Use freezer-safe containers or bags. Make sure to leave some space at the top for expansion. The chicken can last up to three months in the freezer. When you're ready to eat, reheat your chicken on the stove. Use low to medium heat. Stir it often to heat evenly. You can also use the microwave. Heat in short bursts for one to two minutes. Check if it’s warm throughout before serving. Enjoy your tasty meal! No, this recipe is not gluten-free because it uses soy sauce. Most soy sauces contain gluten. To make it gluten-free, use tamari sauce instead. Tamari is a great substitute and tastes similar. Always check the label to ensure it is gluten-free. Yes, you can make this sesame chicken in advance. Simply marinate the chicken and store it in the fridge. You can keep it for up to two hours. If you want to prepare it longer ahead of time, cook the chicken and store it in the fridge. Reheat it when you are ready to eat. You can serve this dish with cooked brown rice or quinoa. Both are healthy options that add fiber. Steamed vegetables like green beans or snap peas also pair well. For a fresh touch, add a simple salad on the side. To make this dish spicier, add crushed red pepper flakes to the marinade. You can also use sriracha or chili paste. Start with a small amount and taste as you go. Adjust the heat to match your preference. Enjoy the extra kick! This blog covered how to make Healthy Sesame Chicken from scratch. We explored key ingredients, step-by-step cooking, and tips for a perfect dish. You learned about delicious variations and smart ways to store leftovers. Healthy meals can be easy and fun to create. Experiment with flavors and ingredients to suit your taste. Enjoy cooking and savor the benefits of a healthier dish!
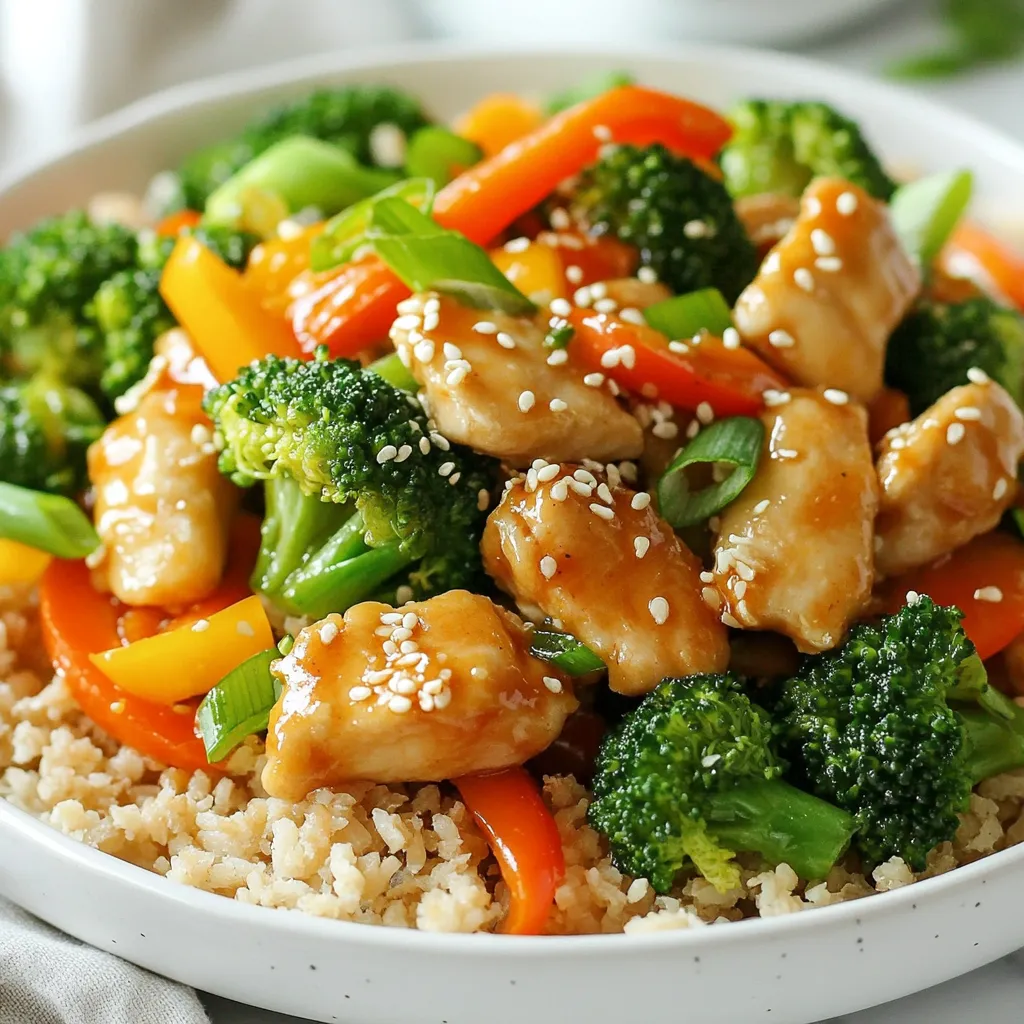
Healthy Sesame Chicken Flavorful and Nutritious Meal
Looking for a tasty and healthy meal? You’ve found it! My Healthy Sesame Chicken is packed with flavor and nutrients. In this blog, I’ll guide
To make a delicious spinach artichoke chicken bake, gather these key items: - 4 boneless, skinless chicken breasts - 1 cup frozen spinach, thawed and drained - 1 can (14 oz) artichoke hearts, drained and chopped - 1 cup cream cheese, softened - 1/2 cup sour cream - 1 cup shredded mozzarella cheese - 1/2 cup grated Parmesan cheese - 3 cloves garlic, minced - 1 teaspoon onion powder - 1 teaspoon garlic powder - Salt and pepper, to taste - 1 tablespoon olive oil - Fresh parsley, chopped for garnish (optional) You can enhance your dish with these optional ingredients: - 1/2 cup chopped bell peppers - 1 cup cooked and shredded chicken - 1/2 cup chopped sun-dried tomatoes - 1/2 teaspoon red pepper flakes for heat If you need to swap items, here are some great options: - Use fresh spinach instead of frozen; just wilt it in a pan. - Swap cream cheese with Greek yogurt for a lighter option. - Use cheddar cheese instead of mozzarella for a different flavor. - Replace artichoke hearts with mushrooms for a unique twist. These ingredients make the spinach artichoke chicken bake rich and tasty. You can mix and match based on what you have at home. Cooking should be fun and creative! {{ingredient_image_1}} Start by heating 1 tablespoon of olive oil in a large skillet over medium heat. While the oil heats, season 4 boneless, skinless chicken breasts with salt, pepper, onion powder, and garlic powder. This adds great flavor. Once the oil is hot, add the chicken breasts. Sear them for about 5 minutes on each side. You want them golden brown, but not fully cooked yet. When done, remove them from the skillet and set them aside. In a large mixing bowl, combine 1 cup of softened cream cheese, 1/2 cup of sour cream, and 1 cup of shredded mozzarella cheese. Add 1/2 cup of grated Parmesan cheese for a nice kick. Then, mix in 3 cloves of minced garlic, 1 cup of thawed and drained frozen spinach, and 1 can of drained and chopped artichoke hearts. Mix everything well. Taste it and add a pinch of salt and pepper as needed. This mixture should be creamy and full of flavor. Now, take a baking dish and lay the partially cooked chicken breasts inside. Spoon the creamy spinach and artichoke mixture over each chicken breast. Make sure they are fully covered. Preheat your oven to 375°F (190°C). Bake the dish for 25-30 minutes. Check that the chicken reaches an internal temperature of 165°F (75°C). You want the top to be golden and bubbly. Once baked, let it rest for 5 minutes. If you like, sprinkle fresh chopped parsley on top before serving. Enjoy this creamy and delicious meal! To get a nice sear on your chicken breasts, start with dry meat. Pat them with paper towels before cooking. This step helps create that golden crust. Heat your skillet over medium heat and add olive oil. Make sure the oil shimmers before adding the chicken. Season both sides with salt, pepper, onion powder, and garlic powder. Sear each side for about 5 minutes. Look for a nice brown color. Remember, they don't need to be fully cooked yet. You will finish cooking them in the oven. To get that creamy texture, use softened cream cheese. This makes it easy to mix. Combine it with sour cream, mozzarella, and Parmesan cheese. Mix these well with your spinach and artichokes. If your mixture feels too thick, add a splash of milk or cream. This will help it spread easily over the chicken. Taste and adjust the salt and pepper before spreading. This ensures every bite is flavorful and creamy. This dish pairs well with many sides. Try serving it with rice or quinoa for a hearty meal. A fresh green salad adds a nice crunch. You can also serve it with roasted vegetables for more color. If you want to keep it light, serve with steamed broccoli or green beans. For a fun touch, add crusty bread to soak up the creamy sauce. You can even top it with chopped fresh parsley for a pop of color and taste. Enjoy your meal! Pro Tips Tip Title: Use Fresh Spinach: If you have fresh spinach on hand, feel free to substitute it for frozen. Just be sure to sauté it until wilted before mixing it into the creamy sauce. Tip Title: Cheese Variations: Experiment with different types of cheese. Adding a bit of cream cheese with herbs or a sharp cheddar can elevate the flavor of the dish. Tip Title: Chicken Thickness: Ensure the chicken breasts are even in thickness for uniform cooking. If they are too thick, consider pounding them to an even thickness. Tip Title: Let It Rest: Allow the chicken to rest for a few minutes after baking. This will help retain the juices and enhance the overall flavor and moisture of the dish. {{image_2}} You can easily make this dish vegetarian. Just skip the chicken. Use extra artichokes and spinach instead. You can add mushrooms or bell peppers for more flavor. This makes a great meal for vegetarians. The creamy mixture still tastes amazing with just veggies. Feel free to mix in other veggies. Zucchini or sun-dried tomatoes work well. You can also add proteins like shrimp or tofu. If you like heat, add diced jalapeños. These variations keep the dish fun and fresh. For a low-carb twist, swap the chicken with cauliflower. Cauliflower rice or zucchini noodles can replace the chicken as well. You can use cream cheese and sour cream as is. This keeps the dish creamy and rich without the carbs. Enjoy a tasty meal that fits your diet! After enjoying your Spinach Artichoke Chicken Bake, store leftovers in an airtight container. Let the dish cool down to room temperature first. Place it in the fridge, where it will last for about three to four days. Always label your container with the date. This helps you keep track of how long it has been stored. To reheat your leftovers, you can use the oven or microwave. For the oven, preheat it to 350°F (175°C). Place the chicken bake in a baking dish and cover it with foil. Heat for about 15-20 minutes until warm. If you prefer the microwave, use a microwave-safe plate. Heat on medium power for 2-3 minutes. Check if it is heated through. If not, add more time in small intervals. You can freeze Spinach Artichoke Chicken Bake for longer storage. First, let it cool completely. Then, wrap it tightly in plastic wrap or aluminum foil. Place it in a freezer-safe bag or container. It can stay in the freezer for up to three months. To serve, thaw it in the fridge overnight. Reheat it in the oven or microwave as mentioned above. Enjoy the same great taste even after freezing! Yes, you can use fresh spinach. Use about 2 cups of fresh spinach. Cook it down in a skillet until wilted. Make sure to drain the excess water. This keeps your dish from being too watery. Check the internal temperature of the chicken. It should reach 165°F (75°C). You can also cut into the chicken. The meat should be white, not pink. Juices should run clear. These steps ensure your chicken is safe to eat. Serve this dish with rice, pasta, or a side salad. Garlic bread pairs well too. You can also make roasted vegetables for a healthy side. These options add variety and balance to your meal. This blog post covered all the key steps for making a tasty Spinach Artichoke Chicken Bake. We discussed the ingredients you need, how to prep and cook the dish, and tips for the best results. I also shared ways to customize the recipe and store your leftovers. Remember, cooking is fun! Don't be afraid to try new things. Enjoy your meal and share it with others. Happy cooking!
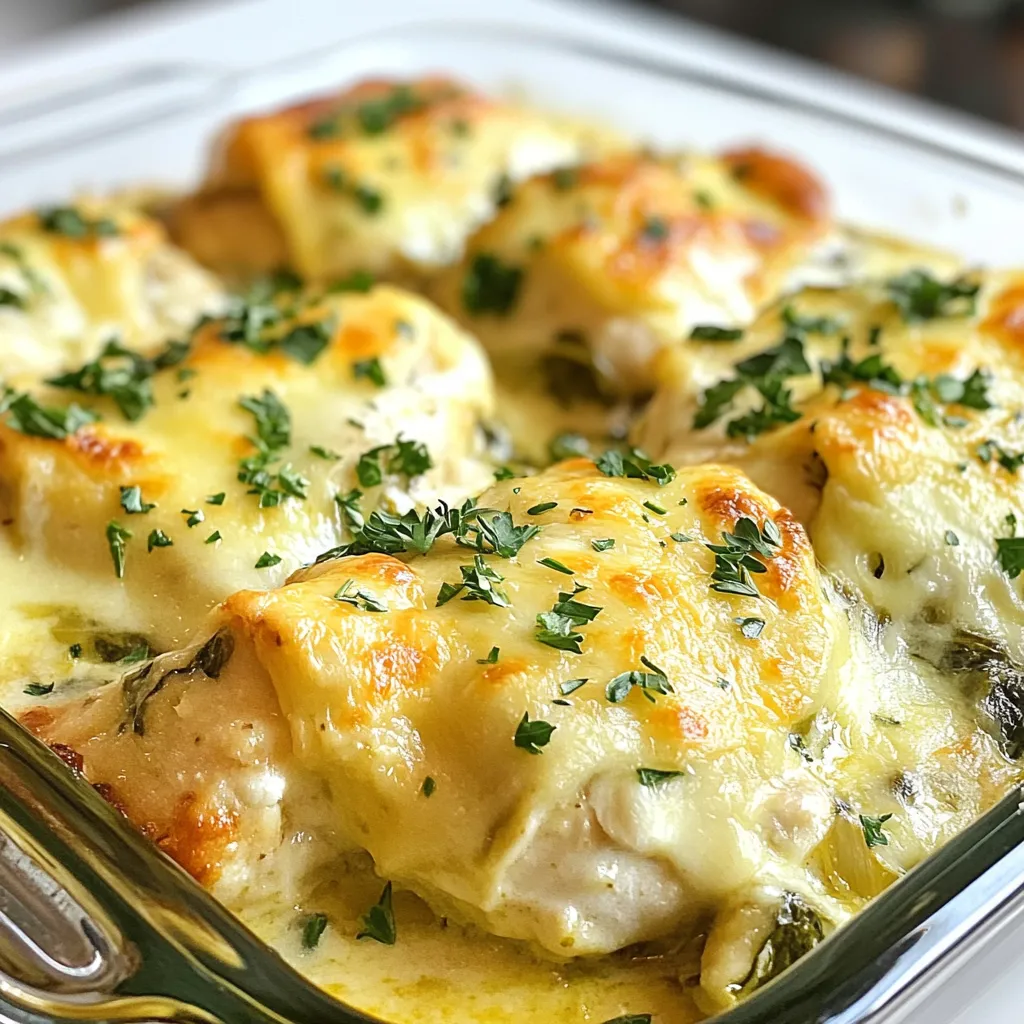
Spinach Artichoke Chicken Bake Flavorful and Easy Recipe
Are you ready to transform dinner into something delicious? This Spinach Artichoke Chicken Bake will impress your family without keeping you in the kitchen all