Dinner

Here’s what you need for Sticky Honey Garlic Shrimp. Each item adds flavor and depth to this dish. - 1 pound large shrimp, peeled and deveined - 1/4 cup honey - 4 cloves garlic, minced - 2 tablespoons soy sauce (or tamari for gluten-free) - 1 tablespoon freshly grated ginger - 1 tablespoon sesame oil - 1 tablespoon olive oil - 1 tablespoon rice vinegar - 1/2 teaspoon red pepper flakes (optional) - Salt and pepper to taste - 2 green onions, sliced (for garnish) - Sesame seeds (for garnish) These ingredients are simple yet powerful. The shrimp gives the dish protein. Honey adds sweetness, and garlic adds a bold flavor. Soy sauce brings saltiness, while ginger adds warmth. Sesame oil and rice vinegar enhance the taste. Use fresh shrimp for the best results. If you want a kick, add red pepper flakes. Garnish your dish with green onions and sesame seeds. They add color and crunch. Gather these ingredients, and you’re ready for a fun cooking adventure! {{ingredient_image_1}} 1. Start by whisking together the sauce. In a medium bowl, combine the honey, minced garlic, soy sauce, grated ginger, sesame oil, rice vinegar, and red pepper flakes if you like some heat. This blend gives the shrimp its sweet and savory kick. 2. Next, heat the skillet. Pour a tablespoon of olive oil into a large skillet and warm it over medium-high heat. Wait until the oil shimmers. This shows that your pan is ready. 1. Now, it's time to cook the shrimp. Add the peeled and deveined shrimp in a single layer in the skillet. Season them lightly with salt and pepper. Cook for about 2 to 3 minutes on one side until they start to turn pink. This is when they begin to cook through. 2. Flip the shrimp over and pour the honey garlic sauce over them. Stir gently to coat each shrimp in the sauce. Cook for another 2 to 3 minutes or until the shrimp are fully cooked. If the sauce feels too thick, add a splash of water to loosen it. 1. Once cooked, remove the skillet from the heat. Let the shrimp sit in the sauce for a minute. This step helps them absorb all those tasty flavors. 2. For serving, dish out the shrimp while hot. Garnish with sliced green onions and a sprinkle of sesame seeds. This adds a nice crunch and fresh flavor, making the dish even more delightful. Best shrimp to use I recommend using large shrimp for this dish. They cook evenly and stay juicy. Look for shrimp that are fresh, firm, and have a slight sea smell. If you prefer, frozen shrimp works too. Just remember to thaw it first. Avoiding overcooking Shrimp cook fast, so you need to watch them closely. Cook them only until they turn pink and opaque. This usually takes about 2-3 minutes per side. Overcooked shrimp become tough and rubbery. To check, cut one open; it should be white inside. Adjusting spice levels If you like heat, add more red pepper flakes to the sauce. Start with half a teaspoon and taste. You can always add more, but you can’t take it out! If you prefer a milder dish, skip the flakes or use just a pinch. Personalizing the garlic sauce You can tweak the garlic sauce to fit your taste. Want it sweeter? Add a touch more honey. Like it tangy? Increase the rice vinegar. Feel free to play with flavors until you find your perfect mix. Pro Tips Fresh Ingredients: Use fresh garlic and ginger for a more vibrant flavor profile. Fresh ingredients enhance the overall taste of the dish and bring out the best in the honey garlic sauce. Perfectly Cooked Shrimp: Be careful not to overcook the shrimp. They should be cooked just until they turn pink and opaque, which usually takes only 2-3 minutes per side. Overcooked shrimp can become rubbery. Adjusting Sauce Thickness: If the sauce becomes too thick while cooking, add a splash of water or broth to loosen it up. This will help you achieve the desired consistency for coating the shrimp. Garnishing Tips: For added flavor and visual appeal, consider garnishing with additional toppings like crushed peanuts or cilantro along with green onions and sesame seeds. {{image_2}} Gluten-free options If you need a gluten-free meal, swap soy sauce for tamari. Tamari tastes great and keeps the dish flavorful. You can also use coconut aminos as a soy sauce alternative. This adds a hint of sweetness. Alternative protein options Don’t have shrimp? Use chicken or tofu instead. Both proteins work well with the honey garlic sauce. For chicken, cut it into bite-sized pieces. Cook until golden and fully cooked. For tofu, use firm tofu, press it, and cut it into cubes. Sauté until golden brown before adding the sauce. Serving with rice or noodles Sticky Honey Garlic Shrimp pairs nicely with rice or noodles. Steam white or brown rice for a soft base. If you prefer noodles, try rice noodles or soba noodles. They soak up the sauce well and add texture to the dish. Pairing with vegetables Add colorful veggies for a complete meal. Broccoli, bell peppers, or snap peas work great. Sauté them in the skillet before adding the shrimp. This adds nutrients and makes your plate look vibrant and appealing. To store leftovers, let the shrimp cool down. Place them in an airtight container. Make sure the container is snug to keep air out. You can store the shrimp in the fridge for up to three days. Reheat the shrimp on the stove or in the microwave. If you choose to microwave, do it in short bursts to avoid overcooking. If you want to freeze Sticky Honey Garlic Shrimp, follow these simple steps. First, let the shrimp cool completely. Then, pack them in a freezer-safe bag or container. Squeeze out all the air to prevent freezer burn. You can freeze the shrimp for up to three months. When you’re ready to eat, thaw them in the fridge overnight. Reheat them gently in a skillet to keep them tender. How long to cook shrimp for perfect texture? Cook shrimp for about 4-6 minutes. Start with 2-3 minutes on one side. Flip them, then cook for another 2-3 minutes. They should turn pink and curl slightly when done. Can I use frozen shrimp? Yes, you can use frozen shrimp. Thaw them first in cold water. This helps to keep the texture nice. What to serve with Sticky Honey Garlic Shrimp? Serve this dish with rice or noodles. Steamed veggies also pair well. You can even use it in tacos for a tasty twist. Can I make this dish spicier? Absolutely! Add more red pepper flakes. You can also stir in some hot sauce to suit your taste. How to adjust the recipe for more servings? Simply double or triple the ingredients. Make sure to cook the shrimp in batches to avoid crowding the skillet. This keeps them juicy and flavorful. This recipe shows how to make Sticky Honey Garlic Shrimp. You learned about key ingredients, simple steps, and helpful tips. Remember to adjust flavors to fit your taste. Serve it with rice or noodles for a full meal. This dish is easy, tasty, and sure to impress. With these guides, you can cook a great meal for friends or family. Enjoy the cooking process and make it your own!
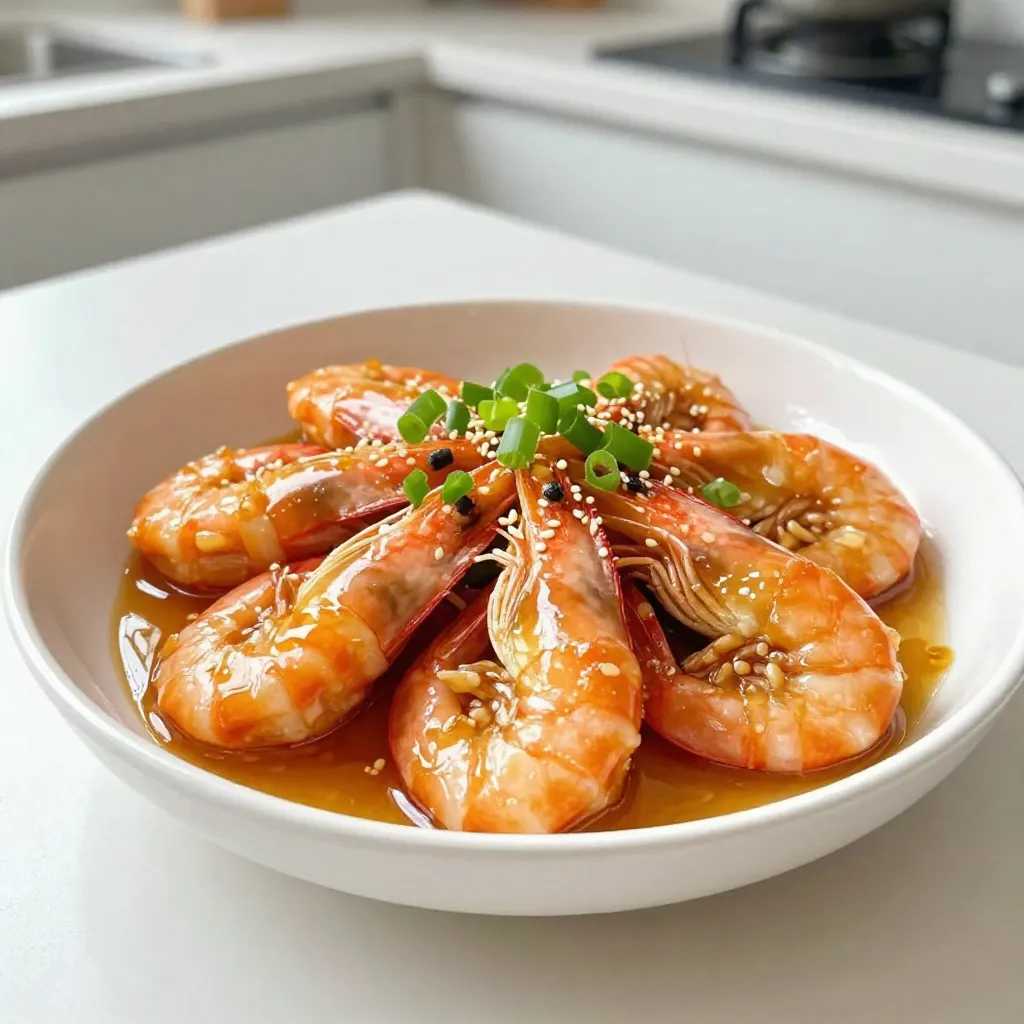
Sticky Honey Garlic Shrimp Flavorful Dinner Delight
Craving a meal that’s both quick and full of flavor? I’ve got just the dish for you: Sticky Honey Garlic Shrimp. This recipe brings together
- 1 lb (450g) ground beef or turkey - 1/2 cup breadcrumbs - 1/4 cup finely chopped onion - 2 cloves garlic, minced - 1 egg - 2 tablespoons soy sauce - 1/4 teaspoon black pepper - 1 tablespoon olive oil (for frying) These main ingredients form the base of your meatballs. You can choose ground beef for a richer taste or turkey for a lighter meal. Breadcrumbs help bind everything, while onion and garlic add flavor. The egg acts as a binder too. The soy sauce gives umami, and black pepper adds a hint of heat. - 1/3 cup honey - 1/4 cup soy sauce (for glaze) - 1 teaspoon minced ginger - 1 tablespoon sesame seeds (for garnish) - Chopped green onions (for garnish) The glaze is where the magic happens. Honey brings sweetness, while soy sauce adds saltiness. Ginger gives a nice zing to the sauce. Once you coat the meatballs, sprinkle them with sesame seeds and green onions for a pop of color and crunch. This simple glaze elevates the dish and makes it shine on your table. {{ingredient_image_1}} To start, gather a large bowl. Add 1 pound of ground beef or turkey. Next, mix in 1/2 cup of breadcrumbs. Then, chop and add 1/4 cup of onion, along with 2 minced garlic cloves. Crack in 1 egg and pour in 2 tablespoons of soy sauce. Finally, sprinkle in 1/4 teaspoon of black pepper. Mix all these ingredients well. It is key to combine them fully. This ensures every meatball has the same flavor. If you don’t mix enough, some bites may taste bland. Now, it’s time to cook. Preheat a large skillet over medium heat. Add 1 tablespoon of olive oil to the pan. While the oil heats, form the meat mixture into small balls, about 1 inch wide. Carefully place the meatballs in the skillet. Cook them for about 6 to 8 minutes. Be sure to turn them often. This helps them brown evenly on all sides. When they are browned and cooked through, they are ready for the glaze. While the meatballs cook, prepare the glaze. In a small saucepan, combine 1/3 cup of honey, 1/4 cup of soy sauce, and 1 teaspoon of minced ginger. Heat this mixture over low heat. Stir it occasionally. Look for the glaze to start simmering. This process helps the flavors mix well. Simmer until the glaze thickens slightly. Once the meatballs finish cooking, pour the glaze over them in the skillet. Toss them gently to coat. Let them cook for an extra 2 to 3 minutes. This will help the glaze stick well to each meatball. To cook meatballs well, aim for an internal temperature of 160°F (71°C). This ensures they are safe to eat. Cook them for about 6-8 minutes. Turn them to brown all sides. Use a meat thermometer to check the temperature. This way, you can be sure they are cooked through. For more flavor, you can change the seasoning. Try adding a pinch of red pepper flakes for heat. You can also switch out the ground beef for ground turkey or chicken. Each meat brings a different taste. If you like, add fresh herbs like parsley or cilantro. These changes can make the dish your own. Presentation is key to a great meal. Serve the meatballs on a nice platter. Drizzle extra honey garlic glaze over them. Garnish with sesame seeds and chopped green onions. This gives a colorful look. Pair your meatballs with jasmine rice or stir-fried vegetables. They add color and balance to your plate. Pro Tips Use Fresh Ingredients: Fresh garlic and ginger will enhance the flavor of your glaze, making it more aromatic and delicious. Don't Overcrowd the Pan: Cook the meatballs in batches if necessary to ensure they brown evenly and cook through without steaming. Adjust Sweetness: Feel free to adjust the amount of honey in the glaze to suit your taste; less honey will create a less sweet but more savory sauce. Perfect Pairings: These meatballs pair beautifully with steamed jasmine rice, stir-fried vegetables, or even in a wrap for a delicious meal. {{image_2}} You can switch up the protein in your meatballs. Ground chicken works great if you want a lighter dish. It has a mild flavor that absorbs the honey garlic glaze well. You can also try plant-based meat. These options are tasty and offer a good texture. They are perfect for those who prefer less red meat. If you want to make these meatballs healthier, consider using less honey or soy sauce. Low-sodium soy sauce can help cut down on salt. You can also reduce the amount of honey for less sweetness. This keeps the flavor while making a lighter meal. Every small change can help you enjoy a guilt-free treat. Add some zing to your meatballs by mixing in spices. A dash of sriracha can bring heat and excitement. You might also try garlic powder or smoked paprika for extra depth. Don’t hesitate to experiment with your favorite sauces too. This can lead to new and exciting flavor profiles. Enjoy the fun of creating your unique version! To keep your honey garlic glazed meatballs fresh, store them in an airtight container. This protects them from drying out. Place a piece of parchment paper between the meatballs to avoid sticking. In the fridge, they last for about 3 to 4 days. Make sure to cool them before storing. This helps maintain their taste and texture. Freezing meatballs is simple and great for meal prep. First, let the cooked meatballs cool completely. Then, arrange them on a baking sheet in a single layer. This prevents them from sticking together. Freeze for about 1 to 2 hours until firm. Next, transfer them to a freezer-safe bag or container. Label it with the date for easy tracking. When you are ready to eat, thaw the meatballs in the fridge overnight. To reheat, place them in a skillet over medium heat. Add a splash of water or broth. Cover the skillet to keep them moist. Heat until warmed through. This method keeps their flavor and texture delicious. It takes about 6 to 8 minutes to cook meatballs in the skillet. You want them to be brown on all sides and cooked through. Cooking time may vary with meat size and heat level. Always check the center to ensure it's no longer pink. Yes, you can use different meats like ground turkey or chicken. These meats have milder flavors, which let the honey garlic glaze shine. Pork also works well if you want a richer taste. Each meat type changes the flavor and texture of the meatballs. You can serve them with jasmine rice for a classic pairing. Stir-fried vegetables add color and crunch. A fresh salad can balance the sweetness of the glaze. You could also serve them as appetizers with toothpicks for easy snacking. This blog post gave you a complete guide to making honey garlic meatballs. You learned about essential ingredients, cooking steps, and tips for flavor and storage. Impress your family with perfectly cooked meatballs! Feel free to make variations that fit your taste. Remember, cooking is fun and all about experimenting. Enjoy every bite and share your delicious results!
Honey Garlic Glazed Meatballs Flavorful and Easy Recipe
Looking for a quick and tasty dinner option? Honey Garlic Glazed Meatballs are your answer! This easy recipe combines juicy ground meat with a sweet
- Ramen noodles: Choose fresh or dried ramen noodles. Fresh noodles offer a chewy texture, while dried noodles are convenient and last longer. - Vegetable broth: You can make your own broth using veggies and herbs. Store-bought broth saves time but check labels for added salt. - Miso paste: Miso adds depth and umami flavor. White miso is milder; yellow miso has more complexity. If needed, try tahini or nut butter as a substitute. - Soy sauce and tamari: Soy sauce works well for most diets. Tamari is a great gluten-free option. Both enhance the savory notes in your ramen. - Sriracha: This adds a spicy kick. If you want less heat, try chili oil or fresh chili peppers. - Best vegetables for vegan ramen: Bok choy, carrots, and bell peppers are perfect. They add crunch and color. - Preparation tips for freshness: Wash and chop veggies just before cooking. This keeps them crisp and vibrant in your dish. {{ingredient_image_1}} To make great ramen, start with a pot of boiling water. Add 200g of ramen noodles. Cook them according to the package instructions, which is usually 3-4 minutes. Keep an eye on them to avoid overcooking. When done, drain and set them aside. In a medium bowl, mix the sauce. Combine 2 cups of vegetable broth, 1 tablespoon of soy sauce, 1 tablespoon of miso paste, 1 tablespoon of sriracha, 1 teaspoon of grated ginger, and 2 cloves of minced garlic. Whisk it all together until it is smooth. This will give your ramen a rich flavor. Now, heat 1 tablespoon of sesame oil in a large skillet or wok over medium heat. Add 1 cup of chopped bok choy, 1 julienned carrot, and 1 thinly sliced red bell pepper. Stir-fry them for about 3-4 minutes. You want the veggies to be tender but still crisp. This keeps them fresh and vibrant. Next, pour your sauce into the skillet with the sautéed vegetables. Bring the mixture to a gentle simmer. Let it cook for 2-3 minutes. This helps the flavors mix well. After that, add the cooked ramen noodles. Toss everything gently to coat the noodles evenly in the sauce. Cook for another 1-2 minutes until everything is heated through. To serve, divide the saucy ramen into bowls. Garnish with chopped green onions and a sprinkle of sesame seeds. Serve lime wedges on the side. This adds a nice tang that enhances the dish's flavor. Enjoy the bright colors and fresh taste! - Overcooking noodles: Be careful not to overcook the ramen noodles. They should be firm, not mushy. Follow package instructions closely. Cooking them for 3-4 minutes usually works best. Drain them right away to stop the cooking process. - Skipping the sauce mixing: Do not skip mixing the sauce. A smooth blend of vegetable broth, soy sauce, miso paste, sriracha, ginger, and garlic is key. Mix it well before adding it to the pan. This ensures every noodle gets that delightful flavor. - How to modify spice levels: If you want less heat, use less sriracha. For more spice, add more. You can also try other hot sauces. This lets you control the heat to suit your taste. - Adding sweetness or acidity: To balance the flavors, add a dash of maple syrup or coconut sugar. For acidity, a squeeze of lime juice brightens the dish. This gives it a fresh taste that pairs well with the rich broth. - Make-ahead tips for meal prepping: You can easily prep this dish ahead of time. Cook the noodles and veggies, then store them separately. Mix them with the sauce just before serving. This keeps everything fresh and tasty. You can also make the sauce in advance for quick meals later. Pro Tips Use Fresh Ingredients: Whenever possible, opt for fresh vegetables to enhance the flavor and texture of your ramen. Customize Your Spice Level: Adjust the amount of sriracha to suit your personal heat preference; you can also add chili flakes for extra kick. Experiment with Toppings: Consider adding tofu, mushrooms, or seaweed to make your ramen even heartier and more nutritious. Store Leftovers Properly: Keep any leftover noodles and broth separate in the refrigerator to maintain texture; reheat gently to serve. {{image_2}} Gluten-free noodle options You can easily swap regular ramen noodles for gluten-free ones. Look for rice noodles or buckwheat soba. These options keep the dish tasty while meeting gluten-free needs. Protein substitutions for tofu If you want different protein, consider chickpeas or edamame. You can also use tempeh for a nutty taste. These swaps add variety and keep your ramen satisfying. Japanese vs Thai flavors in ramen Japanese ramen often uses soy sauce and miso for a rich taste. Thai ramen, on the other hand, may include coconut milk and lime. Try adding Thai basil or cilantro for a fresh twist on your dish. Best vegetables to use throughout the year In spring, use tender peas and asparagus. Summer is great for zucchini and cherry tomatoes. In fall, add pumpkin or sweet potato. Winter calls for hearty greens like kale or spinach. Using seasonal veggies keeps your ramen fresh and exciting each time. To keep your saucy vegan ramen fresh, store leftovers in an airtight container. Let the noodles cool before sealing. Place the container in the fridge. Consume them within three days for the best flavor and texture. You can freeze this ramen for later. First, separate the noodles from the broth and veggies. Place each in freezer-safe bags or containers. When ready to eat, thaw in the fridge overnight. Reheat in a pot on low heat, adding a splash of vegetable broth for moisture. In the fridge, your saucy vegan ramen stays good for about three days. If frozen, it can last up to three months. Always check for signs of spoilage before eating. Enjoy your tasty ramen while it's fresh! Yes, you can! To make this ramen gluten-free, choose gluten-free ramen noodles. Brands like rice noodles or buckwheat noodles work well. When using soy sauce, pick tamari instead. Tamari is a great gluten-free option. Always check labels to ensure all ingredients are gluten-free. This ramen lasts about 3 to 4 days in the fridge. Store it in an airtight container. To reheat, add a splash of broth to keep it moist. Heat on low in a pot or microwave until warm. Avoid reheating multiple times to keep it fresh. Yes! You can add vegan proteins like tofu, tempeh, or chickpeas. For tofu, press and cube it before cooking. Sauté it until golden, then mix it into the ramen. Tempeh can be crumbled or sliced and added for texture. Chickpeas add a hearty touch, too. If you don't have miso paste, try tahini or sunflower seed butter. Tahini adds a nutty flavor, while sunflower seed butter keeps it nut-free. Both give a creamy texture. Adjust the amount to taste, as they differ in strength compared to miso. Absolutely! To make it more kid-friendly, reduce the sriracha for less spice. You can also add sweet veggies like corn or peas. Kids often love noodles, so they will enjoy this dish. Serve with lime wedges on the side for a fun twist. This blog showed you how to make delicious vegan ramen. We talked about the right ingredients, from noodles to broth. You learned tips for cooking each component perfectly. Avoiding common mistakes is key for tasty results. You can also explore different flavors and ingredients to make each bowl unique. Now, get ready to cook and share this great dish with others!
Saucy Vegan Ramen Noodles Comforting and Flavorful Dish
Are you ready to dive into a bowl of Saucy Vegan Ramen Noodles that warms your soul? This comforting dish combines rich flavors and fresh
- 2 cups cooked rice - 2 cups shredded cooked chicken - 1 can (10 oz) red enchilada sauce - 1 can (15 oz) black beans, drained and rinsed - 1 cup corn kernels - 1 cup diced bell peppers (red and green) - 1 cup shredded cheddar cheese - 1 cup shredded Monterey Jack cheese The main ingredients create a hearty base for the casserole. I love using cooked rice as it absorbs all the flavors. Shredded chicken adds protein and a nice texture. Black beans are great for fiber and taste. Corn brings sweetness, while colorful bell peppers add crunch and vitamins. The mix of cheddar and Monterey Jack cheese gives a rich, creamy finish. - 1 teaspoon cumin - 1 teaspoon chili powder - Salt and pepper to taste Spices are key to flavor. Cumin gives a warm, earthy taste. Chili powder adds a nice kick. Salt and pepper enhance all the flavors. I recommend tasting your mixture as you go. Adjusting seasoning helps you find your perfect balance. - Fresh cilantro - Sour cream Garnishes can elevate your dish. Fresh cilantro adds brightness and freshness. A dollop of sour cream gives creaminess and cools the heat. These are optional but really enhance the meal. Personalize your casserole with these tasty toppings. {{ingredient_image_1}} 1. Preheat the Oven Set your oven to 375°F (190°C). This step helps ensure even cooking. 2. Combine Main Ingredients In a large bowl, mix together the cooked rice, shredded chicken, red enchilada sauce, black beans, corn, and diced bell peppers. Stir until all ingredients blend well. This mixture forms the base of your casserole. 3. Add Spices Sprinkle in the cumin, chili powder, salt, and pepper. Stir again to distribute the spices evenly. This adds flavor and warmth to the dish. 4. Transfer to Baking Dish Pour the mixture into a greased 9x13-inch baking dish. Spread it out so it cooks evenly. This step is crucial for a good texture. 5. Cover and Bake Use aluminum foil to cover the dish. Bake it in the preheated oven for 25 minutes. This helps keep moisture in, making the dish creamy. 6. Uncover and Continue Baking After 25 minutes, remove the foil. Bake for an extra 10-15 minutes. This allows the cheese to bubble and turn golden. You want a beautiful, melted top. Avoiding Soggy Rice To avoid soggy rice, use freshly cooked rice. Let it cool for a bit before mixing. If you have leftover rice, make sure it is fluffy and not clumped together. A good trick is to spread the rice out on a baking sheet for a few minutes. This helps to dry it out slightly before you mix it in. Cheese Variations Cheese is key to a great casserole. For a twist, try using pepper jack for some heat. You can also mix in queso fresco for a milder flavor. Mixing different cheeses adds depth. You can even use a blend of mozzarella and cheddar for extra creaminess. Side Dishes Serve this casserole with a fresh salad. A simple green salad with lime dressing complements it well. You can also add tortilla chips for crunch. They are great for scooping up the casserole. Best Accompaniments Sour cream adds creaminess and balances the spice. Fresh cilantro brightens up the dish. You can also serve it with avocado slices or guacamole for an added layer of flavor. Making It in Advance You can prepare this casserole a day ahead. Just mix all the ingredients and store it in the fridge. Bake it when you are ready to serve. This saves time and allows the flavors to meld together. Reheating Tips To reheat, cover the casserole with foil. Bake at 350°F for about 20-25 minutes. This helps keep it moist. You can also microwave individual portions for about 2-3 minutes. Just be sure to check and stir to heat evenly. Pro Tips Use Leftover Chicken: This recipe is perfect for using up leftover rotisserie chicken or any cooked chicken you have on hand. Customize the Veggies: Feel free to add or substitute other vegetables like zucchini or spinach to suit your taste. Make it Spicier: For an extra kick, add diced jalapeños or a sprinkle of cayenne pepper to the mixture. Cheese Choices: Experiment with different cheese blends, like pepper jack or queso blanco, for varied flavors. {{image_2}} Protein Alternatives You can swap chicken for many other proteins. Ground beef or turkey works well. Shredded pork or tofu also adds great taste. Each option brings a new flavor to the dish. Vegetable Additions Feel free to add more veggies! Zucchini, mushrooms, or spinach can enhance the mix. You might also try jalapeños for a spicy kick. Mixing in more colors makes the dish look great! Gluten-Free Options To make this dish gluten-free, check your enchilada sauce. Some brands use gluten. You can also use gluten-free rice. This way, everyone can enjoy the meal. Vegetarian Version Make a vegetarian version by omitting chicken. Replace it with black beans or lentils for protein. You can also add extra veggies for texture and flavor. Mild vs. Spicy Adjust the spice to your taste. Use mild enchilada sauce for a gentle flavor. For more heat, add chopped fresh chilies or extra chili powder. Customizing Flavor Profiles You can customize the flavor easily. Add lime juice for a zesty kick. Fresh herbs like cilantro or parsley can brighten the dish. Each tweak makes it your own! Refrigeration Store any leftover chicken enchilada rice casserole in an airtight container. Place it in the fridge right away. It will stay fresh for about 3 to 4 days. Make sure to cool it to room temperature first. This helps keep the food safe and tasty. Freezing For longer storage, you can freeze the casserole. Divide it into smaller portions for easy use later. Wrap each portion tightly in plastic wrap. Then, place them in a freezer-safe bag or container. This way, your casserole can last up to 2 to 3 months in the freezer. Just remember to label the bags with the date. Oven Reheating To reheat in the oven, preheat it to 350°F (175°C). Place the casserole in a baking dish. Cover it with foil to keep it moist. Heat for about 20 to 25 minutes. Check that it's hot all the way through. You can remove the foil for the last 5 minutes if you want the cheese to get bubbly. Microwave Options You can also reheat the casserole in the microwave. Place a portion on a microwave-safe plate. Cover it with a damp paper towel. Heat on high for about 2 to 3 minutes. Stir halfway through to make sure it heats evenly. How Long It Lasts When stored properly, the chicken enchilada rice casserole lasts 3 to 4 days in the fridge. In the freezer, it can last 2 to 3 months. Signs of Spoilage Look for any changes in color or smell. If it has a sour odor or looks moldy, it’s best to throw it away. Always trust your senses! If you are unsure, it's safer to discard it. Can I use cooked rice? Yes, you can use cooked rice. It saves time and makes the dish easy. Just make sure the rice is cooled before mixing it in. This helps keep your casserole from getting too mushy. Can I make this dish spicy? Absolutely! To add spice, use spicy enchilada sauce or add jalapeños. You can also increase the chili powder for more heat. Adjust the spice to match your taste. How to serve it? Serve the casserole hot, right from the oven. It looks great when garnished with fresh cilantro. You can also add a dollop of sour cream on top for creaminess. What sides pair well with it? This dish pairs well with a simple green salad or some tortilla chips. You can also serve it with fresh guacamole or salsa for extra flavor. Can I substitute chicken? Yes, you can use cooked turkey or even shredded pork. These meats work well and keep the dish tasty. If you want a lighter option, try using cooked tofu instead. Is there a vegan option available? Yes! For a vegan version, replace chicken with black beans or lentils. Use vegetable broth instead of chicken broth if needed. You can also swap the cheese for a dairy-free option. You can make a delicious casserole with chicken, rice, and beans. I covered steps to prepare and bake this dish, along with tips to get it just right. Remember, you can swap ingredients and adjust spice levels to suit your taste. Store your leftovers properly to enjoy later. Whether you're cooking for yourself or a crowd, this dish will impress. Happy cooking!
Chicken Enchilada Rice Casserole Easy and Tasty Meal
Looking for a quick and tasty meal that pleases the whole family? Chicken Enchilada Rice Casserole is your answer! This dish packs bold flavors and
The key to making Spicy Thai Peanut Noodles lies in the ingredients. Here’s what you need: - 8 oz rice noodles - 1 cup creamy peanut butter - 2 tablespoons soy sauce - 2 tablespoons lime juice - 2 tablespoons honey or maple syrup - 1 tablespoon chili garlic sauce - 1 tablespoon sesame oil - 1 cup shredded carrots - 1 cup bell pepper, thinly sliced - 1/2 cup green onions, chopped - 1/4 cup chopped fresh cilantro - Crushed peanuts for garnish - Lime wedges for serving Each ingredient adds flavor and texture. The rice noodles serve as a soft base. Creamy peanut butter gives a rich and nutty taste. Soy sauce adds a hint of salt. Lime juice brightens the dish with a zing. Honey or maple syrup adds sweetness. Chili garlic sauce brings heat. Sesame oil adds depth and nuttiness. The veggies not only add color but also crunch. Shredded carrots and sliced bell pepper balance the rich sauce. Green onions bring freshness. Fresh cilantro is a must for a burst of herb flavor. Finally, crushed peanuts give a delightful crunch. They make every bite exciting! Get ready to cook with these tasty ingredients. They will help you create a dish that is both flavorful and quick! {{ingredient_image_1}} Start by boiling water in a large pot. Add the rice noodles and cook them as per the package instructions, usually about 4-6 minutes. Make sure to stir them gently. Once they are soft, drain the noodles in a colander. Rinse them under cold water to stop the cooking. Set the noodles aside in a large mixing bowl. In a medium bowl, add creamy peanut butter. Pour in soy sauce, lime juice, and honey or maple syrup. Add chili garlic sauce for spice and sesame oil for flavor. Use a whisk to mix everything until it is smooth. If the sauce feels too thick, add a bit of water to thin it out. This sauce will really make the dish pop! Now it's time to bring the noodles and sauce together. Pour the peanut sauce over the cooked rice noodles. Use tongs or a fork to toss the noodles until they are fully coated in sauce. Make sure every bite has that yummy flavor. Next, add the shredded carrots, sliced bell pepper, and chopped green onions to the bowl. Gently toss everything together. This adds nice color and crunch! For a finishing touch, sprinkle chopped fresh cilantro and crushed peanuts on top. You can also add lime wedges for extra zest. Serve the spicy Thai peanut noodles in bowls. You can enjoy them warm or at room temperature. They make a great lunch or dinner. Consider pairing them with grilled chicken or shrimp for added protein. These noodles are sure to impress! Start with one tablespoon of chili garlic sauce. This gives a good kick. If you like it hotter, add more sauce. You can also use fresh chilies. Slice them thin and mix them in. For a milder taste, reduce the sauce. Adding more peanut butter helps tone down the heat too. Adding fresh herbs boosts flavor. Try basil or mint for a twist. You can also toss in some chopped peanuts for crunch. A sprinkle of sesame seeds adds nuttiness. If you want more tang, add a splash of rice vinegar. These small changes can make the dish even better. Rinse the cooked rice noodles in cold water. This stops them from cooking further. Toss them with a bit of sesame oil right after draining. This keeps them separate and adds flavor. Stir them gently to avoid breaking. Keep them in a bowl with a lid until you’re ready to serve. Pro Tips Adjusting Spice Level: If you prefer a milder dish, start with less chili garlic sauce and gradually add more until it reaches your desired heat. Perfecting the Peanut Sauce: For a smoother sauce, ensure your peanut butter is at room temperature. You can also blend the sauce for an even creamier texture. Adding Protein: Consider adding grilled chicken, shrimp, or tofu for a heartier meal. Simply toss them in with the noodles and veggies. Fresh Herbs for Flavor: Fresh cilantro adds a burst of flavor, but feel free to substitute or add fresh mint or basil for a different twist. {{image_2}} You can boost your Spicy Thai Peanut Noodles with tasty proteins. Chicken is a popular choice. Grill or stir-fry thin slices of chicken breast. Mix them in after you add the veggies. Tofu is great too. Use firm tofu, cut it into cubes, and pan-fry until golden. This adds texture and flavor. Shrimp also works well. Cook the shrimp until pink and toss them into the mix. Each protein option offers a unique taste. To keep this dish vegan, swap honey for maple syrup or agave nectar. This keeps it sweet without animal products. For gluten-free, use tamari instead of soy sauce. It gives the same rich flavor without gluten. You can also find rice noodles that are certified gluten-free. Enjoy this dish worry-free while still tasting amazing! Get creative with your veggies! You can add snap peas for crunch or broccoli for a healthy boost. Baby corn adds a fun texture, and snow peas give a nice sweet taste. You could even try zucchini or mushrooms for something different. The more colors you add, the prettier your dish looks. Mix and match your favorites to suit your taste. You can store leftover spicy Thai peanut noodles in an airtight container. Keep them in the fridge for 3 to 5 days. Make sure the noodles are cool before sealing the container. If you want to keep them fresh, avoid adding garnishes like peanuts and cilantro until you serve. If you want to freeze the noodles, pack them in a freezer-safe container. They can last up to 2 months in the freezer. However, the veggies may lose some crunch. To keep the best flavor, freeze the sauce separately if possible. Thaw the noodles in the fridge before reheating. To reheat, you can use a microwave or a pan on the stove. If using a microwave, heat in short bursts. Stir in between to ensure even heating. If using the stove, add a splash of water or oil in the pan to prevent sticking. Heat until warm, then add back any garnishes. Enjoy your delicious noodles again! To make Spicy Thai Peanut Noodles less spicy, you can adjust the chili garlic sauce. Start with less than one tablespoon. You can also add more peanut butter to balance the heat. Adding a bit of honey or maple syrup helps too. If you want, include more veggies like carrots or bell peppers to dilute the spice. Yes, you can prepare this dish in advance. Cook the noodles and store them in the fridge. Make the sauce and keep it separate. Mix them together just before serving. This keeps the noodles nice and fresh. You can also chop the veggies ahead of time for easy assembly later. Spicy Thai Peanut Noodles pair well with many side dishes. Consider serving with a simple cucumber salad. A light green salad with lime dressing is also great. You can serve spring rolls or dumplings on the side for a fun addition. These sides balance the meal and add fresh flavors. Yes, you can use different types of noodles. Rice noodles work well, but you can try wheat noodles or soba noodles too. Just make sure to adjust the cooking time. Each noodle type brings its own texture and taste to the dish. Explore different options to find your favorite! In this blog post, we explored how to make a tasty dish of Spicy Thai Peanut Noodles. We covered the key ingredients and how to cook noodles and make the peanut sauce. I shared tips for adjusting spice levels and added protein or veggies for variety. In the end, this dish is simple and fun. You can store it for later or share it with friends. Enjoy making this meal your own!
Spicy Thai Peanut Noodles Flavorful and Quick Recipe
Craving a quick meal that’s packed with flavor? You’ve come to the right place! In this post, I’ll guide you through my favorite recipe for
- 1 cup long-grain rice (like basmati or jasmine) - 2 cups vegetable broth - 1 medium onion, finely chopped - 2 cloves garlic, minced - 1 tablespoon olive oil - Zest of 1 lemon - 2 tablespoons fresh lemon juice - 1 teaspoon dried oregano - Salt and pepper to taste - ¼ cup fresh parsley, chopped - ¼ cup Kalamata olives, pitted and halved - ¼ cup feta cheese, crumbled The Greek Lemon Rice Pilaf has simple ingredients. You can use long-grain rice like basmati or jasmine. This rice absorbs flavors well. It gives a nice texture. For the broth, I recommend vegetable broth. It adds depth to the dish. The onion and garlic bring a savory base. Olive oil helps sauté the aromatics. Lemon zest and juice create a fresh, zesty flavor. Dried oregano adds an earthy note. Make sure to season with salt and pepper. For add-ins, Kalamata olives add a briny taste. Feta cheese brings creaminess. These add-ins are optional but enhance the dish. They make it even more special. {{ingredient_image_1}} This blog post detailed how to make Greek Lemon Rice Pilaf. We reviewed the essential ingredients, cooking steps, and tips for perfect rice. You can personalize this dish with optional add-ins and variations. Remember to store leftovers properly for the best taste. In concluding, this recipe is simple yet tasty. You can impress anyone with this dish. Enjoy your cooking, and don’t forget to share your results!
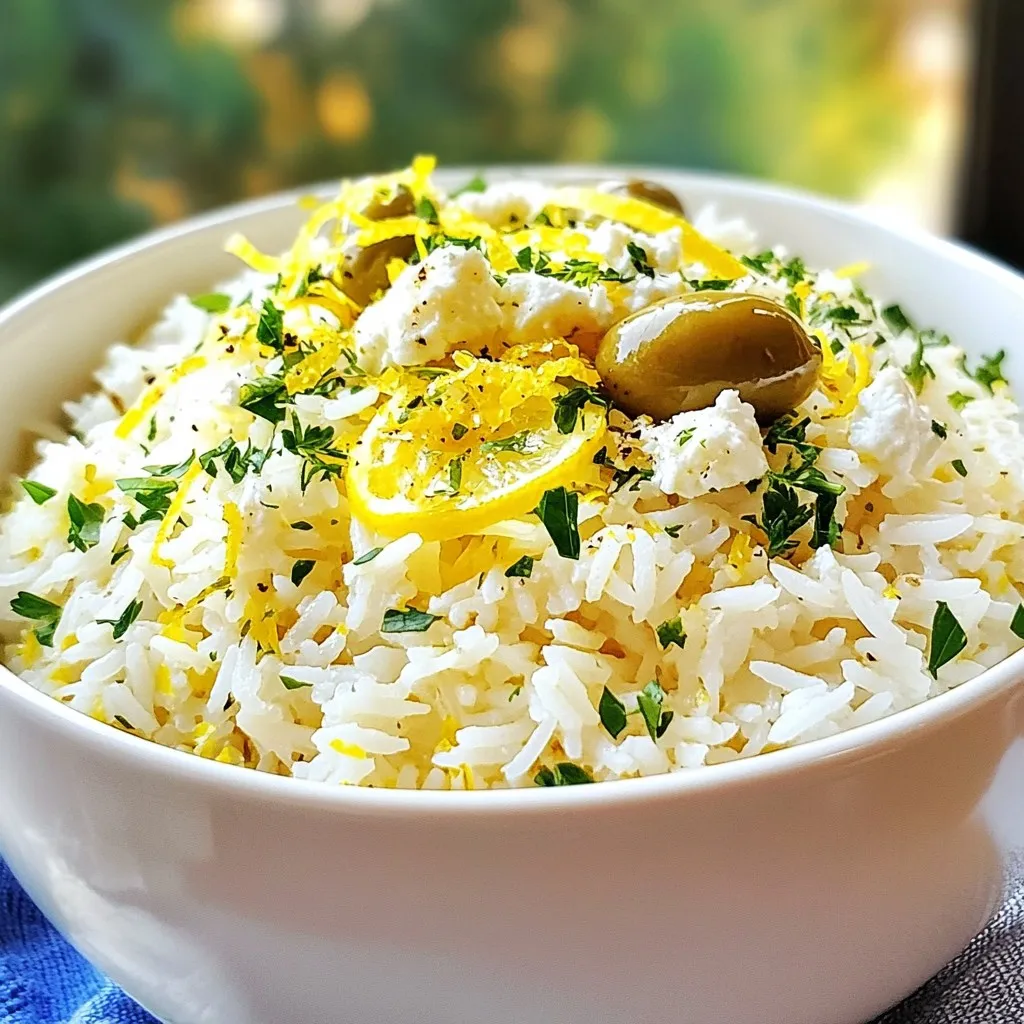
Greek Lemon Rice Pilaf Savory and Flavorful Dish
Welcome to the world of Greek Lemon Rice Pilaf—a dish bursting with flavor! This savory delight combines long-grain rice with bright lemon and aromatic herbs.
- 4 chicken breasts, boneless and skinless - 1/3 cup honey - 1/3 cup Dijon mustard - 2 tablespoons olive oil - 2 cloves garlic, minced - 1 teaspoon fresh thyme, chopped (or 1/2 teaspoon dried thyme) - 1 teaspoon paprika - Salt and pepper to taste - Fresh parsley for garnish The recipe calls for specific amounts. Here’s a quick guide: - Use 4 chicken breasts, about 1.5 pounds total. - For the honey and mustard, stick with 1/3 cup each. - Olive oil needs 2 tablespoons. - Use 2 cloves of garlic for a strong flavor. - Thyme can be fresh or dried; just adjust the amount. - Paprika adds a nice touch, and you can use more or less based on taste. - Season with salt and pepper as you like. If you want to switch up flavors, try these: - Swap Dijon mustard with yellow mustard for a milder taste. - Maple syrup works well if you want a different sweetener. - Use any fresh herb you like if thyme isn’t available. - You can use chicken thighs instead of breasts for a juicier dish. These tips will help you make the dish your own! {{ingredient_image_1}} - Preheating the oven: Start by preheating your oven to 375°F (190°C). This ensures even cooking. - Making the honey mustard mixture: In a medium bowl, whisk together 1/3 cup honey and 1/3 cup Dijon mustard. Add 2 tablespoons of olive oil, 2 minced garlic cloves, 1 teaspoon of fresh thyme (or 1/2 teaspoon dried), and 1 teaspoon paprika. Season with salt and pepper to your taste. Mix well until it is smooth and combined. - Coating the chicken: Take 4 boneless, skinless chicken breasts and place them in a baking dish. Pour the honey mustard mixture over the chicken, making sure to coat both sides well. - Covering and baking times: Cover the baking dish with aluminum foil. Bake for 25 minutes. After that, remove the foil and bake for another 15-20 minutes. The chicken should reach an internal temperature of 165°F (75°C). The glaze will bubble and look caramelized. - Resting the chicken: Once done, pull the baking dish from the oven. Let the chicken rest for about 5 minutes. This step keeps it juicy and tender. - Garnishing tips: Before serving, sprinkle fresh parsley on top. This adds color and flavor. Serve the chicken with a drizzle of sauce from the dish for extra taste. To keep your chicken juicy and tender, use the right cooking time. Bake the chicken for 25 minutes covered. Then, remove the foil and bake for 15-20 more minutes. This will help lock in moisture. Always let the chicken rest for 5 minutes after baking. This step makes a big difference in juiciness. To check for doneness, use a meat thermometer. Insert it into the thickest part of the chicken. The chicken should reach an internal temperature of 165°F (75°C). If you don’t have a thermometer, cut into the chicken. The juices should run clear, not pink. You can add herbs and spices to boost flavor. Fresh rosemary or sage works well with the honey mustard mix. A pinch of cayenne can add a nice kick. Consider adding a splash of lemon juice for brightness. For a different taste, try marinating the chicken in the honey mustard mix for an hour or overnight. This adds depth to the flavor. You could also use different mustards, like whole grain or spicy mustard, for a unique twist. Pro Tips Marinate for Extra Flavor: For a deeper flavor, marinate the chicken in the honey mustard mixture for at least 30 minutes, or even overnight in the refrigerator. Use Bone-in Chicken: For even juicier chicken, consider using bone-in, skin-on chicken thighs. Adjust the cooking time accordingly. Add a Kick: If you like a bit of heat, add a pinch of cayenne pepper or a splash of hot sauce to the honey mustard mixture. Perfect Pairing: This dish pairs wonderfully with sides like roasted sweet potatoes or a crisp green salad to balance the sweetness. {{image_2}} Mustard alternatives: You can swap Dijon mustard with yellow mustard or whole grain mustard. Each adds a different kick. Yellow mustard gives a milder taste. Whole grain mustard adds texture and depth. Honey substitutes: If you need a honey alternative, try maple syrup or agave nectar. Both sweeten the dish well. They may change the flavor slightly but still taste great. Slow cooker adaptation: To use a slow cooker, mix the honey mustard sauce as before. Place the chicken in the slow cooker and pour the sauce over it. Cook on low for 6-8 hours or high for 3-4 hours. This makes the chicken super tender. Grill versus oven method: You can also grill the chicken for a smoky flavor. Marinate the chicken in the honey mustard sauce for at least 30 minutes. Grill it over medium heat for about 6-7 minutes per side. The grilling adds a nice char and flavor. To keep your baked honey mustard chicken fresh, use airtight containers. Glass or plastic containers work well. Let the chicken cool to room temperature before sealing. Store the chicken in the fridge for up to four days. If you want to keep it longer, freeze it. Wrap each piece in plastic wrap, then put it in a freezer bag. This helps avoid freezer burn. Frozen chicken can last for up to three months. To reheat your chicken, the oven is best. Preheat it to 350°F (175°C). Place the chicken in a baking dish. Cover it with foil to keep moisture in. Heat for about 20 minutes. Check that the internal temperature is 165°F (75°C) before serving. You can also use a microwave. Place the chicken on a microwave-safe plate. Cover it loosely with a paper towel. Heat in short bursts, checking often. This keeps the chicken juicy and tasty. Avoid overcooking, as this can dry it out. How long should I bake chicken at 375°F? You should bake chicken at 375°F for about 40 to 45 minutes. Start with 25 minutes covered, then 15 to 20 minutes uncovered. Always check the chicken's internal temperature to reach 165°F for safety. Can I use bone-in chicken for this recipe? Yes, you can use bone-in chicken. Just adjust the cooking time. Bone-in chicken takes longer, about 50 to 60 minutes. Check the internal temperature to ensure it is cooked through. Is this recipe suitable for meal prep? Absolutely! This recipe is great for meal prep. You can make it ahead and store it in the fridge. It will stay fresh for up to four days. Can I make this dish ahead of time? Yes, you can prepare the chicken and the honey mustard mixture ahead of time. Just coat the chicken and store it in the fridge. Bake it when you are ready to serve. What sides pair well with baked honey mustard chicken? This dish pairs well with roasted vegetables, rice, or a fresh salad. You can also serve it with mashed potatoes for a hearty meal. How to adjust the recipe for more servings? To make more servings, simply double or triple the ingredients. Just ensure your baking dish can fit all the chicken. You may need to bake in batches if your dish is small. You learned how to make baked honey mustard chicken using simple ingredients. We covered everything from preparing the chicken to storing leftovers. This dish is easy to customize and perfect for any meal. You can try different flavors and cooking methods based on your taste. Remember, cooking should be fun and rewarding! Enjoy this delicious meal, and don't hesitate to experiment with variations. Happy cooking!
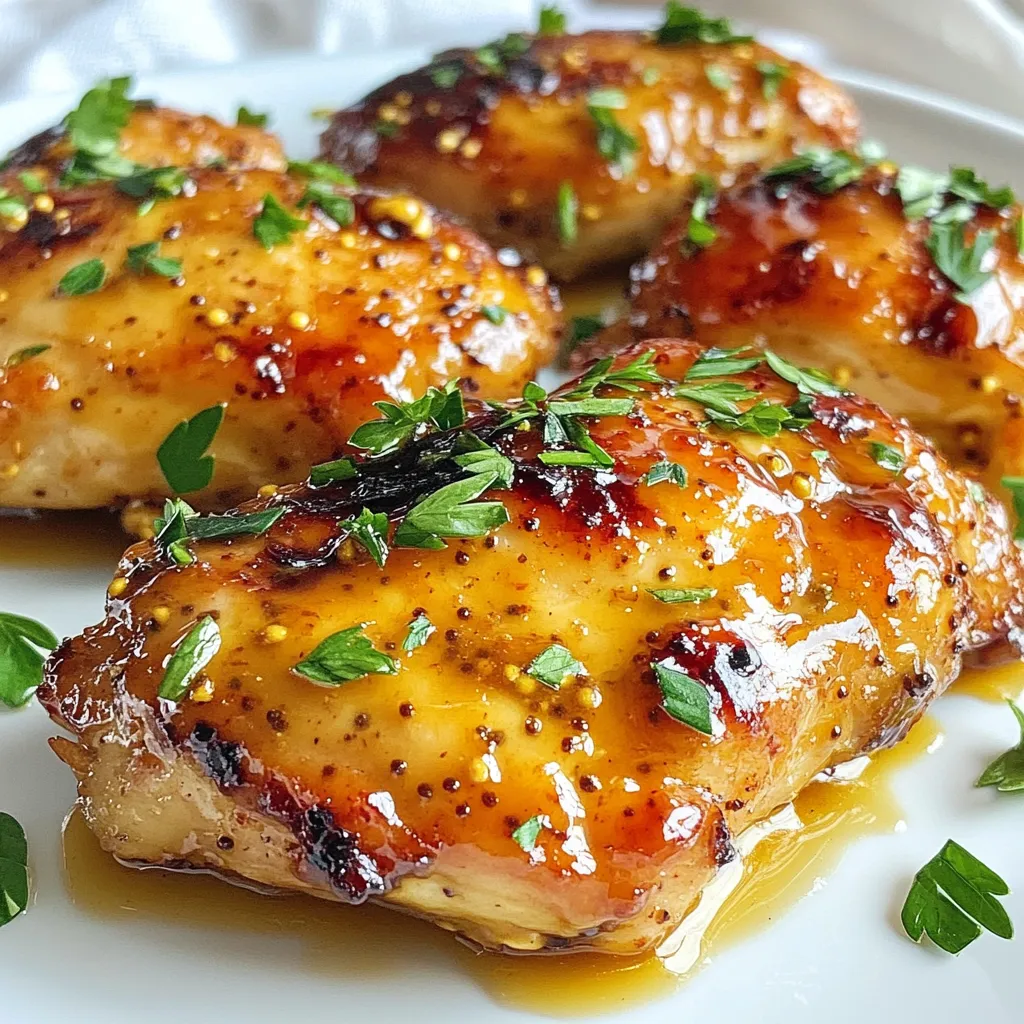
Baked Honey Mustard Chicken Savory and Simple Dish
Are you ready to transform your dinner routine? Baked Honey Mustard Chicken is a savory and simple dish that combines rich flavors with easy prep.
- 2 cups canned white beans (cannellini or great northern), rinsed and drained - 1 medium onion, diced - 3 cloves garlic, minced - 2 medium carrots, diced - 2 celery stalks, diced - 4 cups vegetable broth - 2 cups chopped kale or spinach - 1 teaspoon dried thyme - 1 teaspoon dried rosemary - 1 bay leaf - 2 tablespoons olive oil - Salt and pepper to taste - Juice of 1 lemon - Fresh basil or parsley for garnish In Tuscan White Bean Soup, the beans are the star. You can choose either cannellini or great northern beans. Both are creamy and full of flavor. Canned beans save time and are easy to use. Next, fresh vegetables add crunch and taste. You need onion, garlic, carrots, and celery. The onion gives a sweet base, while garlic adds a strong aroma. Carrots and celery bring color and texture. For the broth, vegetable broth is best. It keeps the soup light. You will also need dried thyme, rosemary, and a bay leaf for flavor. These herbs add depth to the dish. Greens like kale or spinach bring nutrition. They cook down soft and blend well. A squeeze of lemon juice brightens the soup. It adds a fresh taste that balances the beans. Finally, garnish with fresh basil or parsley. This gives a pop of color and extra flavor. Each ingredient plays a role, making the soup both delicious and nourishing. {{ingredient_image_1}} To start, heat 2 tablespoons of olive oil in a large pot over medium heat. Once the oil is hot, add your diced onion, carrots, and celery. Sauté them for about 5-7 minutes. You want them soft but not brown. This step builds a great flavor base for the soup. Next, stir in 3 cloves of minced garlic. Cook it for another 1-2 minutes. This will add a rich aroma to your soup. Be careful not to burn the garlic; it can turn bitter. Now, it’s time to add the main ingredients. Dump in 2 cups of rinsed and drained white beans along with 4 cups of vegetable broth. Add 1 teaspoon of dried thyme, 1 teaspoon of dried rosemary, and 1 bay leaf. Stir everything well. Bring your mixture to a boil. Once it boils, reduce the heat to low. Let the soup simmer for 20-25 minutes. This allows the flavors to blend perfectly. After simmering, add 2 cups of chopped kale or spinach. Let it simmer for another 5-10 minutes. The greens should be tender but still bright. Before serving, remove the bay leaf. Stir in the juice of 1 lemon. Season your soup with salt and pepper to taste. Garnish with fresh basil or parsley for a fresh finish. Enjoy your warm bowl of Tuscan White Bean Soup! To boost flavor, focus on your seasonings. Dried thyme and rosemary work well in this soup. They add depth and warmth. Fresh herbs like basil or parsley can brighten the dish. Add them just before serving for the best taste. Achieving the right texture is key. Start by sautéing the onions, carrots, and celery until soft. This step builds a strong base. When you add the beans, mash some against the pot's side. This adds creaminess to the soup. One common mistake is overcooking the greens. If you add kale or spinach too early, they can become mushy. Add them near the end of cooking for a nice bite. Another mistake is skipping seasoning adjustments. Taste your soup as it cooks. This helps you find the right balance of salt and pepper. A splash of lemon juice at the end brightens the flavors. Pro Tips Use Fresh Herbs: Fresh herbs like basil or parsley can elevate the flavor of your soup significantly, adding a burst of freshness. Adjust Consistency: If you prefer a thicker soup, blend a portion of the beans before adding them to the pot for a creamier texture. Experiment with Greens: Feel free to substitute kale or spinach with other greens such as Swiss chard or collard greens for a different flavor profile. Make it Ahead: This soup tastes even better the next day, so consider making a batch in advance and storing it in the refrigerator. {{image_2}} You can add sausage or chicken for extra protein. Cook the meat first in the pot. Once it’s browned, add the onions, carrots, and celery. This adds great flavor and heartiness. Use Italian sausage for a spicy kick. Chicken breast works well too. Just shred it after cooking, and mix it back in. For a vegetarian or vegan twist, swap the broth. Use vegetable broth instead of chicken broth. You can also add more greens. Spinach or Swiss chard add nutrition and color. If you want a creamier soup, blend a portion of the beans. This makes the soup rich without dairy. Change the soup with the seasons. In summer, add zucchini or fresh tomatoes. These veggies keep the soup light and fresh. In fall, use butternut squash for sweetness. You can also switch herbs based on what’s fresh. Basil and parsley are great, but try sage or oregano for a new taste. To keep your Tuscan white bean soup fresh, store it in a sealed container. Make sure it cools first. Place the container in the fridge. It will last about 3 to 5 days. If you want to freeze the soup, use freezer-safe bags or containers. Leave some space at the top. The soup expands when frozen. It can last up to 3 months in the freezer. When reheating, do it slowly on the stove. Add a splash of broth or water. This keeps the soup from getting too thick. Stir often to blend the flavors. Enjoy your warm, tasty soup! You can use either cannellini or great northern beans. Cannellini beans are larger and creamier. They have a nutty flavor and soft texture. Great northern beans are smaller and milder. They hold their shape well, making them great for soups. Both beans work well, so choose what you prefer or have on hand. Yes, you can adapt this soup for a slow cooker. Start by sautéing the onion, carrots, and celery in a pan. This step adds depth to the soup. After that, transfer the sautéed veggies to the slow cooker. Add beans, broth, and seasonings. Cook on low for 6-8 hours or high for 3-4 hours. Stir in the greens just before serving, and enjoy! Yes, Tuscan White Bean Soup is very healthy. It is packed with fiber from the beans. Fiber helps with digestion and keeps you full. The vegetables add vitamins and minerals. Greens like kale or spinach offer antioxidants. Olive oil provides healthy fats. This soup is a great choice for a nourishing meal! This blog post shared how to make a delicious Tuscan White Bean Soup. We covered essential ingredients, step-by-step instructions, and helpful tips. I highlighted common mistakes to avoid for the best flavor. You can add meat or stick to vegan versions, based on your preference. Don’t forget to store leftovers correctly or freeze them for later. Now, you can enjoy a tasty and healthy meal, full of flavor and warmth. Dive into making your soup and savor the results!
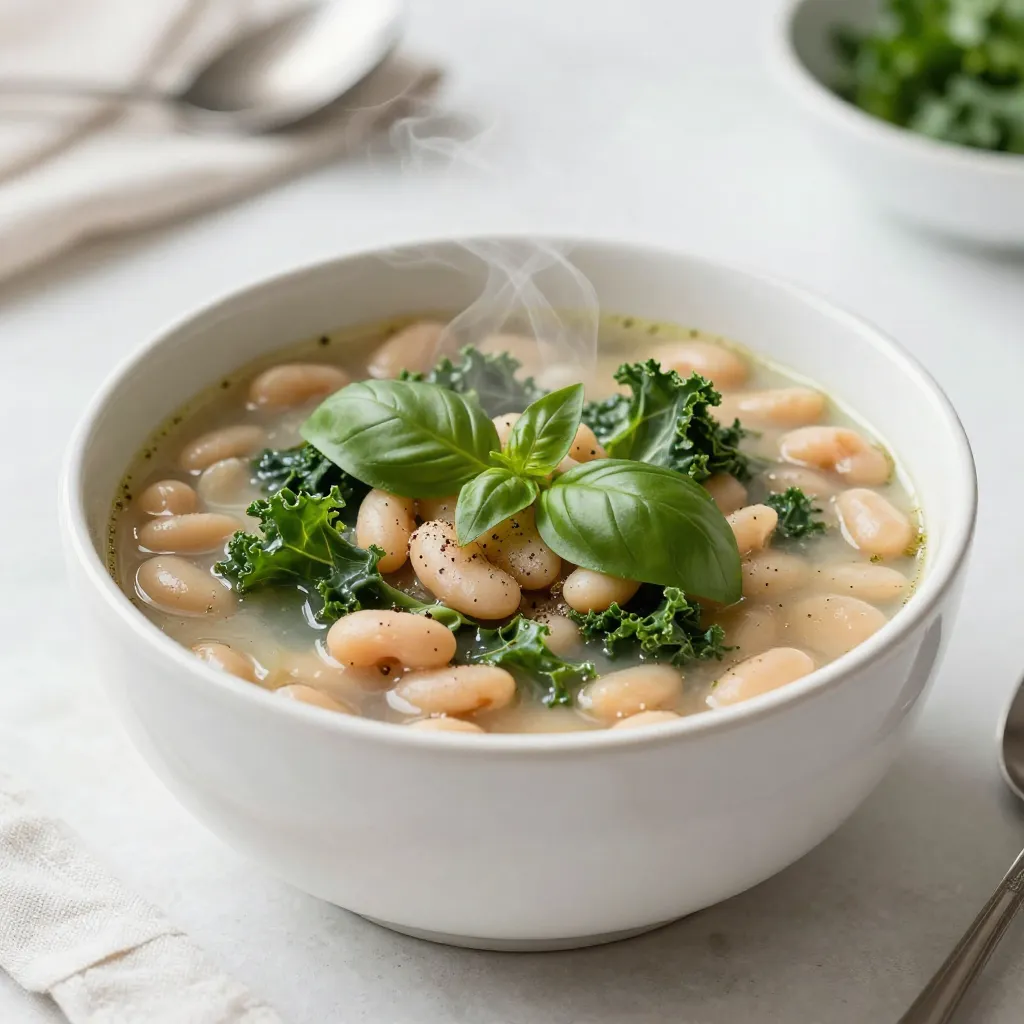
Tuscan White Bean Soup Delicious and Nourishing Meal
Are you looking for a warm, nourishing meal that’s easy to make? Tuscan White Bean Soup is your answer! This hearty dish combines creamy beans,
- 1 red bell pepper, chopped - 1 yellow bell pepper, chopped - 1 zucchini, diced - 1 eggplant, diced - 1 carrot, chopped - 1 onion, diced - 4 cloves garlic, minced - 1 teaspoon dried thyme - 1 teaspoon paprika - 4 cups vegetable broth - 2 tablespoons olive oil - Salt and pepper to taste - Fresh basil leaves for garnish When making roasted vegetable soup, fresh ingredients shine through. You want ripe, colorful veggies. Look for peppers with smooth skin and no blemishes. Zucchini should be firm, while eggplants feel slightly heavy. Choose carrots that snap easily and onions that feel solid. Fresh garlic smells strong and sweet. - Always check for firmness and color. - Seasonal veggies taste the best. In spring, use asparagus. In fall, add squash. - Add spices like cumin or curry for warmth. - For protein, toss in cooked beans or lentils. {{ingredient_image_1}} Start by washing all your fresh veggies. You want them clean and ready. Next, chop the red and yellow bell peppers into bite-sized pieces. Dice the zucchini and eggplant, and chop the carrot and onion. Mince the garlic. In a large bowl, mix your chopped vegetables. Drizzle two tablespoons of olive oil over them. Add one teaspoon of dried thyme, one teaspoon of paprika, and salt and pepper to taste. Toss everything well. Make sure all pieces are coated evenly. Preheat your oven to 425°F (220°C). This high heat helps caramelize the veggies. Spread the mixed vegetables onto a parchment-lined baking sheet. Make sure they are in a single layer. This helps them roast evenly. Roast the veggies for 25-30 minutes. They should be tender and lightly browned. Stir them halfway through for even cooking. The sweet aroma will fill your kitchen and make you hungry! Once the veggies are roasted, move them to a large pot. Pour in four cups of vegetable broth. Bring this mixture to a simmer for 10-15 minutes. This step helps blend the flavors nicely. For blending, an immersion blender works great. It keeps things easy and mess-free. If you want a smooth soup, blend everything until it’s creamy. If you prefer a chunkier texture, blend only half of it. This gives you a nice mix of smooth and chunky bits. Taste and adjust the seasoning as needed, then serve hot. Enjoy your delicious soup! To achieve caramelization, make sure your vegetables are in a single layer. This helps them cook evenly. I recommend using parchment paper on your baking sheet. It stops sticking and helps with cleanup. Roasting at 425°F (220°C) makes the edges crisp and brings out the natural sweetness. Avoiding sogginess is key. Don’t overcrowd the pan. If you pile too many veggies together, steam forms. This prevents that nice, roasted flavor you want. Adding lemon juice is a great way to brighten the soup. Citrus cuts through the richness and balances the flavors. You can squeeze in some fresh juice right before serving. Adjust spice levels to suit your taste. If you love heat, add red pepper flakes. For a milder soup, stick with the herbs in the recipe. Tasting as you go will help find the right balance. Roasted vegetable soup pairs well with crusty bread. A good slice of sourdough or a baguette works wonders. You can also serve it with a side salad for a complete meal. For creative garnishes, try a swirl of olive oil on top. Fresh basil leaves add a pop of color and flavor. A sprinkle of grated cheese can also add extra richness. Make it your own! Pro Tips Use Seasonal Vegetables: Select vegetables that are in season for the best flavor and nutrition. Blend for Texture: </strongAdjust the blending time based on your preference for a smooth or chunky soup. Flavor Boosting: Add a splash of lemon juice or a dash of hot sauce for an extra flavor kick. Storage Tips: This soup can be stored in the refrigerator for up to 5 days or frozen for later use. {{image_2}} You can easily make this soup vegan. Just use vegetable broth instead of chicken broth. This swap keeps the soup plant-based and tasty. To add protein, try adding lentils or chickpeas. Both options boost nutrition and flavor. To keep your soup gluten-free, check all labels. Ensure the broth and any toppings are free of gluten. You can sprinkle gluten-free croutons on top for a nice crunch. They add texture without any gluten risks. Change the veggies based on the season. In summer, use fresh tomatoes or corn. In fall, add squash or sweet potatoes. For special occasions, you might add herbs like rosemary or thyme. These small changes make the soup feel festive and fresh. Let the soup cool down completely before storing. This helps keep it fresh. Use airtight containers to keep out air and moisture. Glass jars work well, and you can also use plastic containers. Just make sure they are safe for the freezer if you plan to freeze. To freeze the soup, pour it into containers, leaving space at the top. The soup will expand as it freezes. It’s best to freeze the soup in single-serving portions. To reheat, take the container out of the freezer and let it thaw in the fridge overnight. You can also microwave it directly from frozen. Heat in short bursts, stirring in between. This ensures even heating. In the fridge, the soup stays fresh for about 3 to 4 days. Make sure to check for any signs of spoilage. If it smells sour or looks off, it’s best to throw it away. Always trust your senses; they can guide you well when it comes to food safety. Yes, you can use frozen vegetables. They are convenient and save time. Just make sure to thaw them before roasting. This helps them cook evenly. You may need to adjust roasting time since frozen veggies may release more water. Roasted vegetables are full of vitamins and minerals. They provide fiber, which helps digestion. Roasting brings out natural sugars, making them sweeter. This method also retains nutrients better than boiling. Overall, they make a tasty and healthy addition to your diet. To add some heat, try these tips: - Add crushed red pepper flakes while roasting. - Mix in fresh chili peppers when blending. - Stir in a splash of hot sauce after blending. Adjust the spice to fit your taste. Absolutely! This soup tastes even better the next day. You can make it and store it in the fridge. Just let it cool and place it in an airtight container. It will last up to five days. If your soup is too thick, add more broth or water. Stir it in gradually until you reach your desired consistency. Heat it back up on the stove after adding liquid. Adjust the seasoning after adding more liquid if needed. Yes, many brands offer low-sodium vegetable broth. You can also make your own at home. Use fresh vegetables, herbs, and spices without added salt. This allows you to control the sodium content in your soup. In this post, we covered all the essential steps to make delicious roasted vegetable soup. You learned about key ingredients, proper vegetable selection, and cooking techniques. We also shared tips for storage and creative variations to match your tastes. Remember, using fresh veggies makes a huge difference in flavor. Enjoy experimenting with spices and toppings! Make this soup your own by adjusting ingredients, and savor every spoonful. Happy cooking!
Roasted Vegetable Soup Easy and Flavorful Recipe
Looking for a warm, hearty dish that bursts with flavor? You’re in the right place! This roasted vegetable soup is not just easy to make;
- 1 lb baby carrots (or regular carrots, peeled and cut into sticks) - 4 cloves garlic, minced - 2 tablespoons olive oil - 1 tablespoon fresh rosemary, chopped - 1 tablespoon fresh thyme, chopped - 1 teaspoon honey (optional for sweetness) - Salt and pepper to taste - Fresh parsley, chopped for garnish - Quantity of Each Ingredient: For this dish, use 1 pound of baby carrots or regular carrots. The garlic should be 4 cloves, and you’ll need 2 tablespoons of olive oil. Use 1 tablespoon each of fresh rosemary and thyme. Hints of sweetness come from 1 teaspoon of honey, which is optional. Season with salt and pepper to your taste. Lastly, garnish with fresh parsley for a pop of color. - Notes on Ingredient Substitutions: If you can’t find baby carrots, regular carrots work just fine. Just peel and cut them into sticks. For herbs, feel free to swap rosemary and thyme with other fresh herbs like dill or basil. If you want a vegan option, skip the honey or use agave syrup instead. {{ingredient_image_1}} - Recommended Temperature: Preheat your oven to 425°F (220°C). This high heat helps caramelize the carrots. - Importance of Preheating: Preheating makes sure the carrots roast evenly. It also enhances their flavor. - Instructions for Peeling and Cutting: If you use regular carrots, peel them first. Cut them into sticks about the same size as baby carrots. This ensures even cooking. - Mixing Ingredients in a Bowl: In a large bowl, mix the carrots, minced garlic, olive oil, chopped rosemary, and thyme. If you want a touch of sweetness, add honey. Season with salt and pepper. Toss until the carrots are well-coated. - Spreading Carrots on Baking Sheet: Line a baking sheet with parchment paper. Spread the carrots in a single layer. This helps them roast, not steam. - Cooking Time and Stirring Tips: Roast for 25-30 minutes. Stir the carrots halfway through to ensure even roasting. They should be tender and caramelized when done. Adjust seasoning if needed. Enjoy the rich flavor! Adjusting Seasoning Start with salt and pepper. These simple seasonings enhance the natural carrot taste. After roasting, taste the carrots. If they need more flavor, add a sprinkle of salt or pepper. Don't be shy about adjusting! Recommended Herbs for Flavor Enhancement I love using fresh herbs. Rosemary and thyme work great here. They bring a warm, earthy flavor. You can also try dill or oregano for something different. Try mixing different herbs to find your favorite blend. Tips for Caramelization Caramelization gives carrots a sweet, rich flavor. To achieve this, roast them at 425°F (220°C). This high heat helps them brown nicely. Make sure to spread them out on the baking sheet. Crowding the carrots can cause steaming instead of roasting. Best Practices for Even Roasting Stir the carrots halfway through cooking. This ensures they roast evenly. It also helps to flip them for a lovely golden color. Use a large baking sheet for better air flow. This way, every carrot gets that perfect roast! Garnishing Ideas Finish your dish with fresh parsley. It adds a nice pop of color and freshness. You can also sprinkle some feta cheese for a creamy touch. A squeeze of lemon juice brightens the flavors, too. Pairing with Other Dishes Garlic herb roasted carrots pair well with many meals. They go great with roasted chicken or grilled fish. Try them alongside a hearty grain salad for a full meal. The flavors mingle nicely, creating a delicious plate. Pro Tips Use Fresh Herbs: Fresh rosemary and thyme elevate the flavor of the carrots significantly compared to dried herbs. Customize Sweetness: Adjust the amount of honey to your taste; more honey will give a sweeter caramelization. Even Roasting: Stir the carrots halfway through roasting to ensure even cooking and caramelization on all sides. Garnish for Freshness: Adding fresh parsley at the end brightens up the dish and adds a pop of color. {{image_2}} You can switch up the carrots in this dish. Try using parsnips, sweet potatoes, or bell peppers. Each vegetable brings its own flavor and texture. For seasonal options, think about using squash in fall or asparagus in spring. These choices keep your meals fresh and fun. To add more excitement, think about spices. A pinch of cumin or paprika can give your carrots a warm kick. If you love heat, try adding red pepper flakes. You can also swap out honey for maple syrup or agave nectar. Each sweetener changes the taste just a bit. Experiment to find what you like best. If you want this dish vegan, skip the honey or use a vegan sweetener. It stays tasty without losing flavor. For allergy-friendly options, ensure you choose oils and herbs that fit your needs. Always check labels for hidden allergens. These small changes help everyone enjoy this dish. After enjoying your garlic herb roasted carrots, store leftovers properly. The best containers for storage are glass or plastic airtight containers. These keep the carrots fresh and tasty. You want to avoid using metal containers, as they can alter the flavor. Keep your cooked carrots in the fridge for about 3 to 5 days. If you want to store them longer, consider freezing. Just remember to place them in a freezer-safe container. This way, you can enjoy them later. To reheat your carrots, use the oven or microwave. For the oven, preheat it to 350°F (175°C). Place the carrots on a baking sheet and heat for about 10-15 minutes. This method helps keep the texture crisp and the flavor intact. If you use a microwave, place the carrots in a bowl. Cover the bowl with a microwave-safe lid or wrap. Heat in short bursts of 30 seconds, stirring in between. This method is quick but may soften the carrots more than the oven method. For both methods, add a little olive oil or a sprinkle of fresh herbs before reheating. This keeps the dish flavorful and fresh. Yes, you can use frozen carrots. Just remember that frozen carrots often have extra water. To keep them from becoming mushy, thaw the carrots first. Drain any excess water before mixing them with the olive oil and herbs. This way, you will get a nice roast. You can tell when the carrots are done by looking for a few signs. First, the carrots should be tender. You can check this by poking them with a fork. They should slide off easily. Second, look for a nice caramel color on the outside. This adds flavor and makes them look great. Yes, you can make this dish ahead of time. If you want to meal prep, roast the carrots and let them cool. Store them in an airtight container in the fridge. They will stay fresh for about three to four days. When you are ready to eat, just reheat them in the oven or microwave. Roasting carrots is simple and rewarding. We covered the best ingredients and measurements. I shared easy step-by-step instructions for roasting. You learned helpful tips for flavor and texture. The variations open up many fun ideas. Proper storage keeps your leftovers fresh and tasty. Try your favorite method to make these carrots shine. Enjoy delicious carrots that anyone can love.
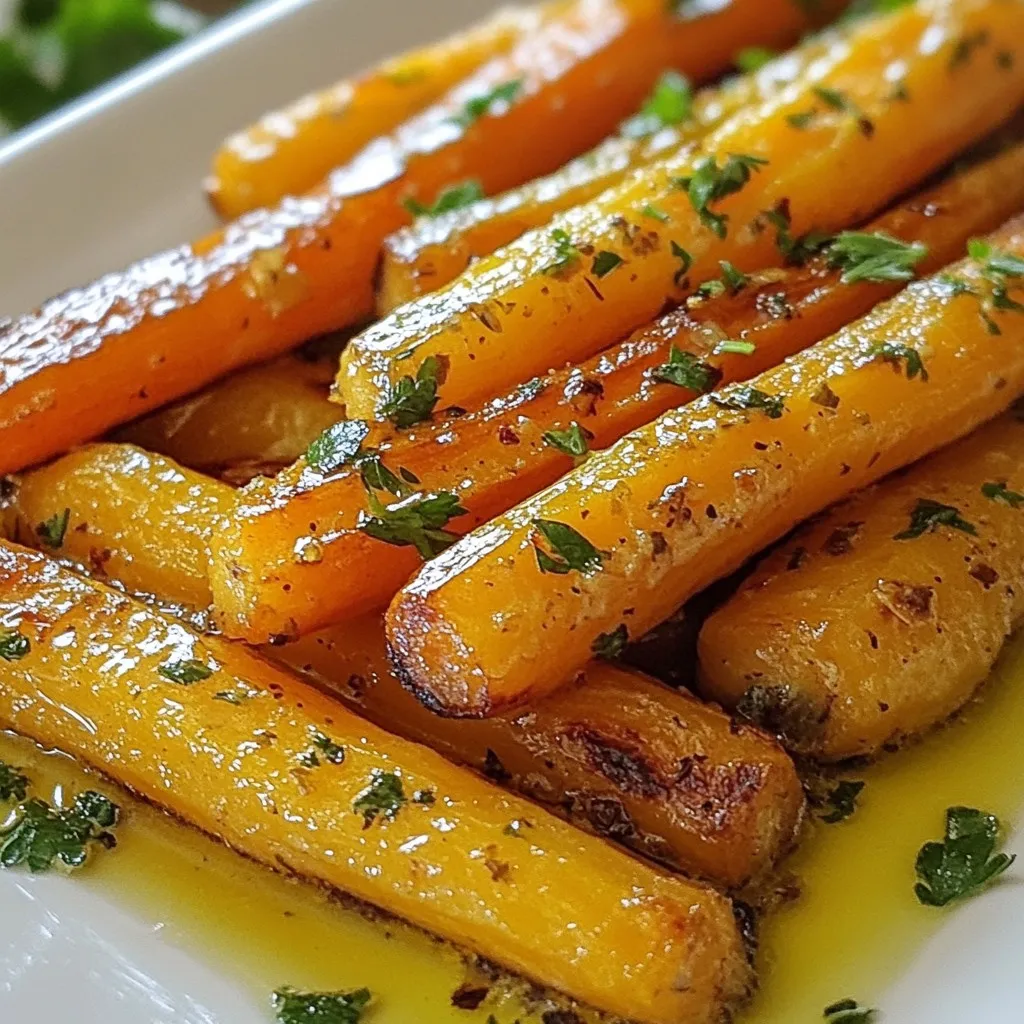
Garlic Herb Roasted Carrots Tasty Side Dish Delight
If you’re looking for a simple yet flavorful side dish, Garlic Herb Roasted Carrots are a must-try! With just a few ingredients, you can create