Dinner
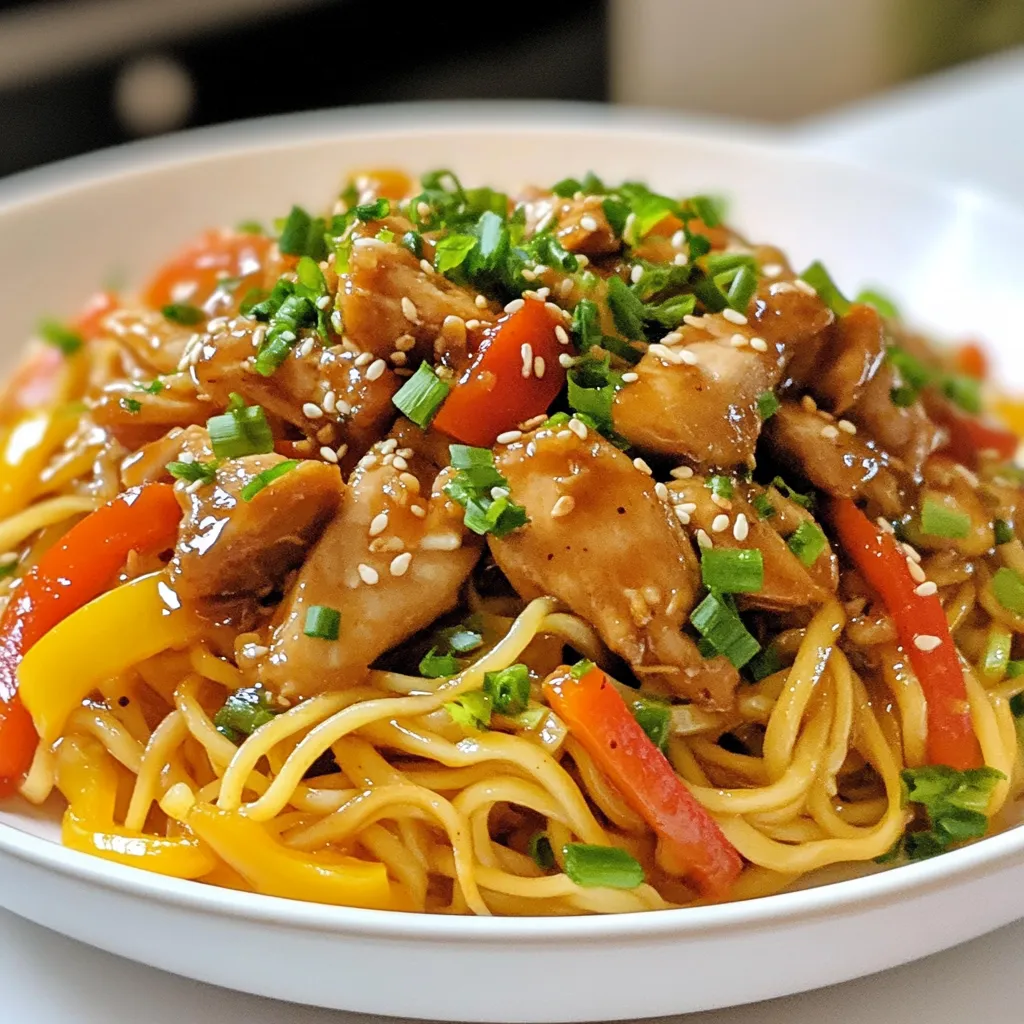
Sticky Garlic Chicken Noodles Rich and Flavorful Meal
Craving a dish that’s both rich and full of flavor? Look no further! Sticky Garlic Chicken Noodles bring together tender chicken, savory garlic, and a
![- 2 cups elbow macaroni - 2 tablespoons olive oil - 1 small onion, finely chopped - 2 cloves garlic, minced - 2 cups vegetable broth - 1 cup canned diced green chiles - 1 teaspoon ground cumin - 1 teaspoon smoked paprika - 1/2 teaspoon salt - 1/2 teaspoon black pepper - 1 cup shredded cheddar cheese - 1/4 cup freshly chopped cilantro (for garnish) - Lime wedges (for serving) In this dish, the elbow macaroni is the star. It provides a nice base for all the flavors. The green chiles add a mild heat that brings life to the macaroni. Olive oil is key for sautéing the onion and garlic, giving the dish a solid flavor foundation. The spices, like cumin and smoked paprika, add depth and warmth. Salt and black pepper bring it all together, enhancing every bite. The cheese is the finishing touch, making it creamy and rich. Don't forget the fresh cilantro for a bright pop, and lime wedges for a zesty kick. - Large pot for cooking - Colander for draining macaroni - Stirring spoon Using the right tools makes cooking easier. A large pot helps to boil the macaroni quickly. A colander is perfect for draining it without making a mess. A simple stirring spoon is all you need to mix everything well. For the full recipe, check out the details to create this delightful dish. - Bring salted water to a boil. - Add 2 cups of elbow macaroni. - Cook until al dente, then drain and set aside. - Heat 2 tablespoons of olive oil in the same pot. - Add 1 small chopped onion and sauté until it turns translucent. - Toss in 2 cloves of minced garlic and sauté until fragrant. - Pour in 2 cups of vegetable broth and stir in 1 cup of canned green chiles. - Add seasonings: 1 teaspoon of ground cumin, 1 teaspoon of smoked paprika, 1/2 teaspoon of salt, and 1/2 teaspoon of black pepper. - Mix in the cooked macaroni and let it simmer for 5 minutes. This helps all the flavors blend well. - Finally, stir in 1 cup of shredded cheddar cheese until it melts and becomes creamy. - Taste and adjust the seasoning if needed. This dish is simple yet full of flavor. You can find the Full Recipe for detailed steps and tips. - Use quality vegetable broth for rich taste. - Don't overcook the macaroni; it should remain firm. Choosing a good vegetable broth makes a big difference. It adds depth and a lovely flavor. In my experience, homemade broth really shines. If you go for store-bought, look for low-sodium options. This way, you can control the salt level better. Next, keep an eye on your macaroni. Cooking it just right is key. Al dente means it's firm to the bite, not mushy. This texture holds up well in your sopita. - Garnish with fresh cilantro and lime wedges. - Serve in rustic bowls for an authentic feel. Presentation matters! A sprinkle of fresh cilantro brightens your dish. Lime wedges add a zesty touch, too. Just squeeze a bit over the top before eating. Choosing rustic bowls gives a homey vibe. It makes your meal feel special and inviting. Plus, it shows off all the vibrant colors of your sopita. - Consider adding jalapeños for extra heat. - Top with avocado or sour cream for creaminess. Want more kick? Adding jalapeños is a great idea. They bring heat and flavor. If you prefer a milder sopita, skip this step. Creaminess takes it up a notch! Slicing ripe avocado on top adds a rich texture. Sour cream also works well. It balances the spice and makes it extra delicious. For the full recipe, be sure to check out the [Full Recipe] section above. {{image_2}} You can easily make this dish vegetarian. Just switch the vegetable broth for chicken broth. This simple swap keeps the flavor rich. You can also use different cheeses. Try pepper jack for a spicy twist or mozzarella for a mild taste. Adding veggies can change the texture and taste. Corn adds sweetness, while bell peppers bring a nice crunch. You can also mix in proteins. Shredded chicken makes it heartier, and black beans add fiber and flavor. Want more heat? Increase the green chiles in your sopita. This gives it a nice kick. Another option is to add chipotle powder. This smoky spice adds depth and makes each bite exciting. For the full recipe, check out Green Chile Macaroni Sopita. Store any leftover Green Chile Macaroni Sopita in an airtight container. This keeps it fresh and tasty. Use it within 3-4 days. The flavors will still be great, but it’s best to enjoy it soon. If you want to save some for later, freeze it in portions. This makes it easy to heat up a quick meal. When you are ready to eat, thaw it in the refrigerator overnight. This way, it warms evenly. To reheat, you can use either the stovetop or microwave. If you use the stovetop, heat it gently on low. If you prefer the microwave, use a medium setting. Always add a splash of broth to keep the sopita creamy and delicious. Green Chile Macaroni Sopita is a warm, creamy pasta dish. It combines elbow macaroni with green chiles, spices, and cheese. This dish brings a taste of comfort and joy. The green chiles add a unique flavor, making it stand out. This dish has roots in Mexican cuisine, where comfort food is key. It is perfect for family meals or cozy nights in. Yes, you can easily make this recipe gluten-free. Choose gluten-free elbow macaroni or any pasta you like. Many brands offer corn or rice-based pasta options. They work well in this dish. Just cook them according to the package instructions. The flavors from the green chiles and spices will still shine through. To enhance heat levels, add more green chiles to the mix. You can also include diced jalapeños or a pinch of cayenne pepper. If you like smoky flavors, try adding chipotle powder. These additions will give your sopita a nice kick. Adjust the heat to match your taste buds. Green Chile Macaroni Sopita pairs well with simple sides. Consider serving a fresh salad with lime dressing. Cornbread or warm tortillas also make great partners. For a crunchy touch, add tortilla chips on the side. These sides will balance the creamy texture of the dish. Check out the Full Recipe to find more serving ideas. In this blog post, I shared a simple and tasty recipe for Green Chile Macaroni Sopita. We covered essential ingredients, cooking steps, tips, and fun variations. This dish is easy to make and sure to please. Whether you're cooking for yourself or friends, you can add your twist. Remember, use quality ingredients and enjoy experimenting with flavors. With the right care and storage, you’ll savor this meal for days. Dive into this delicious recipe and bring joy to your table!](https://grilledflavors.com/wp-content/uploads/2025/08/ff0b180a-cfe9-4899-8de0-0ffb9afb83be.webp)
Green Chile Macaroni Sopita Flavorful and Simple Dish
Craving a cozy dish that’s both tasty and easy to make? Green Chile Macaroni Sopita delivers just that! This warm, comforting meal combines creamy cheese

Chick-fil-A Grilled Chicken Club Sandwich Delight
Are you ready to elevate your lunch game? The Chick-fil-A Grilled Chicken Club Sandwich is a delicious choice that combines juicy chicken with fresh veggies

Mexican Street Corn Soup Flavorful and Easy Recipe
Get ready to indulge in a warm, comforting bowl of Mexican Street Corn Soup! This easy recipe combines fresh corn, zesty seasonings, and creamy goodness
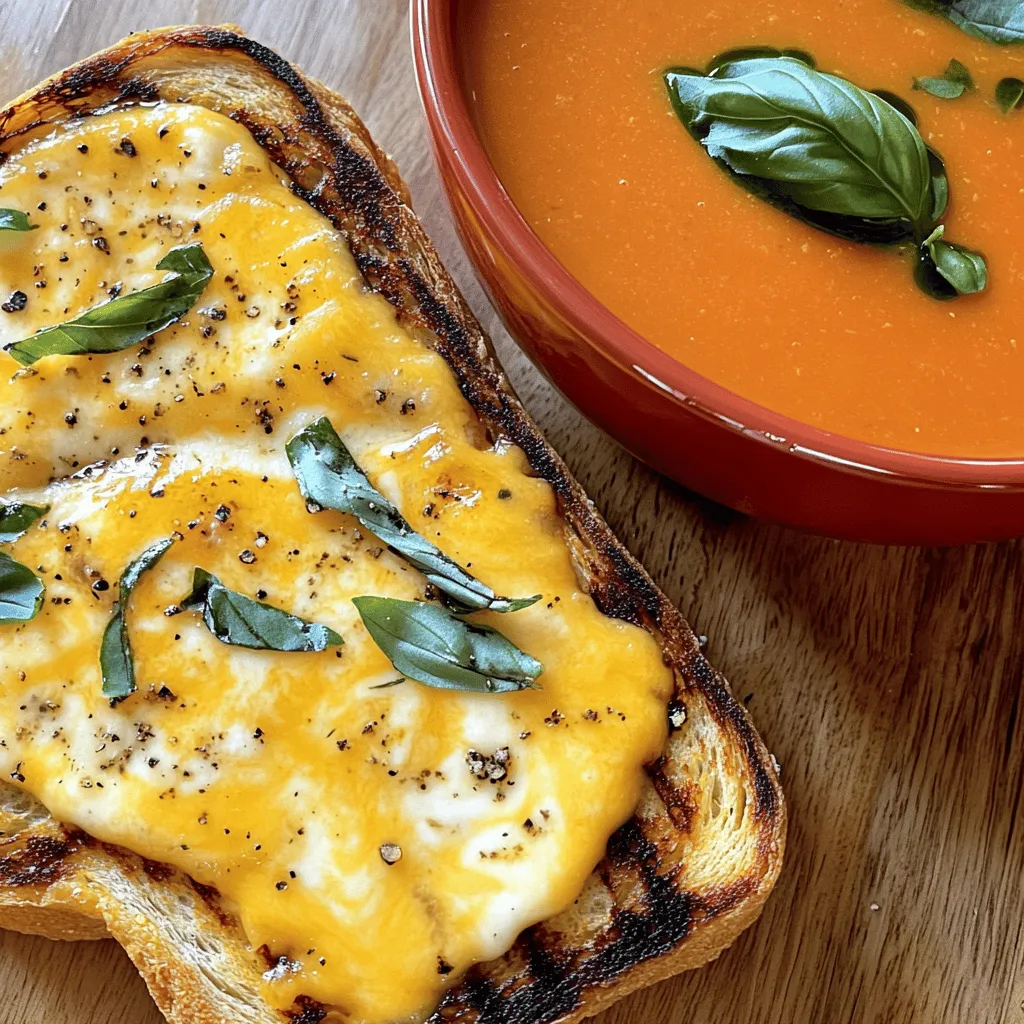
Cheesy Grilled Toast and Tomato Soup Comfort Meal
Nothing beats a warm bowl of tomato soup paired with cheesy grilled toast on a chilly day. This comfort meal is simple to make and
![For a delicious Cozy Autumn Harvest Tart, gather these ingredients: - 1 pre-made pie crust (or homemade if preferred) - 2 cups diced butternut squash - 1 cup diced apple (like Granny Smith or Honeycrisp) - 1/2 cup yellow onion, finely chopped - 2 tablespoons olive oil - 1 tablespoon maple syrup - 1 teaspoon ground cinnamon - 1/2 teaspoon nutmeg - 1/2 teaspoon salt - 1/4 teaspoon black pepper - 3 large eggs - 1 cup heavy cream - Fresh sage leaves for garnish When picking produce, look for bright colors and firm textures. Choose butternut squash that feels heavy for its size. The skin should be smooth and free from blemishes. For apples, go for those with no soft spots. Firm apples hold their shape well in the tart. Fresh herbs, like sage, should have vibrant green leaves without wilting. You can swap butternut squash with pumpkin or acorn squash for a different taste. If you want a sweeter tart, try using pears instead of apples. For those who want a lighter version, use half-and-half in place of heavy cream. If you're short on eggs, you can replace each egg with a quarter cup of unsweetened applesauce. First, you need to set the oven. Preheat it to 400°F (200°C). This heat will help cook the tart evenly. Next, gather your veggies. You will need butternut squash, apple, and onion. Dice them into small, even pieces. This makes sure they cook well. In a large bowl, mix the diced squash, apple, and onion. Pour in the olive oil and maple syrup. Then, add the cinnamon, nutmeg, salt, and black pepper. Toss everything together until it is coated nicely. Spread the mixture on a baking sheet. Make sure it is in a single layer. This way, everything roasts evenly. Place the sheet in the oven and roast for 20-25 minutes. You want the squash to be tender. Halfway through, stir the mixture. This helps all the flavors blend better. The smell will fill your kitchen, making it feel cozy. While the veggies roast, prepare the custard. In a separate bowl, whisk together the eggs and heavy cream. Keep whisking until they blend well. Add a pinch of salt and pepper for flavor. Once the roasted mixture cools a bit, remove it from the oven. Spread it evenly in the pie crust. Pour the egg and cream mixture over the top. Make sure it covers the veggies well. Then, lower the oven temperature to 375°F (190°C). Bake the tart for 30-35 minutes. You want the custard to set and the top to turn golden brown. After baking, let the tart cool for at least 10 minutes. This will help it hold its shape when sliced. Garnish with fresh sage leaves for a pretty touch before serving. Enjoy your Cozy Autumn Harvest Tart! For the complete recipe, refer to the [Full Recipe]. To get a great crust, start with a cold pie crust. If using a pre-made crust, keep it in the fridge until you're ready to use it. This helps it hold shape. Use your fingers to press the dough into the pie dish. Don’t stretch it too much. You want it to fit snugly without tearing. If you make a homemade crust, use chilled butter. This keeps the crust flaky. Roll it out on a lightly floured surface. Aim for an even thickness. After placing it in the dish, remember to poke holes in the bottom. This helps steam escape while baking, so your crust doesn't get soggy. For a creamy custard, whisk the eggs and cream well. Mix until smooth and frothy. This adds air, making it light. Use fresh eggs for the best flavor and texture. Room temperature eggs combine better with the cream. When pouring the custard over the filling, do it slowly. This allows it to settle evenly. If you're worried about lumps, strain it through a fine mesh sieve. This step ensures a smooth custard. Garnishing makes your tart shine. Fresh sage leaves add color and flavor. Place them on top right before serving. You can also sprinkle a little cinnamon for extra warmth. For a sweet touch, drizzle some maple syrup over each slice. It adds shine and a hint of sweetness. Consider serving with a dollop of whipped cream on the side. This adds creaminess and makes each bite more special. These tips will help you create a beautiful and tasty Cozy Autumn Harvest Tart. For the full recipe, check the earlier section. Enjoy your cooking! {{image_2}} You can swap ingredients to change the taste of the Cozy Autumn Harvest Tart. Try using pumpkin instead of butternut squash for a classic fall flavor. Sweet potatoes work great too! If you want a sweeter touch, replace apples with pears. Each choice brings its own unique flavor. This tart can easily suit a vegetarian or vegan diet. For a vegetarian option, use a plant-based cream instead of heavy cream. You can replace eggs with a mix of ground flaxseed and water. For a vegan version, choose a dairy-free pie crust. This way, everyone can enjoy the cozy taste. Pair this tart with simple side dishes to complete your meal. A fresh green salad with a light vinaigrette adds a nice crunch. Roasted Brussels sprouts or garlic green beans make tasty side dishes too. For a warm touch, serve the tart with apple cider or hot tea. These sides enhance the cozy feel of this fall dish. If you're ready to create this comforting tart, check out the Full Recipe for all the details! After enjoying your tart, let it cool completely. Place it on a plate or in a shallow container. Cover it tightly with plastic wrap or aluminum foil. This keeps it fresh for up to three days in the fridge. If you plan to enjoy it later, storing it properly is key. To reheat the tart, preheat your oven to 350°F (175°C). Place the tart on a baking tray. Cover it with foil to prevent burning. Heat for about 15-20 minutes. Check if it's hot in the center. This method keeps the crust crisp and the filling warm. For long-term storage, you can freeze the tart. First, let it cool completely. Wrap it tightly in plastic wrap, then in aluminum foil. Label it with the date. It can last up to three months in the freezer. To eat, thaw it in the fridge overnight, then reheat as mentioned above. Enjoy your Cozy Autumn Harvest Tart any time! Cottagecore is a trend that celebrates a simple, rural lifestyle. It focuses on nature, homemade food, and cozy settings. Fall recipes inspired by cottagecore often feature warm flavors and seasonal ingredients. Think of hearty soups, roasted vegetables, and sweet treats like pies. This style brings a sense of comfort and nostalgia. You can feel the warmth of a cozy kitchen with each bite. Yes, you can! While butternut squash works great in the Cozy Autumn Harvest Tart, you can swap it for other varieties. Acorn squash or pumpkin are good options too. They will add their own unique flavor and texture. Just make sure to adjust cooking times if needed. Each type of squash gives a lovely taste to the tart. The Cozy Autumn Harvest Tart pairs well with many sides. A simple green salad with a light vinaigrette is a great choice. You might also enjoy roasted root vegetables for extra warmth. For a heartier meal, serve it with a creamy soup, like butternut squash soup. These sides will enhance the cozy feeling and make your meal complete. This blog post guides you through making a Cozy Autumn Harvest Tart. We explored key ingredients, including tips for picking fresh produce and smart swaps. Step-by-step instructions showed you how to make the crust and custard. I shared tips for the perfect texture and ways to garnish. We also discussed variations and how to store leftovers. Fall is a great time to enjoy this tart with your favorite sides. Embrace the season and have fun experimenting with flavors!](https://grilledflavors.com/wp-content/uploads/2025/07/a5173ef3-1e1c-4687-9030-31a42f3f92ca.webp)
Fall Recipes Inspired by Cottagecore Cozy Delights
Fall is here, and it’s time to embrace the warmth of cottagecore with comforting recipes. In Fall Recipes Inspired by Cottagecore Cozy Delights, I’ll share
![The main ingredients in this easy healthy baby lasagna create a tasty and nutritious dish. Here’s what you need: - 9 whole wheat lasagna noodles - 1 cup ricotta cheese (low-fat) - 2 cups spinach (fresh, chopped) - 1 cup zucchini (finely diced) - 1 cup shredded carrots - 2 cups marinara sauce (preferably low-sodium) - 1 ½ cups mozzarella cheese (part-skim, shredded) - 1 teaspoon dried Italian herbs (oregano, basil) - Salt and pepper to taste - Olive oil spray (for greasing) These ingredients offer a blend of flavors and textures. Whole wheat noodles add fiber, while ricotta and mozzarella provide creamy goodness. Fresh veggies like spinach and zucchini boost the nutrition. You can personalize this lasagna with different ingredients. Here are some ideas: - Swap whole wheat noodles for gluten-free noodles if needed. - Use cottage cheese instead of ricotta for a different taste. - Add bell peppers or mushrooms for extra veggies. - Try using a low-sugar marinara sauce to cut down on added sugars. These variations keep the dish fun and exciting. You can change it every time you make it! If you don’t have an ingredient, try these easy swaps: - Replace ricotta with Greek yogurt for added protein. - Use frozen spinach if fresh isn’t available; just thaw and drain. - Substitute zucchini with yellow squash or eggplant. - If you need a dairy-free option, use cashew cheese instead of mozzarella. These substitutions help you adjust based on what you have at home. With the right swaps, you can still create a delicious meal. For the full recipe, check the section above! First, gather all the ingredients for Easy Healthy Baby Lasagna. You will need: - 9 whole wheat lasagna noodles - 1 cup ricotta cheese (low-fat) - 2 cups spinach (fresh, chopped) - 1 cup zucchini (finely diced) - 1 cup shredded carrots - 2 cups marinara sauce (preferably low-sodium) - 1 ½ cups mozzarella cheese (part-skim, shredded) - 1 teaspoon dried Italian herbs (oregano, basil) - Salt and pepper to taste - Olive oil spray (for greasing) Next, preheat your oven to 375°F (190°C). While the oven heats, cook the lasagna noodles as directed on the package. After cooking, drain the noodles and set them aside. In a mixing bowl, combine the ricotta cheese, chopped spinach, zucchini, shredded carrots, Italian herbs, salt, and pepper. Mix everything well until it forms a smooth filling. Grease a 9x13-inch baking dish with olive oil spray. This helps the lasagna not stick. Spread 1 cup of marinara sauce evenly on the bottom of the dish. Now, you will layer the ingredients in the dish. Start with 3 lasagna noodles placed side by side over the sauce. Then, spread half of the ricotta and vegetable mixture over the noodles. Sprinkle with ½ cup of mozzarella cheese. Repeat the layering process: add another 3 lasagna noodles, followed by another cup of marinara sauce, the remaining ricotta mixture, and another ½ cup of mozzarella cheese. For the top layer, place the final 3 lasagna noodles on the cheese. Cover them with the remaining marinara sauce and the last ½ cup of mozzarella cheese. Ensure the entire top is well covered to create a nice crust. To bake, cover the dish with aluminum foil. Be sure to spray the foil with olive oil to avoid sticking. Bake for 25 minutes. After that, remove the foil and bake for an additional 15-20 minutes. Look for bubbly, golden cheese as the sign it’s ready. Once done, let the lasagna cool for 10 minutes. This makes it easier to slice and serve. Enjoy this healthy, tasty meal with your little one! For the full recipe, check out the Easy Healthy Baby Lasagna. To boost flavor, use fresh herbs. Instead of dried Italian herbs, try fresh basil or oregano. Fresh herbs add a bright touch. You can also use garlic powder or onion powder for a more robust taste. Add a pinch of red pepper flakes for a slight kick. If your baby is ready, a hint of cheese can enhance the richness. Texture matters for little ones. Make sure veggies are finely diced. This helps them blend well into the lasagna. Cook the zucchini and carrots slightly before adding them. This softens them, making them easy to chew. You want each bite to be soft but not mushy. Layer the ricotta cheese well to keep everything creamy and smooth. Make meals fun to eat! Use colorful plates to catch their eye. Cut the lasagna into small squares or fun shapes. Serve with a sprinkle of fresh basil on top for color. You can also add a side of steamed veggies for a pop of green. This not only makes the plate look nice but also adds nutrition. Creating a fun presentation can make your baby more excited to eat! {{image_2}} You can mix in many veggies for extra flavor and nutrition. Try adding chopped bell peppers or mushrooms. They add a nice texture and taste. You can also use broccoli or cauliflower for more crunch. If your baby likes it, you can blend in some peas too. Each veggie brings its own unique flavor. So, feel free to get creative with what you have on hand. If you want a gluten-free lasagna, use gluten-free noodles. Many brands offer great options that taste good. For dairy-free, you can swap ricotta and mozzarella with cashew cheese or almond cheese. These alternatives still give a creamy texture. Just check the labels to ensure they fit your needs. These changes make the dish suitable for many diets. As your baby grows, you can adjust the recipe. Add more spices like garlic powder for a stronger flavor. You can also increase the amount of cheese for a richer taste. If your child enjoys meat, consider adding ground turkey or chicken. Just cook it before mixing with the cheese and veggies. These tweaks keep the dish appealing as their taste buds develop. For the complete method, check the [Full Recipe]. You can store leftover lasagna in the fridge. Place it in an airtight container. It stays fresh for about three to five days. Before you eat it, check for any signs of spoilage. If it looks or smells off, it’s best to toss it. If you want to save some for later, freezing is a great option. Cut the lasagna into individual portions. Wrap each piece tightly in plastic wrap, then place it in a freezer bag. It will keep well for up to three months. To reheat, let it thaw in the fridge overnight. Then bake it at 350°F (175°C) until warm, about 25-30 minutes. You can also microwave it. Just cover it with a damp paper towel and heat in short bursts. Choose containers that seal tightly. Glass containers work well because they keep odors out. If you use plastic, make sure it is BPA-free. Label your containers with the date. This helps you remember when you made the lasagna and how long it has been stored. Yes, you can make this lasagna ahead of time. Prepare the dish and layer it as instructed. Cover it tightly and store it in the fridge for up to 24 hours. This helps the flavors blend. When ready to bake, just pop it in the oven. You may need to add a few extra minutes of cooking time. This baby lasagna is great for babies over 10 months old. At this age, babies can handle soft textures and a variety of flavors. The veggies offer good nutrition, and the cheese adds protein. Always check with your pediatrician if you have concerns about introducing new foods. To check if the lasagna is done, look for bubbly cheese on top. The edges should be golden brown. Insert a knife into the center. If it goes in easily, the lasagna is ready. Let it cool for about 10 minutes before slicing. This helps the layers hold together better. For the full recipe, visit the [Full Recipe] link. This blog post covered how to make an easy and healthy baby lasagna. We discussed key ingredients, preparation, and cooking steps. I offered helpful tips to make the dish tasty and baby-friendly. We also explored variations for different dietary needs and how to store leftovers properly. Remember, this recipe suits babies and older kids. With these tips, you can create a meal everyone will love. Enjoy making this delicious lasagna for your family!](https://grilledflavors.com/wp-content/uploads/2025/07/795a898b-fce8-47a6-a28e-ce03d428a621.webp)
Easy Healthy Baby Lasagna Simple and Tasty Recipe
Looking for a quick and healthy meal for your little one? I’ve got you covered! This Easy Healthy Baby Lasagna is simple to make and
![To create a fun and tasty bento box, start with key ingredients. You want to include a mix of protein, grains, and plenty of colorful veggies and fruits. Here are some great options: - Protein: Cooked chicken, tofu, or hard-boiled eggs. - Grains: Sushi rice, brown rice, or quinoa. - Veggies: - Carrots - Bell peppers - Cucumbers - Broccoli - Fruits: - Apples - Grapes - Strawberries - Kiwi These ingredients not only look appealing but also keep your child healthy and energized. When making a bento box, you need the right containers and tools. Here are must-have items for your bento box setup: - Containers: - Divided bento boxes - Small containers for dips and sauces - Tools: - Bamboo mat for sushi rolling - Sharp knife for cutting - Measuring cups for rice and water Having the right supplies makes packing fun and easy. Plus, it helps keep everything neat and organized. For a delicious bento option, try the Full Recipe for colorful rainbow sushi rolls! To start, wash the sushi rice. Rinse it under cold water until it runs clear. This step removes extra starch. In a medium pot, mix the rice with water. Bring it to a boil. Then, cover it and lower the heat. Let it cook for 18 to 20 minutes. After that, turn off the heat and let it sit for 10 minutes without lifting the lid. Next, we need to season the rice. In a small pot, combine rice vinegar, sugar, and salt. Heat it gently until the sugar dissolves. Mix this into the cooked rice and let it cool. This gives the rice a nice flavor. Now, let's roll! Place a bamboo sushi mat on a flat surface. Lay a sheet of nori, shiny side down. With wet hands, spread a thin layer of rice over the nori. Leave about an inch at the top. Now comes the fun part! Place thin strips of cucumber, carrot, avocado, and red bell pepper across the rice. Roll it up tightly. Start from the bottom and use the mat to help. Seal the edge with a bit of water. Finally, use a sharp knife to slice the roll into bite-sized pieces. Repeat this with the rest of your nori and filling. When packing your bento box, make it fun! Arrange the sushi pieces neatly. You want it to look colorful and inviting. Use a mix of colors to catch the eye. Add some extra veggies or fruits in the gaps. Think about textures too. Include crunchy veggies with soft sushi. This will keep kids excited about their meal. You can also add a small container of soy sauce for dipping. Remember, it's all about variety! Mix different flavors and textures for a balanced meal. With these tips, you can create a fun and tasty bento box that kids will love. For the full recipe, check out Colorful Rainbow Sushi Rolls. To make bento lunches exciting, focus on how food looks. Use fun shapes and colors. You can use cookie cutters to cut sandwiches into stars or hearts. Add colorful fruits and veggies to brighten the box. Let your kids help with the meal prep. Give them small tasks like washing vegetables or arranging food. This makes them feel involved and proud of their lunch. Ask them to choose their favorite colors for their bento box. Prepare ingredients ahead of time. You can wash and cut fruits and veggies the night before. Store them in the fridge in separate containers. This way, you save time when packing lunches. Batch cooking can also help busy families. Make a big batch of sushi rice or cook extra chicken. Use these ingredients for different meals throughout the week. This method gives you variety without the extra work. For a fun recipe, try making Colorful Rainbow Sushi Rolls. These sushi rolls are simple to prepare and a hit with kids. Follow the [Full Recipe] to get started! {{image_2}} You can swap sushi for different kid-friendly proteins. Try using chicken, turkey, or tofu. These options are tasty and keep lunch fun. You can grill or bake chicken bites. Use a little seasoning for flavor. For turkey, try small meatballs or strips. Tofu can be marinated and baked for extra taste. Adding color and nutrition is easy with veggies. Carrots and cucumbers are great choices. Bell peppers add crunch and bright colors. You can also use cherry tomatoes, snap peas, or broccoli florets. These veggies make your bento box look fun and tasty. Other fillings for rainbow sushi can keep things exciting. Instead of just veggies, try cream cheese or cooked shrimp. You can also add colorful fruits like mango or strawberries. These options bring new flavors and textures. Themed bento box lunches are another fun idea. You can create a beach theme with fish-shaped sandwiches and fruit. Or, make a space theme with star-shaped veggies and galaxy-colored rice. Let your child help pick a theme. This makes lunch special and sparks creativity! For a full recipe of colorful rainbow sushi rolls, check out the details above. To keep your bento box lunches fresh, use the right containers. I recommend using bento boxes made from stainless steel or BPA-free plastic. These materials are safe and durable. They also help to keep food fresh longer. Look for containers with separate compartments to keep different foods apart. This prevents flavors from mixing and keeps everything appealing. To maintain freshness, pack your bento box just before your child leaves for school. If possible, place an ice pack in the lunch bag. This helps keep the food cold and safe to eat. When packing food, always wash your hands and surfaces. This keeps germs away from your child's lunch. Use clean utensils and avoid touching the food directly. It is very important to maintain the right temperature for your bento lunch. Keep cold foods, like sushi, at 40°F or lower. Hot foods should stay at 140°F or higher. If you use an insulated container, it can help. These containers keep hot foods hot and cold foods cold for longer. By following these tips, you can pack tasty and safe bento lunches that your kids will love. To keep sushi fresh, you should pack it right. First, store sushi in the fridge until you leave for lunch. Use a tight container that keeps air out. If you can, add a cold pack to your lunch bag. This helps keep the sushi cool and tasty. Avoid leaving sushi out for too long. It tastes best when served fresh. You can also wrap sushi in plastic wrap to keep it from drying out. Yes, you can make bento box lunches ahead of time. I suggest prepping the night before. This can save you time in the morning. You can store sushi in the fridge for up to 24 hours. Just keep the rice and filling separate until lunch. This keeps the rice from getting soggy. You can also prep fruits and veggies. Cut them and store them in airtight containers. This way, you can mix and match for fun lunches all week. If sushi isn’t your thing, don't worry! You can use other easy meal ideas. Try wraps made with tortillas. Fill them with turkey, cheese, and some veggies. You can also add mini sandwiches cut into fun shapes. Another option is pasta salad. Just mix cooked pasta with veggies and dressing. Kids love fruit kabobs too. Simply skewer pieces of fruit for a colorful treat. These ideas are quick and sure to please! Making bento box lunches is fun and healthy for kids. We covered key ingredients like colorful fruits and veggies. I shared how to prepare rainbow sushi rolls and pack them nicely. You can make meal prep exciting for kids and save time in the kitchen. With simple swaps and creative ideas, bento boxes never have to be boring. Enjoy making these lunches together and keep food fresh for later. Your kids will love the tasty meals you create!](https://grilledflavors.com/wp-content/uploads/2025/07/1f899bb5-b019-4c24-9b23-b180995ff089.webp)
Kids Bento Box Lunch Ideas Fun and Tasty Options
Looking for fun and tasty Kids Bento Box Lunch Ideas? You’re in the right place! These vibrant, healthy meals excite kids and suit picky eaters.
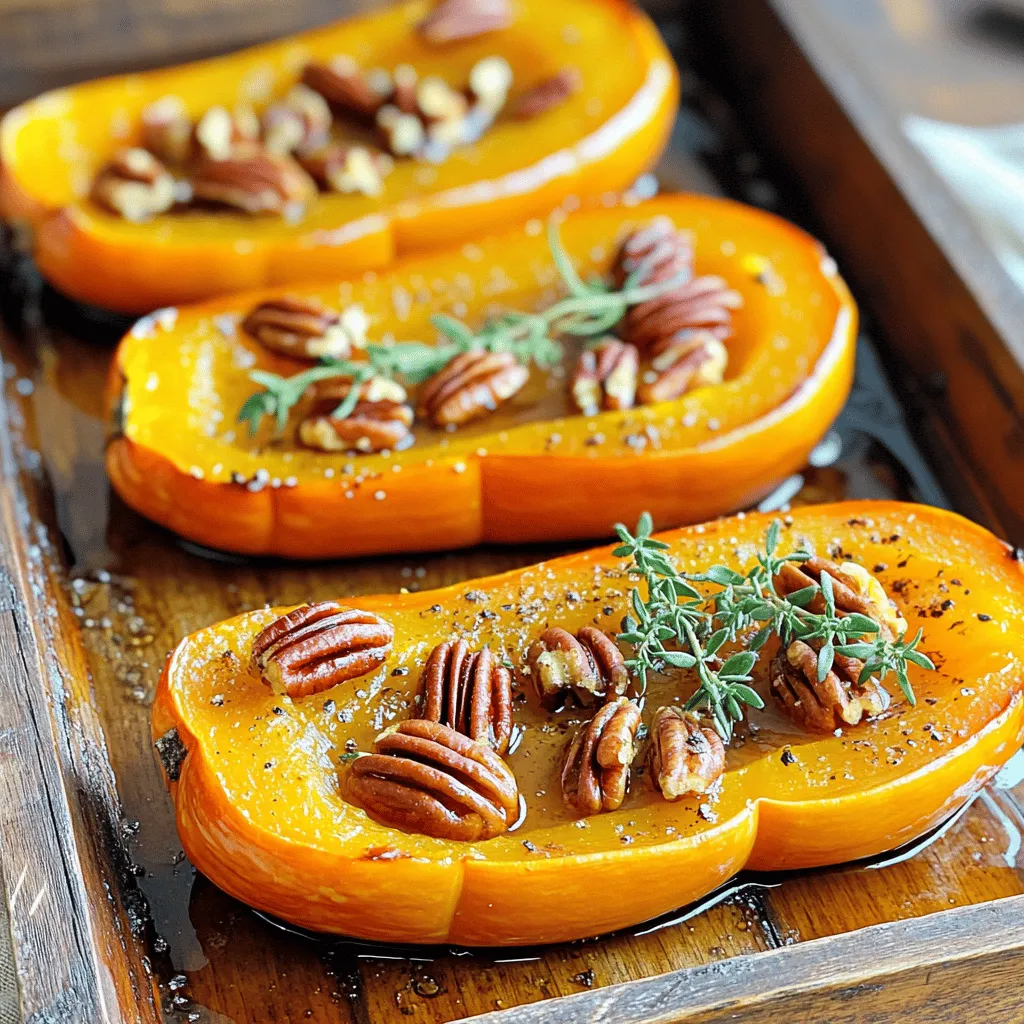
Maple Roasted Honeynut Squash Flavorful Fall Delight
Craving a warm, cozy treat this fall? Maple roasted honeynut squash is your answer! This dish combines the sweet taste of maple syrup with tender,
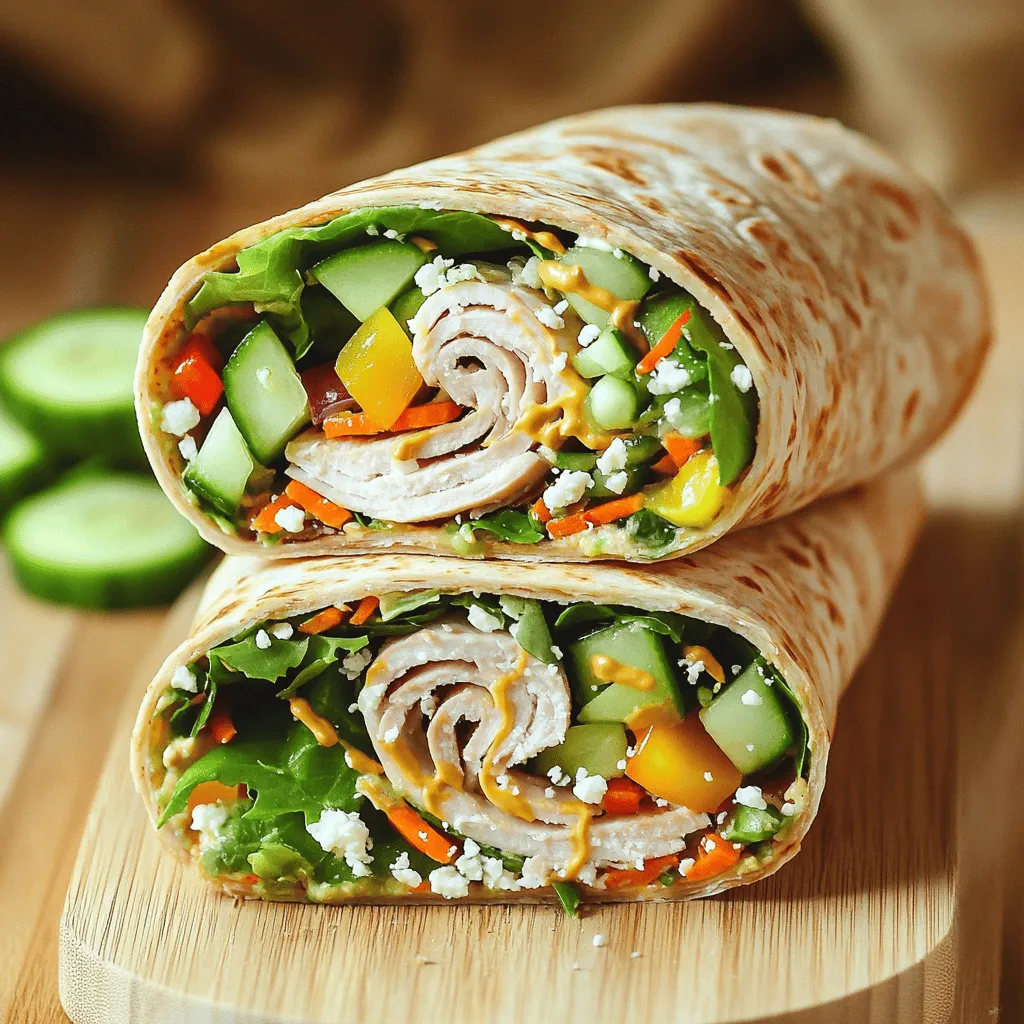
Back-to-School Lunch Ideas for Easy Meal Prep
Looking for fun and easy back-to-school lunch ideas? You’re in the right place! I’ll share tasty turkey and veggie wraps that your kids will love.