Salads
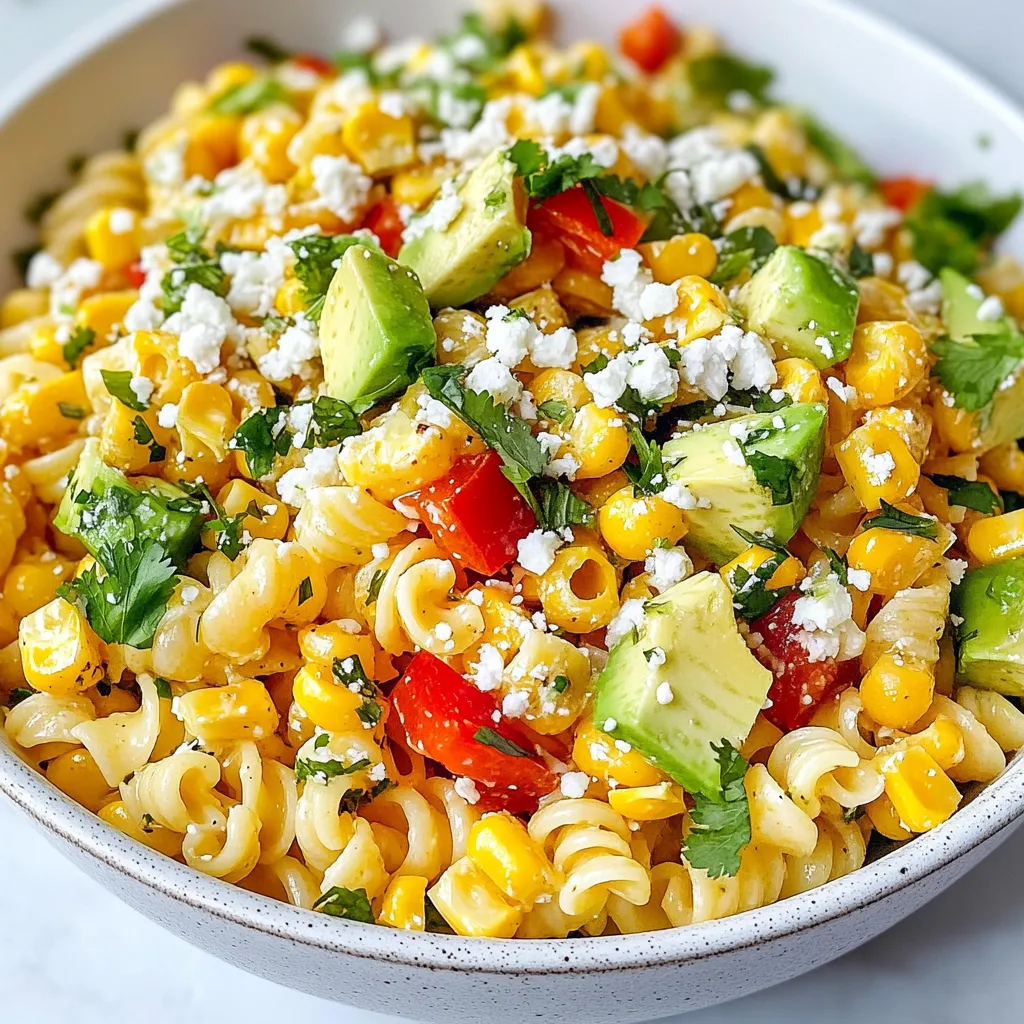
Mexican Street Corn Pasta Salad Flavorful Summer Dish
Summer is here, and what better way to celebrate than with a refreshing Mexican Street Corn Pasta Salad? This vibrant dish blends sweet corn, crisp
![To make a Simple Apple Arugula Salad, you need fresh ingredients that work well together. This salad is bright and tasty. Here's what you will need: - 4 cups fresh arugula - 1 large apple (Granny Smith or Honeycrisp), thinly sliced - 1/2 cup walnuts, roughly chopped - 1/4 cup crumbled feta cheese (optional) - 1/4 cup dried cranberries - 3 tablespoons olive oil - 2 tablespoons apple cider vinegar - 1 teaspoon honey - Salt and pepper to taste Each ingredient adds its own flavor and texture. The fresh arugula gives a nice peppery taste. The apples add a crisp sweetness. Walnuts bring a crunchy bite, while feta cheese adds creaminess. Dried cranberries add a hint of tartness. You can find the full recipe to guide you through making this delightful dish. 1. Combining the base ingredients Start with a large bowl. Add 4 cups of fresh arugula. Next, take 1 large apple, like Granny Smith or Honeycrisp, and slice it thin. Toss the apple slices into the bowl. Now, grab 1/2 cup of walnuts, roughly chopped, and add them in. If you want, you can also add 1/4 cup of crumbled feta cheese. Finally, include 1/4 cup of dried cranberries. 2. Making the dressing In a small bowl, mix 3 tablespoons of olive oil with 2 tablespoons of apple cider vinegar. Add 1 teaspoon of honey for sweetness. Season with salt and pepper to taste. Whisk all the ingredients together until they blend well. This dressing adds a nice zing to your salad. 3. Tossing the salad Pour the dressing over the arugula and apple mix. Use tongs or a large spoon to gently toss everything together. Make sure all the ingredients get coated with the dressing. Taste the salad and see if it needs more salt or pepper. Enjoy your fresh, crunchy salad right away! For the full recipe, check out the detailed instructions above. To make your Simple Apple Arugula Salad even better, consider these tips: - Substitutions for ingredients: If you don’t have arugula, try spinach or mixed greens. For the apple, other crisp types like Fuji or Gala work well. You can swap walnuts with pecans or almonds. If you skip feta, try goat cheese or leave it out. - Best practices for dressing: Always whisk the dressing before adding it to the salad. This helps mix the oil and vinegar well. If you like a sweeter touch, add more honey. Adjust salt and pepper to your taste. A fresh squeeze of lemon juice can brighten the entire dish. - Presentation tips: For a beautiful look, layer ingredients in the bowl. Place arugula at the bottom, then add apples, nuts, and cranberries on top. Drizzle dressing just before serving for the best crunch. Garnish with a few whole nuts or apple slices for a nice touch. These small changes can elevate your salad. Enjoy the fresh flavors of this Simple Apple Arugula Salad! For the complete details, refer to the Full Recipe. {{image_2}} You can switch up the apples in this salad. Try using Fuji or Gala apples. They add a sweet twist. If you prefer tart, go for Granny Smith or Pink Lady apples. Each apple brings its own flavor. For protein, consider adding grilled chicken or shrimp. These options make the salad heartier. You can also toss in chickpeas for a plant-based protein boost. They add extra texture and nutrition. As the seasons change, so can your salad. In spring, add fresh peas or radishes for a crunch. In summer, throw in some cucumber or berries. In fall, consider adding roasted squash. Winter calls for nuts or seeds to give a warm touch. These variations keep the salad fresh and exciting. Feel free to mix and match based on your taste. You can find the full recipe above. Enjoy your creation! To keep your salad fresh, store it in an airtight container. This helps prevent wilting. The best place for it is the fridge. Aim to eat leftovers within two days for the best taste. If you want to save the dressing, store it separately. This way, the arugula stays crisp. You can mix the dressing in just before serving. Reheating is not needed for this salad. Instead, refresh it with a drizzle of olive oil. You can also add a squeeze of lemon for extra flavor. Enjoy your Simple Apple Arugula Salad with a fresh twist! For the full recipe, check the [Full Recipe]. Can I prepare this salad in advance? Yes, you can prep this salad ahead of time. Just keep the dressing separate. If you mix the salad too soon, the arugula will wilt. I suggest making the salad in the morning for lunch or dinner later. This way, you can enjoy the fresh taste and crisp texture. What are some good pairings with this salad? This salad pairs well with grilled chicken or fish. You can also serve it with a warm soup. For a light meal, enjoy it with crusty bread. The sweet and tangy flavors complement many dishes. I find it works great at lunch or as a side dish. How can I make this salad vegan? To make this salad vegan, skip the feta cheese. You can replace it with avocado for creaminess. Use agave syrup instead of honey for the dressing. This will keep the salad rich and flavorful without animal products. Enjoy your simple apple arugula salad vegan style! For the full recipe, check the earlier section. This blog post shared how to make a simple apple arugula salad. You learned about the main ingredients, step-by-step prep, and how to enhance the flavor. I also covered fun variations and how to store leftovers. Remember, salads can be easy and tasty. Don't be afraid to experiment with your own twists. Enjoy this crisp, fresh dish whenever you want. Eating healthy never has to be boring!](https://grilledflavors.com/wp-content/uploads/2025/07/3150baa1-5851-4aee-8d19-c8a5ecc1b42f.webp)
Simple Apple Arugula Salad Recipe for Fresh Flavor
Are you ready to brighten your meals with a fresh, tasty salad? My Simple Apple Arugula Salad Recipe packs vibrant flavors and healthy ingredients. With
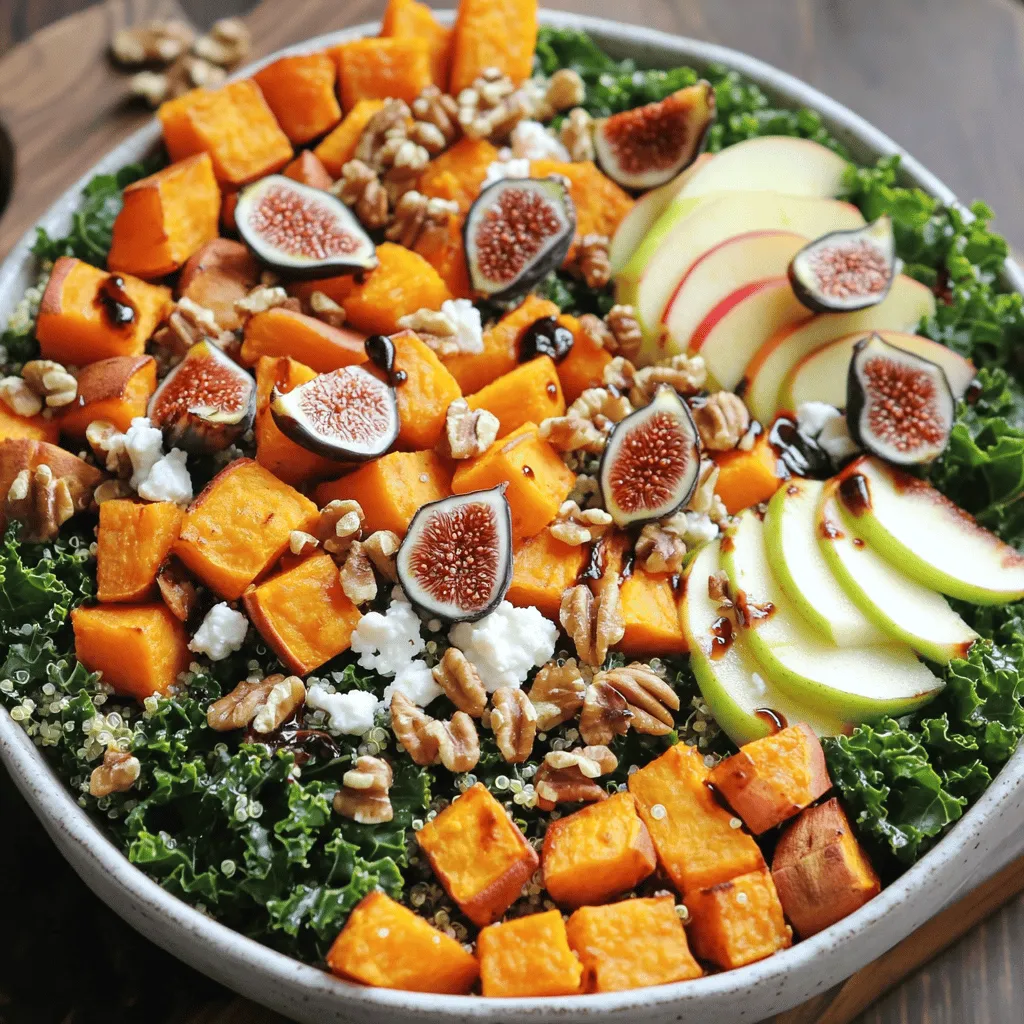
Harvest Bowls with Fig Balsamic Vinaigrette Delight
Get ready to savor the flavors of fall with my Harvest Bowls with Fig Balsamic Vinaigrette Delight! This vibrant dish mixes tender quinoa, roasted sweet
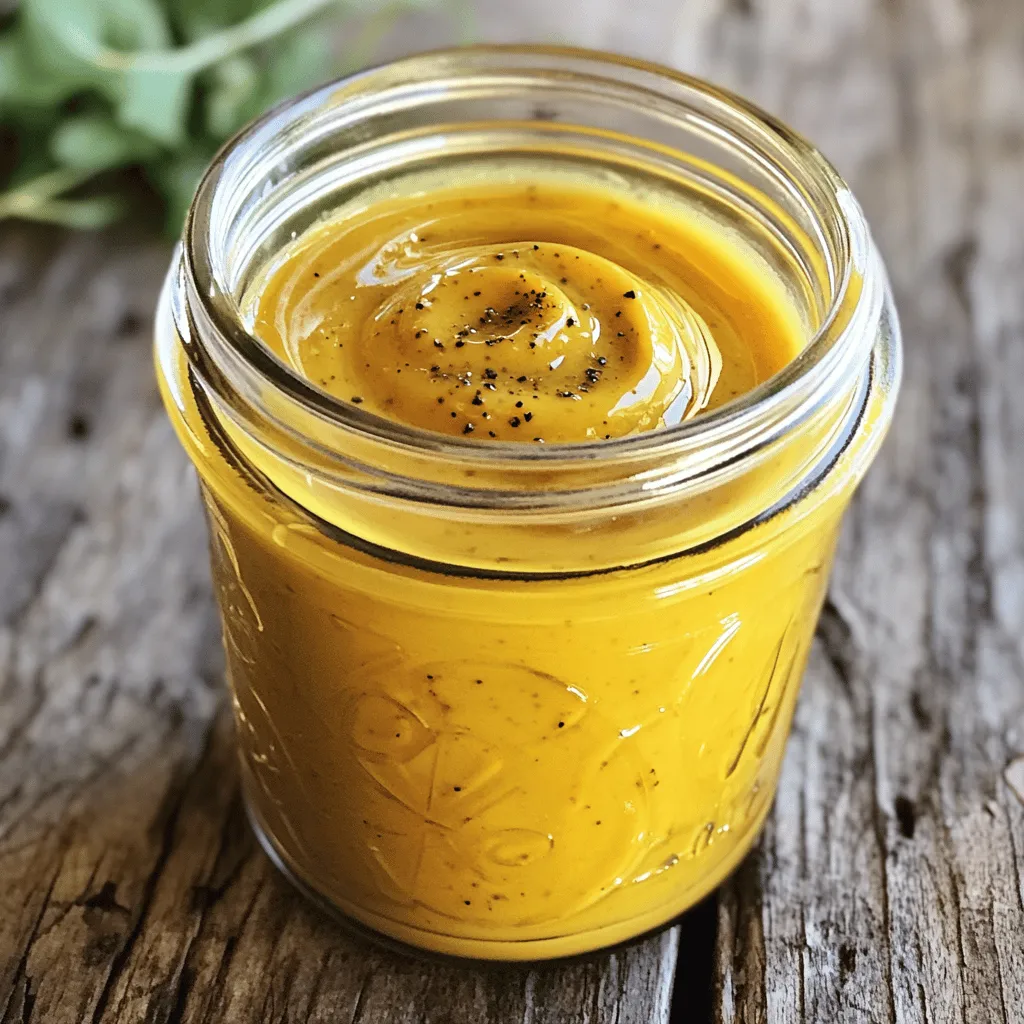
Easy Honey Dijon Vinaigrette Dressing Simple Recipe
Are you ready to elevate your salads with a simple yet delicious dressing? This Easy Honey Dijon Vinaigrette recipe combines the sweetness of honey with
![- 1/2 cup balsamic vinegar - 1/4 cup extra virgin olive oil - 1 tablespoon Dijon mustard These three ingredients form the base of your vinaigrette. Balsamic vinegar brings a rich, tangy flavor. Extra virgin olive oil adds smoothness. Dijon mustard gives it a nice kick and helps blend the oils. - 1 tablespoon honey or maple syrup - 1 clove garlic, minced - 1 teaspoon dried oregano - Salt and black pepper to taste Feel free to adjust the flavor! Honey or maple syrup adds sweetness. Garlic gives a bold taste. Dried oregano adds a hint of earthiness. You can also add fresh herbs like basil or thyme if you wish. - About 80 calories per serving - Fats: 9g, Carbs: 2g, Protein: 0g This vinaigrette is low in calories but full of flavor. Olive oil is a source of healthy fats. Balsamic vinegar contains antioxidants, which are good for your body. Each ingredient offers health benefits while keeping your meals tasty. For the full recipe, check [Full Recipe]. First, I start by whisking the balsamic base. In a medium bowl, I combine 1/2 cup balsamic vinegar, 1 tablespoon Dijon mustard, and 1 tablespoon honey or maple syrup. I mix this well until it is smooth. This step is key. The vinegar and mustard give a nice tang, while the honey adds a touch of sweetness. Next, I emulsify with olive oil. I slowly pour in 1/4 cup extra virgin olive oil while whisking constantly. This helps to blend everything together. The oil makes the vinaigrette rich and smooth. Keep whisking until it looks glossy and thick. Now, I mix in garlic and herbs. I add 1 clove minced garlic and 1 teaspoon dried oregano. These ingredients bring a burst of flavor. I then season with salt and black pepper to taste. This is where you can adjust the taste for your liking. To balance sweetness and acidity, I suggest tasting the vinaigrette. If it is too tangy, add a bit more honey or maple syrup. If it's too sweet, a splash of vinegar can help. This is all about finding your perfect mix. You can personalize the taste with spices. Want a bit of heat? Try adding black pepper or a dash of chili flakes. For a fresh twist, you can add a bit of lemon juice or fresh herbs, like thyme or basil. For storage, I recommend using a jar with a tight-fitting lid. Transfer the vinaigrette to the jar and shake it well before each use. This keeps it fresh and well-mixed. When it comes to serving, drizzle this vinaigrette over fresh salads or roasted vegetables. It works great as a marinade for grilled chicken, too. If you want to impress, serve it in a small glass jar with a ribbon. This makes it a charming gift for friends or family. For the best taste, always store your healthy balsamic vinaigrette in the refrigerator. This keeps it fresh and tasty. I like to use a jar with a tight lid. It helps keep the flavors sealed in. How long does homemade vinaigrette last? Homemade vinaigrette can last about one week in the fridge. After that, it may lose flavor and freshness. Always check for any changes in smell or color before using. If you're looking to cut calories, consider using less olive oil. You can use water instead to reduce fat. Another option is to swap honey for a low-calorie sweetener, like stevia. Gluten-free options for a healthier dressing: Most ingredients in this vinaigrette are gluten-free. Just ensure your Dijon mustard is gluten-free as well. This makes the dressing suitable for anyone avoiding gluten. This vinaigrette pairs perfectly with fresh salads. Drizzle it over greens for a burst of flavor. You can also use it on roasted vegetables for a tasty side dish. Creative uses beyond salads: Try using this vinaigrette as a marinade for grilled chicken or fish. It adds great flavor. You can also use it as a dip for fresh veggies or bread. Let your creativity flow with this versatile dressing! {{image_2}} You can easily make a vegan balsamic vinaigrette. Simply swap honey with maple syrup. This keeps the sweetness while staying plant-based. You can also use agave syrup as a vegan option. For flavor, try adding a bit of mustard or a splash of soy sauce. These enhance the taste without using animal products. This way, you get a tasty dressing that fits your diet. Herbs can really boost the flavor of your vinaigrette. Fresh herbs like basil, parsley, or dill add a nice touch. Simply chop them finely and mix them in. You can also try regional herbs. For example, tarragon gives a French flair, while cilantro adds a twist of Latin flavor. Experimenting with different herbs can surprise your taste buds. If you want a creamy version, mix in yogurt or mashed avocado. This creates a rich texture that works well with salads. You can also add a kick with chili flakes or a dash of sriracha. This spicy twist is great for those who enjoy heat. Each of these variations offers a fun way to enjoy your healthy balsamic vinaigrette. For the full recipe, check the earlier section above. For storing your healthy balsamic vinaigrette, choose jars that seal tightly. Glass jars work best. They keep flavors fresh and do not hold smells. Dark glass jars offer added protection from light. This helps preserve the quality of the vinaigrette. Plastic containers can work too, but they can absorb odors over time. After storing, your vinaigrette may separate. This is normal. To refresh it, simply shake the jar. If it still looks separated, use a whisk to blend it again. Always check for freshness before using. If it smells off or has changed color, it’s best to toss it out. Making a double batch of vinaigrette saves time. You can keep it for up to two weeks in the fridge. Use leftover vinaigrette in many ways. Drizzle it over roasted veggies, or use it as a marinade for chicken. It can also be a tasty dip for bread. This recipe is simple, tasty, and perfect for various dishes. For the full recipe, check out the details above. Making healthy balsamic vinaigrette is easy and quick. Here’s how: 1. Gather your ingredients: You need balsamic vinegar, olive oil, Dijon mustard, honey or maple syrup, minced garlic, dried oregano, salt, and pepper. 2. Mix the base: In a medium bowl, whisk together 1/2 cup of balsamic vinegar, 1 tablespoon of Dijon mustard, and 1 tablespoon of honey or maple syrup. 3. Add the oil: Gradually pour in 1/4 cup of extra virgin olive oil while whisking. This helps blend the ingredients. 4. Incorporate flavors: Stir in 1 clove of minced garlic and 1 teaspoon of dried oregano. 5. Season: Add salt and black pepper to taste. Adjust sweetness or acidity as needed. 6. Store: Pour the vinaigrette into a jar with a tight lid. Shake well before each use. This simple method gives you a fresh and tasty dressing in just 10 minutes. For the full recipe, check out the section above. Homemade vinaigrette has many perks: - Healthier ingredient control: You pick what goes in, so you avoid unwanted additives and preservatives. This means you can enjoy a clean and tasty dressing. - Cost-effective compared to store-bought options: Making your own vinaigrette is often cheaper than buying it. Plus, you can make larger batches and save. Yes, you can freeze it! Here’s how: - Freezing: Pour the vinaigrette into ice cube trays or freezer-safe containers. Leave some space for expansion. - Thawing: When ready to use, move the vinaigrette to the fridge overnight. - Effects on flavor and texture: Freezing may change the texture a bit, but the flavor will still be good. Just shake or stir well before using. Making your own balsamic vinaigrette is simple and rewarding. You learned about key ingredients, customizations, and nutrition. I shared step-by-step instructions for easy preparation. We discussed tips for storage and creative uses. Lastly, I explored various flavors and options that suit your needs. Homemade vinaigrette is a healthy choice. It enhances your dishes while giving you control over ingredients. Enjoy experimenting and crafting your perfect mix!](https://grilledflavors.com/wp-content/uploads/2025/07/be93c1b3-89ef-44cc-8ef9-56bd36a2a054.webp)
Healthy Balsamic Vinaigrette Simple and Tasty Recipe
Want to elevate your salads with something healthy and delicious? This simple balsamic vinaigrette recipe is your answer! With just a few ingredients, you can
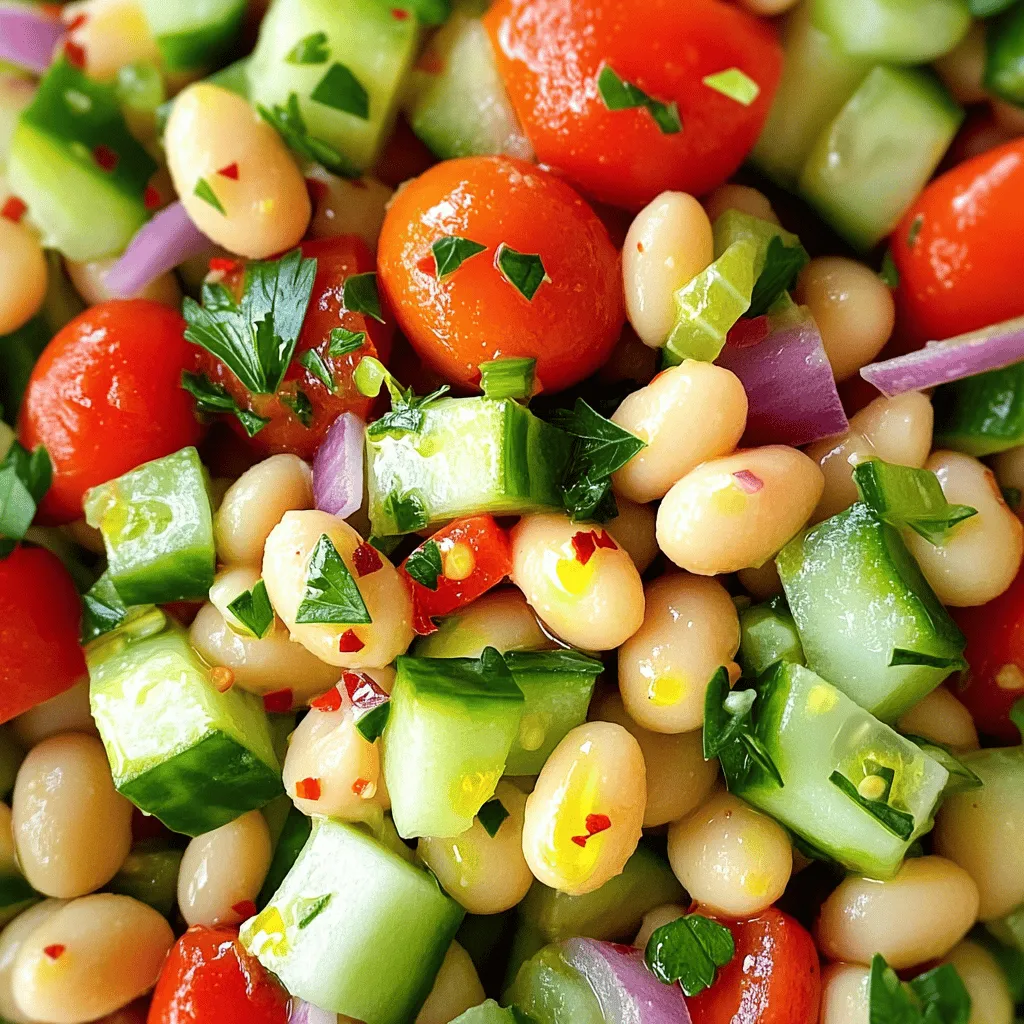
Cannellini Bean Salad Packed with Flavor and Nutrition
Are you ready to enjoy a salad that’s both tasty and good for you? My Cannellini Bean Salad is packed with flavor and nutrition. You’ll
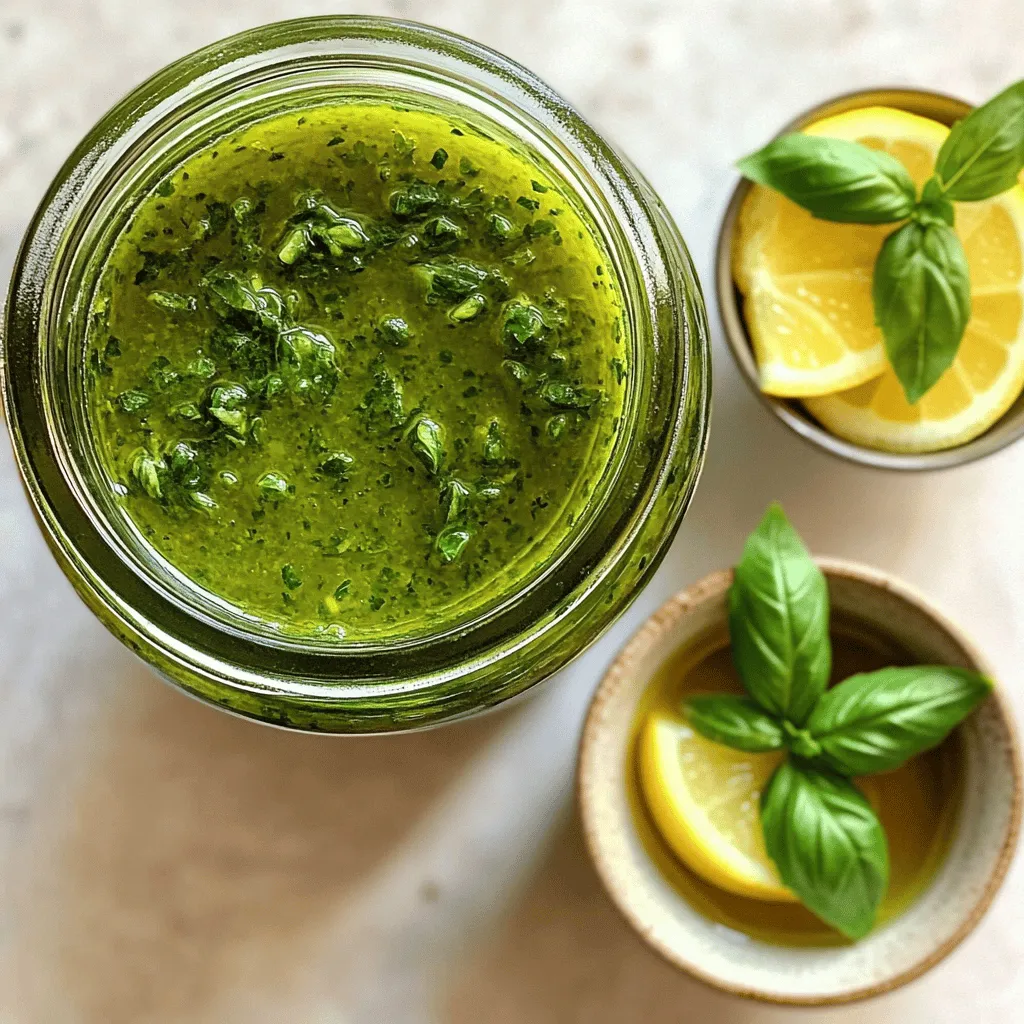
Fresh Basil Vinaigrette Flavorful and Easy Recipe
Looking to brighten up your salads and dishes? My easy Fresh Basil Vinaigrette recipe is your answer! With just a handful of fresh ingredients, you
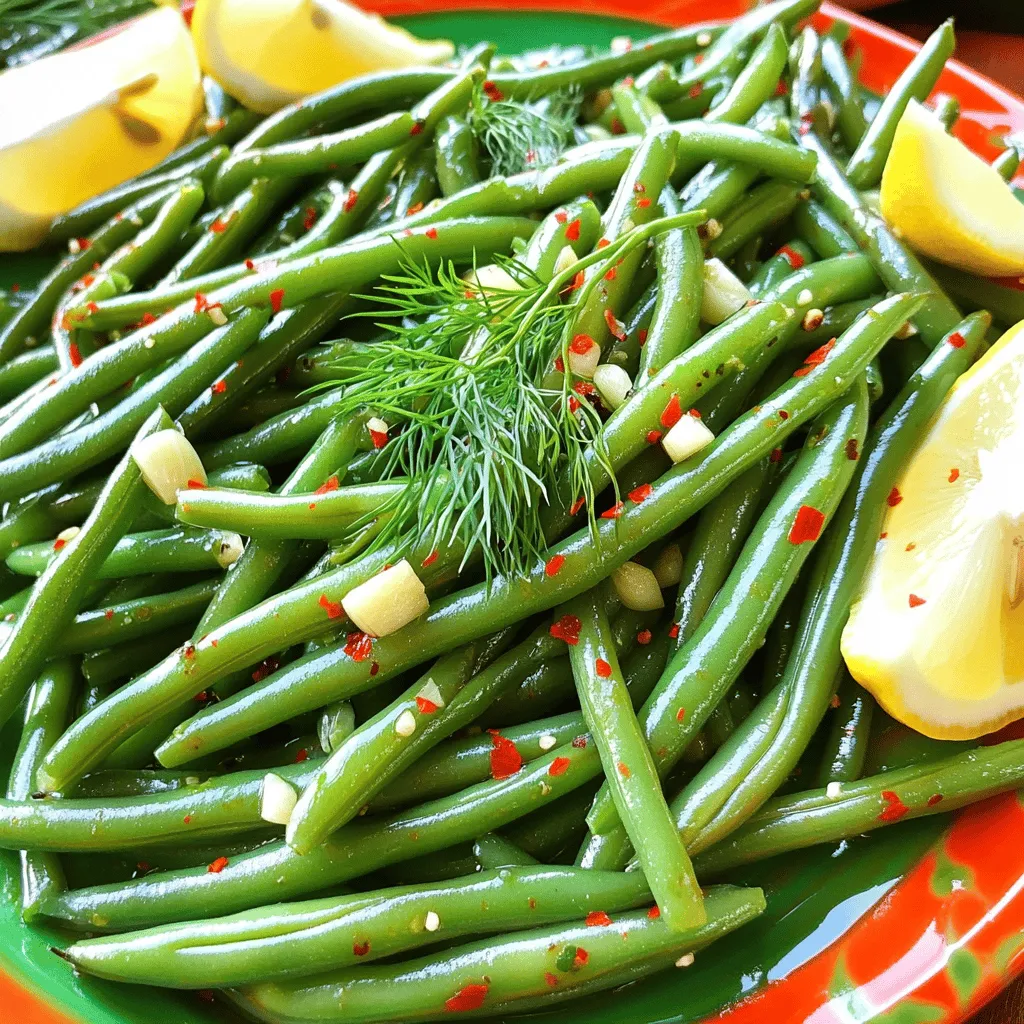
Spicy Dilly Garlic Beans Flavorful and Easy Recipe
If you’re looking for a tasty and easy way to brighten your meals, try my Spicy Dilly Garlic Beans! This recipe combines fresh green beans
![To make tasty roasted maple Brussels sprouts, you need: - 1 lb Brussels sprouts, trimmed and halved - 3 tablespoons olive oil - 1/4 cup pure maple syrup - 1 teaspoon Dijon mustard - 1/2 teaspoon garlic powder - 1/2 teaspoon salt - 1/4 teaspoon black pepper These ingredients work together to create a sweet and savory dish. The Brussels sprouts caramelize beautifully, adding a lovely flavor. The maple syrup gives them a nice sweetness that balances the bitterness of the sprouts. You can add a few optional ingredients to make your dish even better: - 1/4 cup chopped pecans - 2 tablespoons balsamic vinegar (for drizzling) Chopped pecans add a nice crunch. Balsamic vinegar gives a tangy taste that can brighten the whole dish. Both options enhance the flavor and texture. To prepare this dish, you will need: - A large bowl - A whisk for mixing - A baking sheet - Parchment paper (for easy cleanup) - A spatula for stirring Having the right tools makes cooking easier. It helps you mix well and roast evenly. With these tools, you'll create a beautiful dish everyone will love. For the full recipe, check out the detailed instructions provided. Start by washing the Brussels sprouts well. Trim the ends and cut them in half. This helps them cook evenly. You want them to be bite-sized. Make sure to remove any yellow leaves. These can burn in the oven. Once they are clean and cut, set them aside. In a large bowl, combine these ingredients: - 3 tablespoons olive oil - 1/4 cup pure maple syrup - 1 teaspoon Dijon mustard - 1/2 teaspoon garlic powder - 1/2 teaspoon salt - 1/4 teaspoon black pepper Whisk everything together until it is smooth. The maple syrup adds a sweet touch, while the mustard gives a nice kick. This glaze makes the sprouts shine when they roast. Preheat your oven to 425°F (220°C). Line a baking sheet with parchment paper. This helps with cleanup and prevents sticking. Add the halved Brussels sprouts to the bowl with the glaze. Toss them well to coat each sprout evenly. Spread them out on the baking sheet. Make sure they are not too crowded. This helps them roast instead of steam. Roast in the oven for about 20-25 minutes. Halfway through, stir them to ensure even cooking. You want them to turn golden brown and tender. If you like crunch, sprinkle the chopped pecans over the top for the last 5 minutes. For a final touch, drizzle with balsamic vinegar after roasting. This adds a zesty flavor and makes the dish pop. For a complete guide, check out the Full Recipe. To cook Brussels sprouts evenly, cut them in half. This helps them roast well. Spread them out on the baking sheet. Leave space between each sprout. Overcrowding can lead to steaming, not roasting. Stir them halfway through cooking. This ensures all sides get that nice caramelized look. You can add more flavor to your Brussels sprouts. Try adding a splash of lemon juice. A bit of zest brightens the dish. If you love spice, add a pinch of red pepper flakes. This gives a nice kick. You can also mix in fresh herbs like thyme or rosemary. They add a lovely aroma to the dish. Serve your roasted Brussels sprouts in a rustic wooden bowl. It makes the dish look inviting. Top with fresh parsley for color. You can also sprinkle extra pecans on top for crunch. Drizzle with balsamic vinegar for a tangy finish. For a complete meal, pair them with roasted chicken or a hearty grain like quinoa. Explore the [Full Recipe] for more details! {{image_2}} You can switch up the nuts in this recipe. Try almonds, walnuts, or hazelnuts for a tasty twist. Each nut adds a unique crunch and flavor. If you want something lighter, use seeds like pumpkin or sunflower seeds. They give great texture and a nutty taste. To add them, simply sprinkle them on the sprouts during the last few minutes of roasting. If you want to change the sweetness, use honey or agave syrup instead of maple syrup. Both options keep the dish sweet but add their own flavors. You can also try brown sugar or coconut sugar. These sweeteners create a lovely caramelization when roasted. Just keep in mind that each sweetener will change the final taste a bit. This dish is already vegetarian, but it can easily be made vegan. Just ensure the maple syrup is pure and not mixed with other ingredients. You can also skip the pecans if you have a nut allergy. For a hint of extra flavor, add a splash of lemon juice before serving. This brightens up the dish and complements the sweet glaze. For the full recipe, check out the details above. Enjoy customizing your Roasted Maple Brussels Sprouts! After enjoying your roasted maple Brussels sprouts, store leftovers in an airtight container. Make sure to let them cool first. Keeping them sealed helps keep the flavors fresh. Place the container in the fridge. The sprouts will stay good for about three days. To enjoy your Brussels sprouts again, reheating is key. Preheat your oven to 350°F. Spread the sprouts on a baking sheet. Heat for about 10-15 minutes until warmed through. This method keeps them crispy and delicious. You can also use the microwave, but they may lose some crunch. Freezing roasted Brussels sprouts is possible but may change their texture. If you want to freeze them, first let them cool completely. Then, spread them on a baking sheet. Freeze them for about two hours until firm. Once frozen, transfer them to a freezer bag. They can last for up to three months in the freezer. When you’re ready to eat them, thaw in the fridge and reheat as mentioned earlier. For the best flavor, try to use them soon after freezing. Yes, you can use frozen Brussels sprouts. However, they may not roast as well as fresh sprouts. Frozen sprouts often have more moisture. This can make them soggy when roasted. If you choose frozen, thaw them first and pat them dry. This helps to keep them crispy. To make the dish less sweet, reduce the maple syrup. You can cut the syrup to 2 tablespoons instead of 1/4 cup. You can also add more garlic powder or Dijon mustard. This adds depth without adding more sweetness. Consider using balsamic vinegar for a tangy kick, too. Roasted Maple Brussels Sprouts pair well with many meals. They go great with roasted chicken or pork. You can also serve them with quinoa or rice for a vegetarian option. Try adding them to a holiday feast alongside mashed potatoes and gravy. The sweet and savory combo adds a nice touch to any plate. For the full recipe, check out the details provided above. Roasted Maple Brussels Sprouts are tasty and easy to make. We covered the key ingredients, step-by-step prep, and roasting tips. You learned about flavor enhancements and serving ideas too. Incorporating variations like different nuts can add fun to the dish. Remember to store leftovers properly for the best flavor. Try these tips and enjoy your savory treats!](https://grilledflavors.com/wp-content/uploads/2025/07/b31d9ad2-f915-42cd-bf5d-96b4338fb724.webp)
Roasted Maple Brussels Sprouts Flavorful Side Dish
Looking for a side dish that wows? Roasted Maple Brussels Sprouts are your answer! This tasty dish combines crispy sprouts with a sweet maple glaze,
![To make your Southwest Chipotle Pasta Salad, gather these ingredients: - 8 oz elbow macaroni - 1 can (15 oz) black beans, rinsed and drained - 1 cup corn kernels (fresh, frozen, or canned) - 1 red bell pepper, diced - 1 green onion, chopped - 1/2 cup cherry tomatoes, halved - 1/4 cup cilantro, chopped - 1/2 cup mayonnaise - 2 tablespoons sour cream - 1 tablespoon chipotle in adobo sauce (or adjust for spice preference) - 1 tablespoon lime juice - 1 teaspoon garlic powder - 1 teaspoon cumin - Salt and pepper to taste You can switch some ingredients if needed. Here are a few ideas: - Use whole wheat macaroni for a healthier pasta choice. - Swap black beans with kidney beans or chickpeas for a twist. - Try fresh corn off the cob instead of canned for better taste. - Replace mayonnaise with Greek yogurt for a lighter dressing. - Add fresh herbs like parsley if you don’t have cilantro. Choosing the best ingredients makes a big difference. Here are my tips: - Pick pasta that is made from durum wheat for a firmer bite. - Use fresh vegetables when possible. They add vibrant colors and flavors. - Buy high-quality canned beans. Look for low-sodium options. - Fresh lime juice is better than bottled for brightness. - Choose ripe cherry tomatoes for sweetness. They enhance the salad’s flavor. This dish is not just tasty; it’s a feast for the eyes too. You can find the Full Recipe above to guide you through making this vibrant salad. Start by boiling water in a large pot. Add salt to the water for flavor. Once the water boils, add 8 oz of elbow macaroni. Cook for about 8-10 minutes until it is al dente. You want it to be firm but not hard. Drain the pasta and rinse it under cold water. This cools it down and stops the cooking. Set the macaroni aside to dry. In a large bowl, combine the cooled macaroni with the other ingredients. Add 1 can of black beans, rinsed and drained. Then, toss in 1 cup of corn kernels, 1 diced red bell pepper, and 1 chopped green onion. Next, mix in 1/2 cup of halved cherry tomatoes and 1/4 cup of chopped cilantro. Gently stir everything to mix well. In a separate bowl, make the dressing. Whisk together 1/2 cup of mayonnaise and 2 tablespoons of sour cream. Add 1 tablespoon of chipotle in adobo sauce for spice. Then, mix in 1 tablespoon of lime juice, 1 teaspoon of garlic powder, and 1 teaspoon of cumin. Finally, season with salt and pepper to taste. Pour this dressing over the pasta salad mixture. Toss gently until everything is well coated. For the full recipe, check out the detailed steps above. Enjoy your delicious Southwest Chipotle Pasta Salad! Store your Southwest Chipotle Pasta Salad in an airtight container. This keeps it fresh longer. I recommend eating leftovers within three days. If you notice extra liquid, drain it before serving. You can also add fresh ingredients to revive the taste. You can make this pasta salad a day in advance. It allows the flavors to blend well. Just keep the dressing separate until you are ready to serve. This way, the pasta stays firm and does not get mushy. Mixing in the dressing just before serving keeps everything fresh. Not everyone loves spice the same way. Start with one tablespoon of chipotle in adobo sauce. Taste the salad before adding more. If you want more heat, add extra sauce or diced jalapeños. For a milder version, skip the chipotle altogether or use a mild sauce. Adjusting spice levels makes this dish perfect for everyone. For the full recipe, check out the [Full Recipe]. {{image_2}} You can boost the protein in your Southwest Chipotle Pasta Salad easily. Consider adding grilled chicken or shrimp. These add a nice texture and flavor. You might also try diced tofu or tempeh for a plant-based option. They soak up the dressing well, adding depth to your dish. For a quick fix, canned tuna or salmon works great too. Just drain and toss it in! If you want a vegetarian or vegan salad, swap out the mayo and sour cream. Use a vegan mayo instead. It gives the same creamy texture without the dairy. You can also add avocado for richness and healthy fats. It adds a lovely green color, making your salad look fresh. For extra flavor, try adding nuts or seeds. They add crunch and protein, making the salad more filling. You can play with the flavors in this salad. Try adding diced jalapeños for extra heat. A sprinkle of smoked paprika can deepen the smoky taste. If you like tang, squeeze in more lime juice or add some vinegar. Fresh herbs like parsley or dill can brighten the dish. You can even add a small amount of honey or agave for a sweet twist. These changes can make this salad your own! For the full recipe, check the link above. To keep your Southwest Chipotle Pasta Salad fresh, store it in an airtight container. This helps to keep moisture in and air out. Make sure the salad is fully cooled before sealing it. This prevents condensation, which can make the salad soggy. It will stay fresh in the fridge for about three to five days. I recommend not freezing this pasta salad. Freezing can change the texture of the pasta and vegetables. If you freeze it, the salad may become mushy when thawed. However, if you have extra dressing, you can freeze that. Just store it in a small container. It will keep well for up to three months. When you're ready to eat leftovers, check the texture. If it seems dry, add a splash of lime juice or a bit of dressing. Stir gently to mix it in. You can also toss in fresh veggies for crunch. This will brighten up the flavors and make it taste fresh again. You can swap the mayonnaise for Greek yogurt. This change cuts fat and adds protein. Use whole wheat pasta instead of regular for more fiber. Adding more veggies also boosts nutrition. Try adding spinach, kale, or zucchini. You can also reduce the amount of chipotle for less heat. This makes the dish friendlier for kids. Yes! You can use any pasta shape you like. Rotini or penne works well. They hold the dressing nicely. You can even try gluten-free pasta if needed. Just cook it according to package directions. Remember, cooking time may vary based on the shape you choose. This salad pairs well with grilled chicken or shrimp. You can also serve it with tacos or quesadillas for a fun meal. For a lighter option, serve it with a green salad. You can add avocado or guacamole on the side. This adds creaminess and flavor to your plate. This blog post covered all you need for a great Southwest Chipotle Pasta Salad. We explored the best ingredients, like quality pasta and yummy dressings. You learned about cooking pasta, mixing ingredients, and making tasty dressings. I shared tips to store leftovers and options for protein or vegetarian styles. To sum up, this salad is fun to make and offers many twists. Enjoy creating your version!](https://grilledflavors.com/wp-content/uploads/2025/07/1c1efac1-d237-46d8-afc1-1301d2443596.webp)
Southwest Chipotle Pasta Salad Fresh and Flavorful Dish
Are you ready to spice up your meals? The Southwest Chipotle Pasta Salad is a fresh and flavorful dish that brings vibrant flavors right to