No Bake Peanut Butter Oat Cups Easy and Tasty Snack

WANT TO SAVE THIS RECIPE?

Looking for a quick, tasty snack? Try my No Bake Peanut Butter Oat Cups! These delicious bites are easy to make and perfect for satisfying your hunger. With just a few simple ingredients, you can whip up a treat that’s both healthy and satisfying. Join me as I share recipes and tips to customize your oat cups. You’ll love how fun and simple they are to prepare!

Ingredients

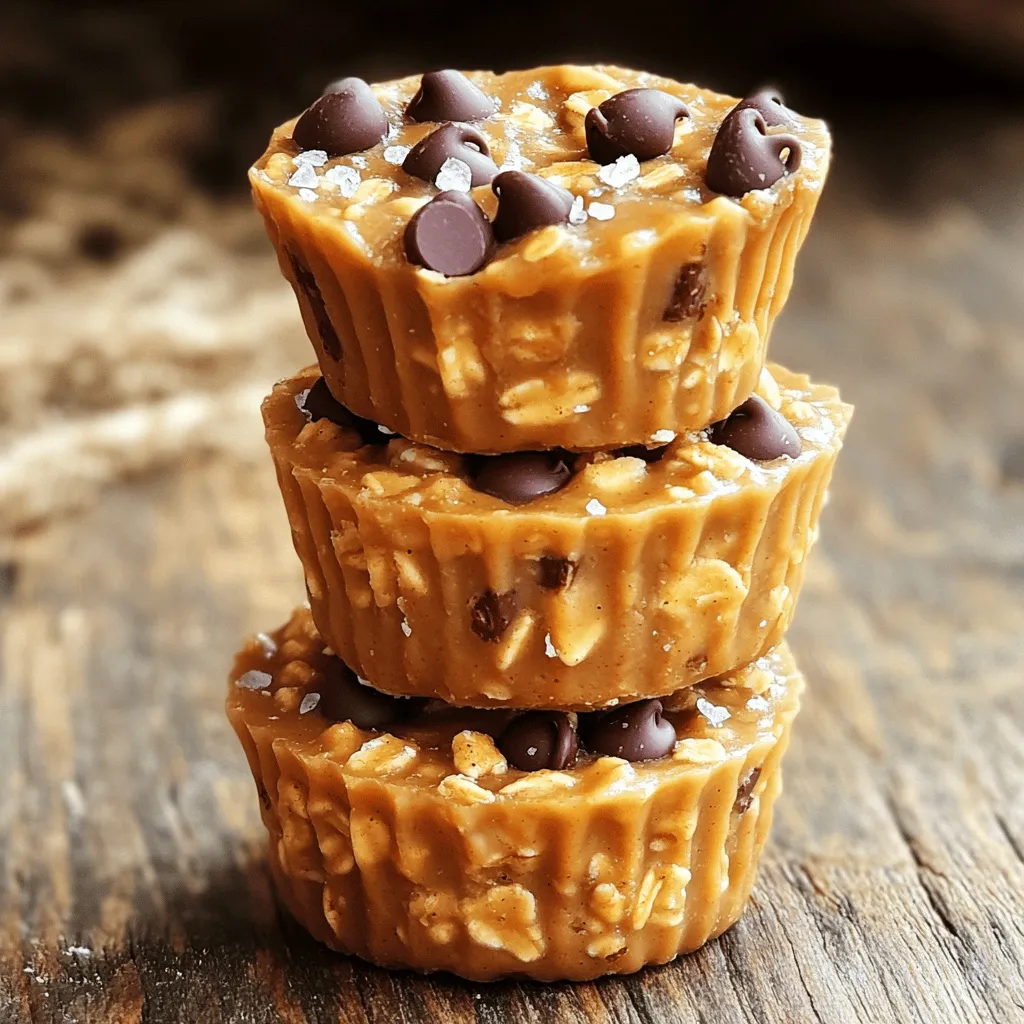
Key Ingredients for No Bake Peanut Butter Oat Cups

The main ingredients in this recipe make it both tasty and healthy. Here’s what you need:

– 1 cup rolled oats

– 1/2 cup natural peanut butter

– 1/4 cup honey or maple syrup

– 1/4 cup mini chocolate chips

– 1/4 cup chopped nuts (like almonds or walnuts)

– 1 teaspoon vanilla extract

– A pinch of salt

Rolled oats form the base. They add fiber and good texture. The natural peanut butter gives protein and a rich taste. Honey or maple syrup adds sweetness. Mini chocolate chips and chopped nuts provide fun flavor and crunch. Vanilla extract rounds it all out with warmth. A pinch of salt balances the sweetness.

Optional Ingredients for Customization

You can tweak the recipe to fit your taste. Here are some fun ideas:

– Dried fruit (like raisins or cranberries)

– Seeds (such as chia or flaxseeds)

– Different nut butters (like almond or cashew)

– Coconut flakes for a tropical twist

– A sprinkle of cinnamon for warmth

Feel free to mix and match! This way, you can make your oat cups special.

Nutritional Focus of Each Ingredient

Let’s look at what each main ingredient offers.

Rolled oats: Great for digestion. They keep you full longer.

Natural peanut butter: Packed with protein. It helps build muscles.

Honey or maple syrup: Natural sugars that give you quick energy.

Mini chocolate chips: A little treat that can boost your mood.

Chopped nuts: Provide healthy fats and add crunch.

Vanilla extract: Adds flavor without extra calories.

Salt: Enhances all the flavors in the mix.

These ingredients not only taste good but also give you energy and nutrients. Try this recipe for a quick snack or a sweet treat. For the full recipe, check out the details above.

Step-by-Step Instructions

Preparation Process Overview

Making no bake peanut butter oat cups is quick and fun. You can whip them up in about 10 minutes. First, gather your ingredients. You’ll need rolled oats, peanut butter, honey or maple syrup, chocolate chips, nuts, vanilla, and salt. Make sure you have a mixing bowl and a muffin tin ready.

Detailed Instructions for Mixing Ingredients

1. Start by adding 1 cup of rolled oats and a pinch of salt to a large mixing bowl.

2. In another bowl, warm 1/2 cup of peanut butter and 1/4 cup of honey in the microwave. Heat for about 30 seconds. Stir it until smooth.

3. Next, add 1 teaspoon of vanilla extract to the peanut butter mixture. Mix well.

4. Pour the warm peanut butter mixture over the oats. Stir until the oats are fully coated.

5. Now, fold in 1/4 cup of mini chocolate chips and 1/4 cup of chopped nuts. This adds great texture and taste.

Tips for Perfectly Shaping the Oat Cups

To shape the oat cups, line your muffin tin with paper or silicone liners. Use a spoon to scoop the mixture into each cup. Press down firmly to make sure they hold together. This step is key for a good shape. After filling the tin, chill it in the fridge for at least 30 minutes. This helps the oat cups firm up nicely. Once they are set, take them out and enjoy! You can also store them in an airtight container in the fridge for up to a week. For the full recipe, check the section above.

Tips & Tricks

How to Make the Best No Bake Peanut Butter Oat Cups

To make the best no bake peanut butter oat cups, start with quality ingredients. Use natural peanut butter, as it has no added sugar or oils. This makes your cups healthier and tastier. Choose rolled oats, as they provide great texture.

Warm the peanut butter and honey together, but don’t overheat them. About 30 seconds in the microwave is perfect. This helps the two mix well. When mixing, ensure every oat is coated. This step is key for flavor.

Press the mixture firmly into the muffin tin. This helps the cups hold their shape. After chilling, they should be firm but still soft enough to enjoy.

Common Mistakes to Avoid

One common mistake is not measuring the ingredients correctly. Too much peanut butter can make the cups too sticky. Too little honey can make them dry.

Another mistake is not chilling the oat cups long enough. If you don’t chill them for at least 30 minutes, they may fall apart. Avoid using non-stick spray on the muffin tin, as it can make removal tricky. Use paper or silicone liners instead.

Suggestions for Serving and Pairing

Serve these oat cups as a snack, breakfast, or dessert. They pair well with fresh fruit. Try serving them with sliced bananas or berries for added flavor. You can also enjoy them with yogurt for a protein boost.

For a fun twist, drizzle melted chocolate on top before serving. Or, sprinkle some sea salt for a sweet and salty mix. Check out the full recipe for more ideas on how to enjoy your no bake peanut butter oat cups!

Variations

Alternative Sweeteners for Different Flavors

You can switch up the sweetener in this recipe. Honey is great, but maple syrup works too. Each sweetener gives a unique taste. Agave nectar is another option. It adds a mild sweetness. You can even use coconut sugar for a hint of caramel flavor. These changes keep your oat cups fresh and exciting!

Nut-Free Options for Allergen Considerations

If you need a nut-free snack, try sun butter or soy nut butter. These spread alternatives taste amazing and are safe for nut allergies. You can still enjoy the creamy texture without any nuts. Just make sure to check for allergens in other ingredients too. You can still make delicious oat cups that everyone can enjoy!

Flavor Enhancements: Spices and Add-Ins

Want to make your oat cups even better? Add spices like cinnamon or nutmeg for warmth. These spices can enhance the flavor without adding extra calories. You might also try adding a scoop of protein powder for a boost. Dried fruits like cranberries or raisins add a sweet chewiness too. You can mix and match to find your favorite flavors!

Storage Info

Best Practices for Storing Peanut Butter Oat Cups

To keep your no bake peanut butter oat cups fresh, store them in an airtight container. This helps maintain their taste and texture. Place them in the fridge for the best results. If you use paper or silicone liners, make sure to keep them in the liners for easy access.

Shelf Life and Freshness Tips

These oat cups last about a week in the fridge. After a few days, check for any changes in smell or texture. If they seem off, it’s best to toss them out. To keep them tasting great, avoid leaving them at room temperature for too long.

Freezing Instructions for Long-Term Storage

If you want to save these tasty treats for later, freezing is a great option. Wrap each oat cup in plastic wrap. Then, place them in a freezer bag or container. They can last for up to three months in the freezer. To enjoy, simply take one out and let it thaw in the fridge overnight. For a quick snack, you can eat them straight from the freezer!

FAQs

Are No Bake Peanut Butter Oat Cups healthy?

Yes, No Bake Peanut Butter Oat Cups are quite healthy. They have oats, which offer fiber and energy. The peanut butter adds protein and healthy fats. Using honey or maple syrup gives natural sweetness. You can also add nuts and chocolate chips for extra nutrition. Overall, they make a great snack or quick breakfast.

Can I use crunchy peanut butter instead of creamy?

Absolutely! You can use crunchy peanut butter if you like some texture. It will add a nice crunch to the oat cups. The flavor remains the same, so feel free to switch it up. Just make sure the peanut butter is natural and smooth enough to mix well.

How do I make these oat cups vegan-friendly?

To make these oat cups vegan, swap honey for maple syrup. Ensure you use vegan chocolate chips too. The rest of the ingredients remain the same. This way, you keep the taste and texture while making them suitable for a vegan diet.

What’s the best way to cut these oat cups?

These oat cups are best not cut. Instead, use a muffin tin for easy serving. After they firm up in the fridge, just pop them out. If you do want to cut them, use a sharp knife and cut them into squares. This works better if you let them set longer for a firmer texture. For more details, check out the Full Recipe.

In this post, we explored the key ingredients for no-bake peanut butter oat cups. We covered how to mix them well and shape them perfectly. I shared tips to avoid common mistakes and suggestions for serving. You can try different sweeteners and nut-free options to suit your taste. Proper storage is important for keeping them fresh.

These oat cups are fun to make and easy to customize. Enjoy creating your own tasty treats!

The main ingredients in this recipe make it both tasty and healthy. Here’s what you need: - 1 cup rolled oats - 1/2 cup natural peanut butter - 1/4 cup honey or maple syrup - 1/4 cup mini chocolate chips - 1/4 cup chopped nuts (like almonds or walnuts) - 1 teaspoon vanilla extract - A pinch of salt Rolled oats form the base. They add fiber and good texture. The natural peanut butter gives protein and a rich taste. Honey or maple syrup adds sweetness. Mini chocolate chips and chopped nuts provide fun flavor and crunch. Vanilla extract rounds it all out with warmth. A pinch of salt balances the sweetness. You can tweak the recipe to fit your taste. Here are some fun ideas: - Dried fruit (like raisins or cranberries) - Seeds (such as chia or flaxseeds) - Different nut butters (like almond or cashew) - Coconut flakes for a tropical twist - A sprinkle of cinnamon for warmth Feel free to mix and match! This way, you can make your oat cups special. Let’s look at what each main ingredient offers. - Rolled oats: Great for digestion. They keep you full longer. - Natural peanut butter: Packed with protein. It helps build muscles. - Honey or maple syrup: Natural sugars that give you quick energy. - Mini chocolate chips: A little treat that can boost your mood. - Chopped nuts: Provide healthy fats and add crunch. - Vanilla extract: Adds flavor without extra calories. - Salt: Enhances all the flavors in the mix. These ingredients not only taste good but also give you energy and nutrients. Try this recipe for a quick snack or a sweet treat. For the full recipe, check out the details above. Making no bake peanut butter oat cups is quick and fun. You can whip them up in about 10 minutes. First, gather your ingredients. You’ll need rolled oats, peanut butter, honey or maple syrup, chocolate chips, nuts, vanilla, and salt. Make sure you have a mixing bowl and a muffin tin ready. 1. Start by adding 1 cup of rolled oats and a pinch of salt to a large mixing bowl. 2. In another bowl, warm 1/2 cup of peanut butter and 1/4 cup of honey in the microwave. Heat for about 30 seconds. Stir it until smooth. 3. Next, add 1 teaspoon of vanilla extract to the peanut butter mixture. Mix well. 4. Pour the warm peanut butter mixture over the oats. Stir until the oats are fully coated. 5. Now, fold in 1/4 cup of mini chocolate chips and 1/4 cup of chopped nuts. This adds great texture and taste. To shape the oat cups, line your muffin tin with paper or silicone liners. Use a spoon to scoop the mixture into each cup. Press down firmly to make sure they hold together. This step is key for a good shape. After filling the tin, chill it in the fridge for at least 30 minutes. This helps the oat cups firm up nicely. Once they are set, take them out and enjoy! You can also store them in an airtight container in the fridge for up to a week. For the full recipe, check the section above. To make the best no bake peanut butter oat cups, start with quality ingredients. Use natural peanut butter, as it has no added sugar or oils. This makes your cups healthier and tastier. Choose rolled oats, as they provide great texture. Warm the peanut butter and honey together, but don’t overheat them. About 30 seconds in the microwave is perfect. This helps the two mix well. When mixing, ensure every oat is coated. This step is key for flavor. Press the mixture firmly into the muffin tin. This helps the cups hold their shape. After chilling, they should be firm but still soft enough to enjoy. One common mistake is not measuring the ingredients correctly. Too much peanut butter can make the cups too sticky. Too little honey can make them dry. Another mistake is not chilling the oat cups long enough. If you don’t chill them for at least 30 minutes, they may fall apart. Avoid using non-stick spray on the muffin tin, as it can make removal tricky. Use paper or silicone liners instead. Serve these oat cups as a snack, breakfast, or dessert. They pair well with fresh fruit. Try serving them with sliced bananas or berries for added flavor. You can also enjoy them with yogurt for a protein boost. For a fun twist, drizzle melted chocolate on top before serving. Or, sprinkle some sea salt for a sweet and salty mix. Check out the full recipe for more ideas on how to enjoy your no bake peanut butter oat cups! {{image_2}} You can switch up the sweetener in this recipe. Honey is great, but maple syrup works too. Each sweetener gives a unique taste. Agave nectar is another option. It adds a mild sweetness. You can even use coconut sugar for a hint of caramel flavor. These changes keep your oat cups fresh and exciting! If you need a nut-free snack, try sun butter or soy nut butter. These spread alternatives taste amazing and are safe for nut allergies. You can still enjoy the creamy texture without any nuts. Just make sure to check for allergens in other ingredients too. You can still make delicious oat cups that everyone can enjoy! Want to make your oat cups even better? Add spices like cinnamon or nutmeg for warmth. These spices can enhance the flavor without adding extra calories. You might also try adding a scoop of protein powder for a boost. Dried fruits like cranberries or raisins add a sweet chewiness too. You can mix and match to find your favorite flavors! To keep your no bake peanut butter oat cups fresh, store them in an airtight container. This helps maintain their taste and texture. Place them in the fridge for the best results. If you use paper or silicone liners, make sure to keep them in the liners for easy access. These oat cups last about a week in the fridge. After a few days, check for any changes in smell or texture. If they seem off, it's best to toss them out. To keep them tasting great, avoid leaving them at room temperature for too long. If you want to save these tasty treats for later, freezing is a great option. Wrap each oat cup in plastic wrap. Then, place them in a freezer bag or container. They can last for up to three months in the freezer. To enjoy, simply take one out and let it thaw in the fridge overnight. For a quick snack, you can eat them straight from the freezer! Yes, No Bake Peanut Butter Oat Cups are quite healthy. They have oats, which offer fiber and energy. The peanut butter adds protein and healthy fats. Using honey or maple syrup gives natural sweetness. You can also add nuts and chocolate chips for extra nutrition. Overall, they make a great snack or quick breakfast. Absolutely! You can use crunchy peanut butter if you like some texture. It will add a nice crunch to the oat cups. The flavor remains the same, so feel free to switch it up. Just make sure the peanut butter is natural and smooth enough to mix well. To make these oat cups vegan, swap honey for maple syrup. Ensure you use vegan chocolate chips too. The rest of the ingredients remain the same. This way, you keep the taste and texture while making them suitable for a vegan diet. These oat cups are best not cut. Instead, use a muffin tin for easy serving. After they firm up in the fridge, just pop them out. If you do want to cut them, use a sharp knife and cut them into squares. This works better if you let them set longer for a firmer texture. For more details, check out the Full Recipe. In this post, we explored the key ingredients for no-bake peanut butter oat cups. We covered how to mix them well and shape them perfectly. I shared tips to avoid common mistakes and suggestions for serving. You can try different sweeteners and nut-free options to suit your taste. Proper storage is important for keeping them fresh. These oat cups are fun to make and easy to customize. Enjoy creating your own tasty treats!

No Bake Peanut Butter Oat Cups

Indulge in a deliciously simple treat with these No Bake Peanut Butter Oat Cups! Made with rolled oats, creamy peanut butter, and a touch of honey, these easy cups are perfect for a quick snack or healthy dessert. With chocolate chips and nuts, they are packed with flavor and energy. Ready in just 10 minutes, they’ll satisfy your cravings without the oven. Click through to explore the full recipe and enjoy a sweet moment today!

Ingredients
  

1 cup rolled oats

1/2 cup natural peanut butter

1/4 cup honey or maple syrup

1/4 cup mini chocolate chips

1/4 cup chopped nuts (like almonds or walnuts)

1 teaspoon vanilla extract

A pinch of salt

Instructions
 

In a large mixing bowl, combine the rolled oats and a pinch of salt.

    In a separate microwave-safe bowl, warm the peanut butter and honey (or maple syrup) together for about 30 seconds to 1 minute, until smooth and easily mixable.

      Add the vanilla extract to the peanut butter mixture and stir until well combined.

        Pour the peanut butter mixture over the rolled oats and stir thoroughly until all the oats are coated.

          Fold in the mini chocolate chips and chopped nuts into the mixture.

            Line a muffin tin with paper or silicone liners for easy removal.

              Evenly distribute the oat mixture into the muffin tin, pressing down firmly to ensure they hold together.

                Place the muffin tin in the refrigerator for at least 30 minutes to allow the oat cups to firm up.

                  Once set, remove the oat cups from the muffin tin and enjoy immediately or store in an airtight container in the fridge for up to a week.

                    Prep Time: 10 minutes | Total Time: 40 minutes | Servings: 12 cups

                      WANT TO SAVE THIS RECIPE?