![- 1 cup graham cracker crumbs - 8 oz cream cheese, softened - 1 cup pumpkin puree For your no-bake pumpkin mini cheesecakes, the main ingredients are simple yet flavorful. Graham cracker crumbs make a perfect, crunchy base. Cream cheese gives the cheesecake its rich, creamy texture. The pumpkin puree brings in that classic fall flavor. - Whipped cream - Ground cinnamon Toppings can elevate your mini cheesecakes. Whipped cream adds a light touch to each bite. Ground cinnamon gives a warm aroma and enhances the pumpkin flavor. You can sprinkle it just before serving for a festive look. - Alternative sweeteners - Gluten-free crust options If you want to change things up, consider using alternative sweeteners like honey or maple syrup. They can add unique flavors and reduce refined sugar. For a gluten-free option, you can use gluten-free graham cracker crumbs or crushed nuts for the crust. This way, everyone can enjoy these tasty treats! For the complete recipe, refer to the [Full Recipe]. First, we will mix the crust ingredients. In a bowl, combine graham cracker crumbs, melted butter, and brown sugar. Mix until the crumbs are evenly coated. This gives the crust a sweet flavor. Next, we form the bases. Spoon about one tablespoon of the mixture into each mini cheesecake cup. Press down firmly to create a flat base. This step is key for a good texture. After that, place the cups in the fridge to set while we prepare the filling. Now, let’s make the cheesecake filling. In a large bowl, beat the softened cream cheese with an electric mixer. Mix until it is smooth. Then, add pumpkin puree, powdered sugar, vanilla extract, and pumpkin spice. Combine these ingredients until they form a creamy mixture. The next step is whipping the cream. In a separate bowl, whip the heavy cream until stiff peaks form. This will add lightness to the filling. Carefully fold the whipped cream into the pumpkin mixture until they blend well. Now it’s time to fill the cups. Take the mini crusts out of the fridge. Spoon or pipe the pumpkin cheesecake filling over each crust. Fill them generously for a delightful treat. Finally, we need to chill the mini cheesecakes. Return the filled cups to the fridge. Let them set for at least four hours, but overnight is best. This allows the flavors to meld. For the full recipe, check out the link above. Using room temperature ingredients is key. When your cream cheese is soft, it blends smoothly. This helps avoid lumps in your filling. Always take your cream cheese out early. Let it sit at room temperature for about 30 minutes. Folding in whipped cream is another important step. Once you whip the cream, it should be fluffy and light. Gently mix it into the pumpkin mixture. This keeps the filling airy. If you stir too hard, you risk losing that light texture. For a stunning presentation, arrange the mini cheesecakes on a pretty platter. You can add a sprinkle of crushed graham crackers around them. This adds color and texture. Pair your mini cheesecakes with warm drinks. A spiced chai or a pumpkin latte works well. The flavors blend perfectly. You can also serve them with a scoop of vanilla ice cream for a treat. One common mistake is overmixing the filling. Mixing too long makes the texture dense. Be gentle when incorporating the ingredients. Stop mixing as soon as it’s smooth. Another mistake is not chilling long enough. These cheesecakes need at least four hours to set. For the best taste and texture, chill them overnight. This allows the flavors to meld and firm up nicely. For the full recipe, check the section above. {{image_2}} You can easily change the flavor of your mini cheesecakes. A fun twist is to add chocolate or caramel swirls. Just melt some chocolate or caramel, and swirl it into the cheesecake filling before you chill it. This adds a rich flavor and makes it extra fancy. You can also use different spices. If you want a warmer taste, try adding nutmeg or allspice. This gives your cheesecakes a unique kick that everyone will love. If you or your guests have dietary needs, you can still enjoy these treats. To make a vegan version, replace cream cheese with a plant-based option. Use coconut cream in place of heavy cream for a creamy texture. For those who need dairy-free and nut-free options, look for nut-free cream cheese. You can also use oat or coconut-based creams. These swaps keep the taste delicious while meeting dietary needs. Changing the serving size is simple with this recipe. If you want to make a larger cake, use a springform pan. Just pour the filling over the crust and adjust the chilling time. A larger cake may need more time to set. If you want smaller bites, use mini muffin tins instead. Fill each cup lightly for bite-sized treats. This makes them perfect for parties or quick snacks. For the full recipe, check the earlier section. To keep your no-bake pumpkin mini cheesecakes fresh, store them in the fridge. Place them in an airtight container. This prevents them from drying out or absorbing other smells. You can also cover them with plastic wrap. If you want to store them longer, consider freezing. Wrap each cheesecake tightly in plastic wrap, then place them in a freezer-safe bag. This helps maintain their flavor and texture. These mini cheesecakes last about 4 to 5 days in the fridge. After this time, they may start to lose their taste. If you freeze them, they can last up to three months. Signs of spoilage include a sour smell or a change in texture. If you see any mold, throw them away immediately. You won’t need to reheat these cheesecakes. They are best enjoyed cold. If they seem too firm after freezing, let them sit out for 10 to 15 minutes before serving. This helps them regain their creamy texture. For more details, check out the Full Recipe for serving tips and more! Yes, you can use fresh pumpkin. Fresh pumpkin adds a bright taste. It also gives a nice texture. However, fresh pumpkin needs more time to prepare. You must cook and puree it first. This can take longer than using canned puree. Canned pumpkin is ready to use. It also has a consistent flavor. If you want a quick option, go for canned. If you love the fresh taste, use fresh pumpkin. These mini cheesecakes need to chill for at least 4 hours. For the best taste, chill them overnight. This allows the flavors to blend well. Chilling also helps the cheesecake set properly. If you skip this step, they may be too soft when served. Ensure you give them enough time to chill for a better experience. Yes, you can make these mini cheesecakes ahead of time. They are perfect for meal prep. Just store them in the fridge until you are ready to serve. You can make them one or two days in advance. This makes your event stress-free. Ensure to cover them well to keep them fresh. When serving, add whipped cream and cinnamon on top for a lovely touch. For the full recipe, check the details above. In this blog post, we covered how to make no-bake pumpkin mini cheesecakes. You learned about key ingredients like graham crackers, cream cheese, and pumpkin puree. We discussed optional toppings and substitutions to fit your needs. I shared step-by-step instructions, tips for texture, and serving ideas. These cheesecakes are not just tasty; they’re easy to make. With some creativity, you can customize them to suit any occasion. Enjoy your delicious treat, and remember to share it with friends!](https://grilledflavors.com/wp-content/uploads/2025/08/2d36d16d-b677-4a36-bccb-d7e5705a2f2c.webp)
If you’re looking for a quick and easy dessert that packs a punch of flavor, these No-Bake Pumpkin Mini Cheesecakes are just the treat for you! With creamy pumpkin and just a hint of spice, they make the perfect fall snack. Plus, you don’t need to turn on the oven! Join me as I guide you through a simple recipe that’s sure to impress your friends and family. Let’s dive in!
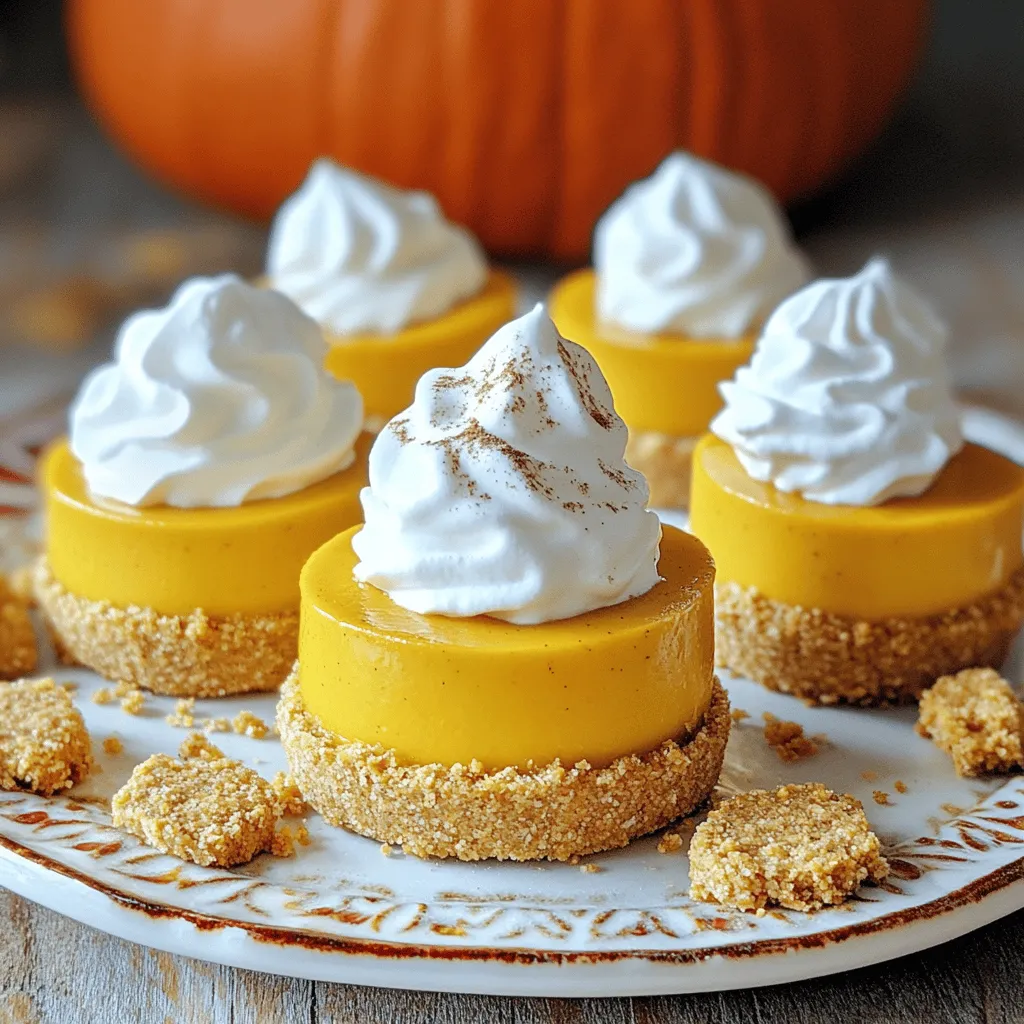
Ingredients
Main Ingredients for No-Bake Pumpkin Mini Cheesecakes
– 1 cup graham cracker crumbs
– 8 oz cream cheese, softened
– 1 cup pumpkin puree
For your no-bake pumpkin mini cheesecakes, the main ingredients are simple yet flavorful. Graham cracker crumbs make a perfect, crunchy base. Cream cheese gives the cheesecake its rich, creamy texture. The pumpkin puree brings in that classic fall flavor.
Optional Toppings and Garnishes
– Whipped cream
– Ground cinnamon
Toppings can elevate your mini cheesecakes. Whipped cream adds a light touch to each bite. Ground cinnamon gives a warm aroma and enhances the pumpkin flavor. You can sprinkle it just before serving for a festive look.
Potential Ingredient Substitutions
– Alternative sweeteners
– Gluten-free crust options
If you want to change things up, consider using alternative sweeteners like honey or maple syrup. They can add unique flavors and reduce refined sugar. For a gluten-free option, you can use gluten-free graham cracker crumbs or crushed nuts for the crust. This way, everyone can enjoy these tasty treats!
For the complete recipe, refer to the [Full Recipe].
Step-by-Step Instructions
Preparing the Crust
First, we will mix the crust ingredients. In a bowl, combine graham cracker crumbs, melted butter, and brown sugar. Mix until the crumbs are evenly coated. This gives the crust a sweet flavor.
Next, we form the bases. Spoon about one tablespoon of the mixture into each mini cheesecake cup. Press down firmly to create a flat base. This step is key for a good texture. After that, place the cups in the fridge to set while we prepare the filling.
Making the Cheesecake Filling
Now, let’s make the cheesecake filling. In a large bowl, beat the softened cream cheese with an electric mixer. Mix until it is smooth. Then, add pumpkin puree, powdered sugar, vanilla extract, and pumpkin spice. Combine these ingredients until they form a creamy mixture.
The next step is whipping the cream. In a separate bowl, whip the heavy cream until stiff peaks form. This will add lightness to the filling. Carefully fold the whipped cream into the pumpkin mixture until they blend well.
Assembling the Mini Cheesecakes
Now it’s time to fill the cups. Take the mini crusts out of the fridge. Spoon or pipe the pumpkin cheesecake filling over each crust. Fill them generously for a delightful treat.
Finally, we need to chill the mini cheesecakes. Return the filled cups to the fridge. Let them set for at least four hours, but overnight is best. This allows the flavors to meld.
For the full recipe, check out the link above.
Tips & Tricks
How to Achieve the Perfect Texture
Using room temperature ingredients is key. When your cream cheese is soft, it blends smoothly. This helps avoid lumps in your filling. Always take your cream cheese out early. Let it sit at room temperature for about 30 minutes.
Folding in whipped cream is another important step. Once you whip the cream, it should be fluffy and light. Gently mix it into the pumpkin mixture. This keeps the filling airy. If you stir too hard, you risk losing that light texture.
Serving Suggestions
For a stunning presentation, arrange the mini cheesecakes on a pretty platter. You can add a sprinkle of crushed graham crackers around them. This adds color and texture.
Pair your mini cheesecakes with warm drinks. A spiced chai or a pumpkin latte works well. The flavors blend perfectly. You can also serve them with a scoop of vanilla ice cream for a treat.
Common Mistakes to Avoid
One common mistake is overmixing the filling. Mixing too long makes the texture dense. Be gentle when incorporating the ingredients. Stop mixing as soon as it’s smooth.
Another mistake is not chilling long enough. These cheesecakes need at least four hours to set. For the best taste and texture, chill them overnight. This allows the flavors to meld and firm up nicely.
For the full recipe, check the section above.
Variations
Flavor Variations
You can easily change the flavor of your mini cheesecakes. A fun twist is to add chocolate or caramel swirls. Just melt some chocolate or caramel, and swirl it into the cheesecake filling before you chill it. This adds a rich flavor and makes it extra fancy. You can also use different spices. If you want a warmer taste, try adding nutmeg or allspice. This gives your cheesecakes a unique kick that everyone will love.
Dietary Modifications
If you or your guests have dietary needs, you can still enjoy these treats. To make a vegan version, replace cream cheese with a plant-based option. Use coconut cream in place of heavy cream for a creamy texture. For those who need dairy-free and nut-free options, look for nut-free cream cheese. You can also use oat or coconut-based creams. These swaps keep the taste delicious while meeting dietary needs.
Serving Size Alternatives
Changing the serving size is simple with this recipe. If you want to make a larger cake, use a springform pan. Just pour the filling over the crust and adjust the chilling time. A larger cake may need more time to set. If you want smaller bites, use mini muffin tins instead. Fill each cup lightly for bite-sized treats. This makes them perfect for parties or quick snacks.
For the full recipe, check the earlier section.
Storage Info
How to Store Leftovers
To keep your no-bake pumpkin mini cheesecakes fresh, store them in the fridge. Place them in an airtight container. This prevents them from drying out or absorbing other smells. You can also cover them with plastic wrap. If you want to store them longer, consider freezing. Wrap each cheesecake tightly in plastic wrap, then place them in a freezer-safe bag. This helps maintain their flavor and texture.
Shelf Life
These mini cheesecakes last about 4 to 5 days in the fridge. After this time, they may start to lose their taste. If you freeze them, they can last up to three months. Signs of spoilage include a sour smell or a change in texture. If you see any mold, throw them away immediately.
Reheating Instructions
You won’t need to reheat these cheesecakes. They are best enjoyed cold. If they seem too firm after freezing, let them sit out for 10 to 15 minutes before serving. This helps them regain their creamy texture. For more details, check out the Full Recipe for serving tips and more!
FAQs
Can I use fresh pumpkin instead of canned?
Yes, you can use fresh pumpkin. Fresh pumpkin adds a bright taste. It also gives a nice texture. However, fresh pumpkin needs more time to prepare. You must cook and puree it first. This can take longer than using canned puree. Canned pumpkin is ready to use. It also has a consistent flavor. If you want a quick option, go for canned. If you love the fresh taste, use fresh pumpkin.
How long do these mini cheesecakes need to chill?
These mini cheesecakes need to chill for at least 4 hours. For the best taste, chill them overnight. This allows the flavors to blend well. Chilling also helps the cheesecake set properly. If you skip this step, they may be too soft when served. Ensure you give them enough time to chill for a better experience.
Can I make these mini cheesecakes ahead of time?
Yes, you can make these mini cheesecakes ahead of time. They are perfect for meal prep. Just store them in the fridge until you are ready to serve. You can make them one or two days in advance. This makes your event stress-free. Ensure to cover them well to keep them fresh. When serving, add whipped cream and cinnamon on top for a lovely touch. For the full recipe, check the details above.
In this blog post, we covered how to make no-bake pumpkin mini cheesecakes. You learned about key ingredients like graham crackers, cream cheese, and pumpkin puree. We discussed optional toppings and substitutions to fit your needs. I shared step-by-step instructions, tips for texture, and serving ideas.
These cheesecakes are not just tasty; they’re easy to make. With some creativity, you can customize them to suit any occasion. Enjoy your delicious treat, and remember to share it with friends!
![- 1 cup graham cracker crumbs - 8 oz cream cheese, softened - 1 cup pumpkin puree For your no-bake pumpkin mini cheesecakes, the main ingredients are simple yet flavorful. Graham cracker crumbs make a perfect, crunchy base. Cream cheese gives the cheesecake its rich, creamy texture. The pumpkin puree brings in that classic fall flavor. - Whipped cream - Ground cinnamon Toppings can elevate your mini cheesecakes. Whipped cream adds a light touch to each bite. Ground cinnamon gives a warm aroma and enhances the pumpkin flavor. You can sprinkle it just before serving for a festive look. - Alternative sweeteners - Gluten-free crust options If you want to change things up, consider using alternative sweeteners like honey or maple syrup. They can add unique flavors and reduce refined sugar. For a gluten-free option, you can use gluten-free graham cracker crumbs or crushed nuts for the crust. This way, everyone can enjoy these tasty treats! For the complete recipe, refer to the [Full Recipe]. First, we will mix the crust ingredients. In a bowl, combine graham cracker crumbs, melted butter, and brown sugar. Mix until the crumbs are evenly coated. This gives the crust a sweet flavor. Next, we form the bases. Spoon about one tablespoon of the mixture into each mini cheesecake cup. Press down firmly to create a flat base. This step is key for a good texture. After that, place the cups in the fridge to set while we prepare the filling. Now, let’s make the cheesecake filling. In a large bowl, beat the softened cream cheese with an electric mixer. Mix until it is smooth. Then, add pumpkin puree, powdered sugar, vanilla extract, and pumpkin spice. Combine these ingredients until they form a creamy mixture. The next step is whipping the cream. In a separate bowl, whip the heavy cream until stiff peaks form. This will add lightness to the filling. Carefully fold the whipped cream into the pumpkin mixture until they blend well. Now it’s time to fill the cups. Take the mini crusts out of the fridge. Spoon or pipe the pumpkin cheesecake filling over each crust. Fill them generously for a delightful treat. Finally, we need to chill the mini cheesecakes. Return the filled cups to the fridge. Let them set for at least four hours, but overnight is best. This allows the flavors to meld. For the full recipe, check out the link above. Using room temperature ingredients is key. When your cream cheese is soft, it blends smoothly. This helps avoid lumps in your filling. Always take your cream cheese out early. Let it sit at room temperature for about 30 minutes. Folding in whipped cream is another important step. Once you whip the cream, it should be fluffy and light. Gently mix it into the pumpkin mixture. This keeps the filling airy. If you stir too hard, you risk losing that light texture. For a stunning presentation, arrange the mini cheesecakes on a pretty platter. You can add a sprinkle of crushed graham crackers around them. This adds color and texture. Pair your mini cheesecakes with warm drinks. A spiced chai or a pumpkin latte works well. The flavors blend perfectly. You can also serve them with a scoop of vanilla ice cream for a treat. One common mistake is overmixing the filling. Mixing too long makes the texture dense. Be gentle when incorporating the ingredients. Stop mixing as soon as it’s smooth. Another mistake is not chilling long enough. These cheesecakes need at least four hours to set. For the best taste and texture, chill them overnight. This allows the flavors to meld and firm up nicely. For the full recipe, check the section above. {{image_2}} You can easily change the flavor of your mini cheesecakes. A fun twist is to add chocolate or caramel swirls. Just melt some chocolate or caramel, and swirl it into the cheesecake filling before you chill it. This adds a rich flavor and makes it extra fancy. You can also use different spices. If you want a warmer taste, try adding nutmeg or allspice. This gives your cheesecakes a unique kick that everyone will love. If you or your guests have dietary needs, you can still enjoy these treats. To make a vegan version, replace cream cheese with a plant-based option. Use coconut cream in place of heavy cream for a creamy texture. For those who need dairy-free and nut-free options, look for nut-free cream cheese. You can also use oat or coconut-based creams. These swaps keep the taste delicious while meeting dietary needs. Changing the serving size is simple with this recipe. If you want to make a larger cake, use a springform pan. Just pour the filling over the crust and adjust the chilling time. A larger cake may need more time to set. If you want smaller bites, use mini muffin tins instead. Fill each cup lightly for bite-sized treats. This makes them perfect for parties or quick snacks. For the full recipe, check the earlier section. To keep your no-bake pumpkin mini cheesecakes fresh, store them in the fridge. Place them in an airtight container. This prevents them from drying out or absorbing other smells. You can also cover them with plastic wrap. If you want to store them longer, consider freezing. Wrap each cheesecake tightly in plastic wrap, then place them in a freezer-safe bag. This helps maintain their flavor and texture. These mini cheesecakes last about 4 to 5 days in the fridge. After this time, they may start to lose their taste. If you freeze them, they can last up to three months. Signs of spoilage include a sour smell or a change in texture. If you see any mold, throw them away immediately. You won’t need to reheat these cheesecakes. They are best enjoyed cold. If they seem too firm after freezing, let them sit out for 10 to 15 minutes before serving. This helps them regain their creamy texture. For more details, check out the Full Recipe for serving tips and more! Yes, you can use fresh pumpkin. Fresh pumpkin adds a bright taste. It also gives a nice texture. However, fresh pumpkin needs more time to prepare. You must cook and puree it first. This can take longer than using canned puree. Canned pumpkin is ready to use. It also has a consistent flavor. If you want a quick option, go for canned. If you love the fresh taste, use fresh pumpkin. These mini cheesecakes need to chill for at least 4 hours. For the best taste, chill them overnight. This allows the flavors to blend well. Chilling also helps the cheesecake set properly. If you skip this step, they may be too soft when served. Ensure you give them enough time to chill for a better experience. Yes, you can make these mini cheesecakes ahead of time. They are perfect for meal prep. Just store them in the fridge until you are ready to serve. You can make them one or two days in advance. This makes your event stress-free. Ensure to cover them well to keep them fresh. When serving, add whipped cream and cinnamon on top for a lovely touch. For the full recipe, check the details above. In this blog post, we covered how to make no-bake pumpkin mini cheesecakes. You learned about key ingredients like graham crackers, cream cheese, and pumpkin puree. We discussed optional toppings and substitutions to fit your needs. I shared step-by-step instructions, tips for texture, and serving ideas. These cheesecakes are not just tasty; they’re easy to make. With some creativity, you can customize them to suit any occasion. Enjoy your delicious treat, and remember to share it with friends!](https://grilledflavors.com/wp-content/uploads/2025/08/2d36d16d-b677-4a36-bccb-d7e5705a2f2c-300x300.webp)