Go Back
- 2 ripe bananas - 1 cup sushi rice (cooked and cooled) - 4 tablespoons almond butter (or your favorite nut butter) - 1 tablespoon honey or maple syrup (optional for sweetness) - 1/4 cup shredded coconut - 1/4 cup granola or crushed nuts (for added crunch) - 1/4 cup chopped dark chocolate or chocolate drizzle (optional) - Sliced fruits (kiwi, strawberries) for garnish To make banana sushi, gather these simple ingredients. You want ripe bananas to get that sweet taste. Cook sushi rice and let it cool down. Nut butter adds creaminess, while honey or maple syrup can give extra sweetness. Shredded coconut and granola bring a fun crunch. Chocolate can add a sweet touch, but it’s optional. Finally, sliced fruits like kiwi or strawberries brighten the plate. These ingredients work well together. They create a tasty treat that is also fun to eat. You can even switch out some items based on what you like. Check out the Full Recipe for more details on how to put these ingredients to use! To start, you need sushi rice. Cook the sushi rice according to the package instructions. Once it's done, spread it out and let it cool to room temperature. This helps the rice stick better to the bananas. Next, take two ripe bananas. Peel each banana gently and cut them in half. You will have four banana pieces. Spread a thin layer of almond butter over each banana half. If you want more sweetness, drizzle honey or maple syrup on top before you spread the almond butter. This adds a nice touch! Now comes the fun part! Take a small amount of sushi rice and press it onto the almond butter layer of each banana half. Make sure the rice sticks well. Next, roll the banana tightly in plastic wrap. This forms a sushi roll shape. Squeeze gently to keep it together, then refrigerate for about 20 minutes to set. After chilling, unwrap your sushi rolls and slice them into bite-sized pieces. Enjoy your banana sushi! For the complete recipe, refer to the Full Recipe section. Serving banana sushi is a fun way to impress your friends. Use colorful plates for a bright touch. You can also garnish with sliced fruits like kiwi or strawberries. This adds color and makes your dish look tasty. To roll your banana sushi tightly, start with a firm grip. Use plastic wrap to keep the roll together. After rolling, refrigerate it for about 20 minutes. This helps the sushi hold its shape better. If you want more sweetness, try adding extra honey or maple syrup. You can also switch up the nut butter. Peanut butter, cashew butter, or sunflower seed butter all work well. Each option gives a unique flavor to your banana sushi. {{image_2}} You can change the nut butter for fun. Try peanut butter, cashew butter, or sun butter. Each will give a new taste to your banana sushi. You can also add toppings for crunch. Use chia seeds, flax seeds, or dried fruits like cranberries and apricots. They add flavor and texture. Spices can make a big difference. A sprinkle of cinnamon adds warmth and a nice kick. You can also try using flavored sushi rice. Matcha rice gives a green color and earthy taste. Or, use colored rice to make it more fun. Kids love bright colors! Get kids involved! They can help spread the nut butter and layer the rice. It makes cooking fun and easy. If your child is picky, let them choose their favorite toppings. This way, they will enjoy their sushi more. You can even make fun shapes or use cookie cutters for a twist. This makes eating more exciting! To store leftovers, wrap your banana sushi tightly in plastic wrap. This helps keep them fresh. You can also place them in a container with a lid. A good option is a glass or plastic container with a seal. This will help prevent the sushi from drying out. You can store banana sushi in the fridge for about 2 to 3 days. After that, the bananas may get mushy. Watch for signs of spoilage. If you see brown spots on the bananas or if they smell off, it’s time to toss them. I recommend serving banana sushi fresh for the best taste. If you need to reheat it, do so gently in the microwave. This can change the texture, making it a bit softer. Fresh banana sushi has a nice crunch from the rice, and the flavors are brighter. So, enjoy it right after you make it for the best experience! Yes, you can make banana sushi ahead of time. To do this, prepare the rolls as I described before. After rolling and chilling, keep them in an airtight container. This way, they stay fresh for up to two days. If you want to add toppings, like coconut or granola, do it just before serving. This keeps them crunchy. You can use many fruits in banana sushi. Some popular options include apples, pears, and mangoes. Each fruit brings a unique flavor. You can also try berries, like blueberries or raspberries. Just slice them thinly to fit well in your roll. Feel free to mix and match for fun flavors! Banana sushi is quite healthy! Bananas provide potassium and fiber. The sushi rice adds energy and keeps you full. Almond butter gives healthy fats and protein. If you drizzle honey or chocolate, it adds sweetness but also some sugar. A typical serving has about 200 to 250 calories, depending on your toppings. Enjoy this tasty treat without feeling guilty! This blog post showed you how to make delicious banana sushi. You learned the required ingredients, like ripe bananas and sushi rice. The step-by-step instructions helped you assemble and roll your sushi perfectly. With helpful tips for presentation and variations, you can customize it your way. Finally, we covered storage practices to keep your sushi fresh. Enjoy making this fun recipe, knowing it’s tasty and healthy!

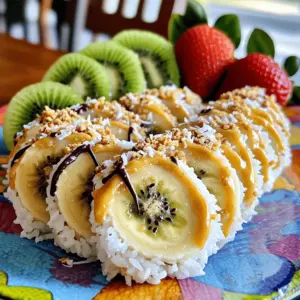
How to Make Banana Sushi

Experience a fun twist on dessert with this delightful Banana Sushi recipe! Made with ripe bananas, sushi rice, and your favorite nut butter, these sweet treats are not only delicious but also easy to prepare. Perfect for kids and entertaining, this healthy recipe brings a burst of flavor with every bite. Click through to explore how to make your own Banana Sushi Delight and impress your friends and family with this creative snack!

Ingredients
  

2 ripe bananas

1 cup sushi rice (cooked and cooled)

4 tablespoons almond butter (or your favorite nut butter)

1 tablespoon honey or maple syrup (optional for sweetness)

1/4 cup shredded coconut

1/4 cup granola or crushed nuts (for added crunch)

1/4 cup chopped dark chocolate or chocolate drizzle (optional)

Sliced fruits (kiwi, strawberries) for garnish

Instructions
 

Start by preparing the sushi rice according to package instructions. Once cooked, allow it to cool to room temperature.

    Peel the bananas and gently cut them in half. You’ll end up with two pieces of banana per banana.

      Spread a thin layer of almond butter or your chosen nut butter over the top of each banana half. If you like it sweeter, drizzle with honey or maple syrup before spreading.

        Take a small amount of the sushi rice and carefully press it onto the almond butter layer of each banana half. Make sure the rice adheres well.

          Roll the banana with the rice tightly in plastic wrap, creating a sushi roll shape. Squeeze gently to ensure it holds together, and refrigerate for about 20 minutes to set.

            After chilling, unwrap the sushi rolls and carefully slice them into bite-sized pieces.

              To finish, sprinkle shredded coconut and granola or crushed nuts over the rolled banana sushi for added texture. If desired, you can drizzle with melted chocolate or sprinkle chopped dark chocolate on top.

                Serve your banana sushi on a colorful plate and garnish with slices of fresh fruit such as kiwi or strawberries for a vibrant presentation.

                  Prep Time: 15 mins | Total Time: 35 mins | Servings: 4