Go Back
To make these no-bake peanut butter bars, you need the following items: - 1 cup creamy peanut butter - 1 cup rolled oats - 1/2 cup honey or maple syrup - 1/2 cup chocolate chips (semi-sweet or dark) - 1/4 cup shredded coconut (unsweetened) - 1/4 teaspoon salt - Optional toppings: chopped nuts, seeds, or a drizzle of melted chocolate - Creamy peanut butter: This gives the bars their rich flavor. You can use crunchy peanut butter for added texture. - Rolled oats: Choose old-fashioned oats for the best results. Instant oats may not hold up well. - Honey or maple syrup: Both serve as sweeteners. Maple syrup is great for a vegan option. - Chocolate chips: I love semi-sweet, but dark chocolate is a nice twist too. - Shredded coconut: Unsweetened coconut adds a nice chew. Sweetened coconut can make the bars too sweet. - Salt: Just a little enhances the flavors. Don't skip it! - Toppings: Add nuts or seeds for crunch. Melted chocolate drizzled on top makes them look fancy. The star of this recipe is the creamy peanut butter. It blends perfectly with the other ingredients. Honey or maple syrup adds the right sweetness. The chocolate chips give a touch of indulgence. Together, they create a balanced flavor that everyone loves. The rolled oats provide a hearty texture, making each bite satisfying. Using high-quality ingredients ensures your bars taste amazing. Making no-bake peanut butter bars is quick and fun. Gather all your ingredients first. This helps everything go smoothly. You will need peanut butter, oats, honey, chocolate chips, coconut, and salt. Optional toppings can make your bars even better. 1. In a large bowl, mix the creamy peanut butter and honey. Stir until smooth. 2. Add the rolled oats, shredded coconut, and salt. Mix until everything is combined. 3. Gently fold in the chocolate chips. Ensure they are spread evenly. 4. Line an 8x8 inch baking dish with parchment paper. Let some paper hang over the sides. 5. Press the mixture into the dish. Use a spatula or your hands to pack it down well. 6. If you want, add chopped nuts or drizzle with melted chocolate on top. 7. Refrigerate for 1 to 2 hours. This helps the bars set properly. 8. Once set, lift the bars out using the parchment paper. Cut them into squares. Make sure to mix well for the best flavor. If the mixture feels too sticky, wet your hands slightly. This will help you press it down. Layering toppings can add a great crunch. Try to spread them evenly for a nice look. For added fun, sprinkle some coconut on top before it sets. Enjoy your tasty treat! If your bars fall apart, it may be due to too few binding ingredients. Ensure you use enough peanut butter and honey. If they are too sticky, add a bit more oats. You can also press them down harder while packing to help them hold together. To get that perfect texture, use creamy peanut butter. This helps the bars be smooth and easy to cut. You can also mix in some crunchy peanut butter for added crunch. Make sure to pack the mixture tightly in the dish. This will help your bars hold their shape. Serve the bars chilled for the best taste. I like to place them on a nice platter. A sprinkle of coconut or some whole nuts on top makes them look fancy. You can also drizzle melted chocolate over them for a sweet touch. Enjoy with a glass of cold milk or hot coffee for a tasty treat. For the full recipe, check out the detailed instructions and ingredients. {{image_2}} If you want to make these bars nut-free, swap peanut butter for sunbutter. Sunbutter comes from sunflower seeds and tastes great. You can also use soy nut butter. These options keep the bars creamy and delicious without nuts. You can add fun flavors to your bars. Try mixing in a dash of cinnamon or a sprinkle of cocoa powder for extra taste. You can also add vanilla extract for a sweet touch. For a tropical twist, toss in some dried fruit like raisins or cranberries. Each addition changes the flavor and makes your bars unique. For gluten-free bars, choose certified gluten-free oats. This way, you keep the bars safe for those with gluten allergies. To make them vegan, use maple syrup instead of honey. This simple switch keeps the sweetness while fitting a vegan diet. These adaptations let everyone enjoy your tasty treat! To keep your no-bake peanut butter bars fresh, store them in an airtight container. Layer parchment paper between the bars to prevent sticking. This helps maintain their shape and texture. Always keep them in a cool, dry place. Avoid keeping them out in heat or sunlight. Refrigeration is your best bet for short-term storage. Place the container in the fridge for up to a week. For longer storage, freeze the bars. Wrap them tightly in plastic wrap and then foil. This method keeps them fresh for up to three months. Just thaw them in the fridge before enjoying. The bars stay good for about a week in the fridge. If you see any changes in color or smell, it’s time to toss them. Signs of spoilage include a dry texture or a sour smell. If they feel hard or crumbly, they might not taste great. Always trust your senses when checking freshness. To make sure your bars hold together, use a creamy peanut butter. It helps bind the mixture. Also, press the mixture firmly into the pan. Use a spatula or your hands to pack it down. If the bars still crumble, try adding a bit more honey or maple syrup. This extra moisture can help. Once set, cut them carefully for the best results. Yes, you can swap peanut butter with other nut butters. Almond butter or cashew butter work well. Each nut butter will change the taste a little. If you use a different nut butter, make sure it is smooth. This will help keep the texture right. You can also try sunflower seed butter for a nut-free option. Yes, refrigerating the bars is key. It helps them set properly and gives them a firmer texture. After mixing, chill them in the fridge for at least 1-2 hours. If you want to enjoy them later, you can keep them in the fridge. This will keep them fresh and tasty for several days. For long-term storage, you can freeze them as well. Just wrap them well to avoid freezer burn. For the full recipe, check the section above. This post covered all you need to make delicious no-bake peanut butter bars. We explored the complete ingredient list, cooking steps, and ways to solve common issues. We also discussed different variations and storage tips to keep your bars fresh. In closing, enjoy the fun of creating these tasty treats. You can easily customize them to fit your taste. Follow the tips, and you’ll impress everyone with your snack skills. Happy baking!

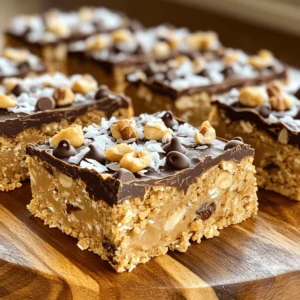
No-Bake Peanut Butter Bars

Satisfy your sweet tooth without turning on the oven with these No-Bake Peanut Butter Bliss Bars! Made with creamy peanut butter, rolled oats, and a touch of sweetness from honey or maple syrup, these bars are perfect for a quick, healthy treat. Customize them with chocolate chips, coconut, or your favorite toppings. Click through to discover the full recipe and indulge in these deliciously easy bars today!

Ingredients
  

1 cup creamy peanut butter

1 cup rolled oats

1/2 cup honey or maple syrup

1/2 cup chocolate chips (semi-sweet or dark)

1/4 cup shredded coconut (unsweetened)

1/4 teaspoon salt

Optional toppings: chopped nuts, seeds, or a drizzle of melted chocolate

Instructions
 

In a large mixing bowl, combine the creamy peanut butter and honey (or maple syrup). Stir until well mixed and smooth.

    Add the rolled oats, shredded coconut, and salt to the peanut butter mixture, and mix until all the dry ingredients are fully incorporated.

      Fold in the chocolate chips gently until evenly distributed throughout the mixture.

        Line an 8x8 inch baking dish with parchment paper, leaving some overhang on the sides for easy removal.

          Press the peanut butter mixture evenly into the prepared dish, using a spatula or your hands to firmly pack it down.

            If desired, sprinkle additional chopped nuts or seeds on top for added crunch or drizzle with melted chocolate.

              Refrigerate for at least 1-2 hours, or until set.

                Once set, lift the bars out of the baking dish using the parchment overhang and slice into squares or rectangles.

                  Prep Time: 15 minutes | Total Time: 2 hours 15 minutes | Servings: 12 bars

                    - Presentation Tips: Serve bars chilled, arranged on a platter, with a sprinkle of coconut or a few whole nuts as garnish for an appealing look.